Home > PC Assembly
How to Assemble a PC (Full Guide)
19 Step Checklist + Full Instructions for Beginners (Explained in Layman's Terms)
 Learn how to build a PC from start to finish with confidence using our flagship photo-filled tutorial carefully written for beginners
Last Updated: August 3, 2024
You've spent what feels like 400 light-years researching how to build a PC for the first time, changed your mind on which parts to use 267 times, and wrestled back and forth with whether or not you should just call it a day and buy a prebuilt gaming PC to save time having to go through the many PC assembly steps. But you eventually mustered up the courage and bit the bullet on ordering the perfect list of PC parts for your needs, and they've finally arrived at your door.
Excellent choice my friend. While getting a premade PC isn't the end of the world if you do your research and pick a decent value desktop from a good company, there's no escaping the fact that building your own PC has many advantages over buying a prebuilt system. Overall, it's well worth the little extra time and effort to learn how to assemble a PC yourself, and you'll be glad you did once it's all over and your new custom PC is up and running.
After all the build-up and endless research on how to build a PC, the moment of truth is here and it's FINALLY time to do the actual PC assembly steps. Feeling anxious? Fear not, Padawan, as we're proud to present this comprehensive yet simple to understand PC installation guide. This computer building tutorial will take you by the hand from the absolute start to finish of your very first build, with a ton of helpful photos and diagrams along the way to make every single step as easy to follow along with as possible.
Throughout all the PC assembly steps below, we'll also simultaneously cover many common beginner questions and concerns that may pop up throughout the process. So if you're a little confused at any stage, just trust in this process that's been used by many thousands and thousands of other beginner builders, and just keep going one step at a time at your own pace because chances are your concerns will be addressed at some point in this guide if you simply continue on.
Stuck in PC Planning Land of Eternal Doom? See Our Sample Gaming PC Builds for Ideas
If you'd rather learn how to assemble a PC with a detailed written guide with photos so that you can slowly go through each and every step in your own time without having to continually pause and rewind videos on YouTube (or so you can print it out and have by your side to read from as you go through your build), this is the in-depth PC build guide you're looking for.
Way back when I learned how to build a PC for the first time myself, I followed a written guide too as I found it easier that way to learn all the steps without missing out on little important details (that video tutorials often brush over too quickly or leave out altogether).
If you're feeling a little anxious about building a PC, there's no need. It's easy to do if you simply take your time and have all the steps layed out in front of you, and if I do say so myself, you're in good hands with this installation guide as it's been used by many other first-timers before you with success.
 Feel like this about building a PC? Fear not, feline - this guide makes it easy
This walkthrough has also been continually fine-tuned over the past few years with a single aim: make it the the most helpful, in-depth (yet easy to understand) computer assembly tutorial around. If I'm being honest, I find the majority of PC installation guides out there aren't all that newbie-friendly and almost always brush over many little details and important things to know when you're brand new to PC hardware.
To be fair, most guides aren't specifically targeted for complete hardware novices though, who crave detailed instructions on every single little part of the process, and not just how to do a certain step but why you should (or shouldn't) do it so you can fully grasp and understand the process.
At least that's what I wanted when I learned how to build a PC for the very first time, so if that's what you seek in a tutorial then I'm confident you'll find the instructions below helpful on your journey. I remember exactly what it was like to be a total newbie to building PCs, and to often only become further confused and intimidated by the written guides and videos out there.
To this day I try to never forget what it's like being a stone-faced newbie, and I aim to keep this PC building guide as elementary basic as possible despite my hardware knowledge and experience increasing a lot over the past few years. Want to be spoken to as if you've never even seen the inside of a PC before? Let's go.
By the way, this gaming PC build tutorial is written in a way that applies to building any type of PC, but we've also included photos from 3 slightly different build examples to further ensure that nobody gets stuck along the way no matter what set of parts you're installing. We will show photos from a budget Intel gaming build, a budget AMD gaming build, and a high-end AMD build.
19 Steps to Assembling a PC
1. Gather What You Need to Build a PC
2. Open Case and Prepare for Installation
3. Mount Additional Case Fans (Optional)
4. Prepare Motherboard for Out-of-Case Installation
5. Insert Processor Onto Motherboard
6. Mount Heatsink and Fan On Motherboard
7. Insert Memory Into Motherboard
8. Insert M.2 SSD Onto Motherboard (Optional)
9. Quickly Test Core Components (Optional)
10. Mount Motherboard Into Case
11. Mount GPU and Other PCIe Cards
12. Mount HDD/SSD In Case (Optional)
13. Mount Optical Drive in Case (Optional)
14. Connect Case Front-Panel Cables
15. Mount Power Supply In Case
16. Connect Power Supply to Components
17. Last Checks and Booting Your PC
18. Setup BIOS, Install OS, Update Drivers
19. Game in All-New Graphical Glory
1. Gather What You Need to Build a PC
To complete the assembly of a new PC from start to finish, here's a list of every single tool, piece of equipment, and component that you need:
- Required Parts/Accessories: Compatible list of PC components, accessories, and operating system software (ie Windows). See our introduction to planning your first gaming PC for help if you're still planning your parts-list.
- Screwdriver/s: It's true; to build a PC from scratch, all you need for most builds is a Phillips-head screwdriver. Specifically, you need one with a size #2 head, but if you're installing an M.2 SSD you'll also need a size #1 (M.2 screws are smaller). As for the length of the screwdriver, it doesn't really matter as you can use either a short, medium, or longer screwdriver. Using a magnetic screwdriver - one that is a magnet to screws - is also handy (and safe to use for PC building). See our PC building tools guide for more.
- Suitable Surface: A large, flat, hard, non-conductive surface to assemble your PC on such as a desk or table (wood or glass is fine). If the floor of the room is carpet, that's okay so long as you practice safely precautions at all times and you do NOT wear socks or wool sweaters/jumpers.
- A Way to Ground Yourself: To protect your components being damaged from static electricity when building a PC, you need to physically ground your body before handling the internal parts. You can do so by wearing an ESD/anti-static wrist strap/bracelet, or by periodically touching the bare (non painted) metal frame of your PC case or another metal object every now and then for a couple seconds (and specifically before going to touch a part). For example, you could touch a metal desk leg, door knob file cabinet, toaster, masonry wall (stone, brick or concrete), water pipe, gas pipe, metal AC, heating vent/radiator - anything metal will do.
- Enough Time: To learn how to build your first PC from start to finish, you want to give yourself plenty of time as you'll be (or should be) taking it nice and slow. Setting aside a good 3-4 hour block of time (minimum) is wise if you want to install all your PC parts in one go, but you don't have to do it in one sitting so long as you keep pets and any Baby Yoda's in the house well away from your half-assembled system, and keep parts in their anti-static bags until you install them just in case.
- Motherboard Manual: The only manual you will likely need to build a PC which comes in handy for certain things that are specific to your particular board including where to connect your case's front panel connections and which RAM sockets to install your memory. Your case manual is a close second in importance (and aftermarket CPU cooler manual if you bought one) and may be handy to browse over, but don't expect much instruction or guidance (usually only contains some basic diagrams). Same goes for any other manuals your parts might come with (not all parts have manuals) - they're not needed to learn PC assembly and you'll find better instructions in a full PC build guide like this one.
Disclaimer: No, building a computer is not hard if you take your time, but if you get careless 'cause you're in a rush to boot up and play some Fortnite or Tarkov, it is possible to damage a component (or even yourself, though I've never heard of that happening so relax). In the rare chance you cause any sort of damage using this gaming PC build tutorial (to your hardware parts, to your human parts, or to your cat) we cannot be held responsible.
We've prudently put a lot into making this PC building guide as precise and thorough in its explanations as possible, but your build is of course 100% your responsibility. From my world view this goes without saying, but a lawyer buddy told me I should include this for (lame) legal purposes. In other words, if you burn your house down, get electrocuted and now resemble Palpatine after facing Windu in ROTS, or die, don't sue me 'cause this tutorial doesn't exist and this site is a figment of your imagination.
2. Open Case and Prepare for Installation
So, you've got everything you need to build your very first PC. Now, let's begin the process. Funny enough, the first step to assemble a PC is to disassemble it. Well, your case that is. Some cases may only have one removable side panel, but most will have two so that you can work from both sides (the rear side is handy to access for managing your cables later on).
Go ahead and remove both side panels, or the main side panel at least (usually the left side of the case). Many modern cases use thumbscrews to hold the side panels in place, meaning you can just use your hands to undo them, but sometimes you'll still need to use a screwdriver to initially loosen them up enough to the point where you can then use your hands. Other cases will just have standard screws that you'll need to fully unscrew with your screwdriver.
The Cooler Master N200 case for our Intel build example did need the screwdriver to open up:
 Unscrew the side panel/s and slide them off
For our AMD build example using the DeepCool Matrexx 30 case, it can be opened up without the screwdriver by simply undoing the thumbscrews by hand:
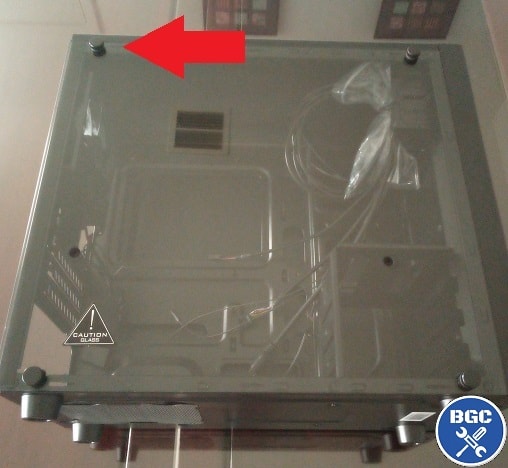 Undo the 4 thumbscrews with your hands if your case has them
Once you've removed the screws on each of the 4 corners of the case, the panel should simply slide off. If it's a glass panel like the one pictured above for our DeepCool Matrexx 30, be careful with it and make sure to place your case on its side before undoing the screws so that it doesn't accidentally fall off (and once removed gently place the glass panel somewhere safe where it won't get scratched or marked).
So now that's your case opened up; yup, told you we're keeping it real basic here so nobody gets left behind. Not even your Grandma, who may very well be in on the tangible Half Life Alyx hype of late and be assembling a high end gaming PC build to get in on the action (respect, but I think she'll have a heart attack when that first headcrab pounces right at your face in freakin' VR).
Inside your case you'll find the already attached front panel cables (pictured below) which we'll connect to the motherboard later on, pre-installed fans and their cables which also connect to the mobo later, and you should also find a bag of screws which you'll want to open up and keep handy. Just don't lose any screws and keep them all together somewhere.
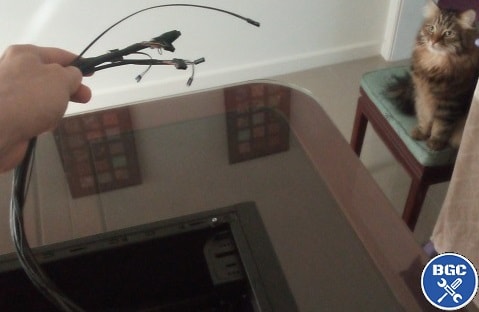 Guard your front panel connectors from any local felines
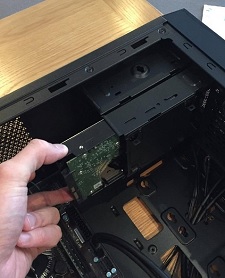
Also, if your case has a hard drive rack/caddy on the bottom and you're not going to install many hard drives, consider removing it to free up room in your case. Especially if you either have a smaller case with limited room and/or if using a non-modular (or semi-modular) power supply that will require a fair bit of room for your cables (PSU cables can be real chunky).
The Cooler Master N200 Mini Tower case has a drive caddy, but it's a smaller case and we've only got one storage drive for this build (plus we have a non-modular power supply to install for this build which takes up more room) so I removed the caddy by simply unscrewing it:
 If your case has a storage drive rack/caddy, consider removing it for more room
3. Mount Additional Case Fans (Optional)
The majority of cases will come with 1-2 fans already pre-installed inside, so there's nothing to do for these stock-standard fans besides plug them into the motherboard when the time comes.
There should be a fan in the back of the case to push out warm air (called an exhaust fan), and if a case comes with 2 fans then the second one will likely be in the front to suck cool air in from outside the case to provide airflow onto your internal components (called an intake fan). Most cases will also have support for more fans should you want to buy some to increase airflow further.
For our Intel build, the Cooler Master N200 has two pre-installed fans, and it's a budget gaming PC build so there's no need for any more than that.
Even if you were using more powerful components than what we're installing here, More than 2 fans is only necessary for super powerful PCs, significant overclocking, and/or aesthetic purposes where you need 3 fans or more.
The DeepCool Matrexx 30 for our budget AMD build only comes with 1 fan (exhaust fan in the back), so I've gone ahead and got an extra 120mm fan that will go in the front to fortify airflow and add some cool green lighting that will be visible through the front mesh panel of this already quite slick-looking budget case (can definitely recommend this one).
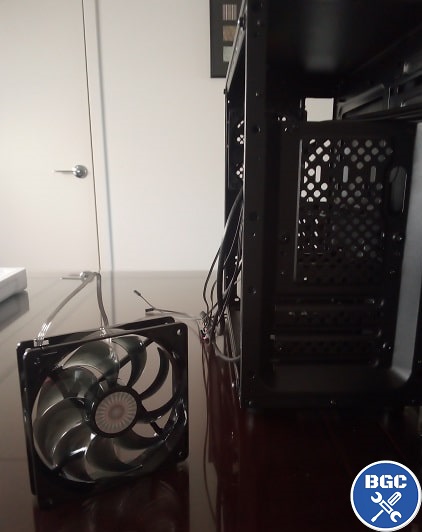
The extra fan we'll add to the budget AMD build
It's worth mentioning that if you're not using a graphics card, and are simply using the integrated graphics of a CPU like the AMD Athlon 3000G (or the 3200G or 3400G for that matter), you could get away with just the 1 fan. Low powered systems like these really don't need much airflow.
So, if you have an aftermarket fan (just a fancy word for an extra non-stock fan) to install, consider doing that now otherwise it could be more difficult to reach in and fit the fan/s later when your motherboard is inside the case.
Full Steps: How to Install Extra Case Fans
4. Prepare Motherboard for Out-of-Case Installation
Now we've prepared the case, there are two different approaches you can take from here when learning how to build a PC from scratch for the first time. You can either:
- Build PC Outside Case: This involves installing some of your components (CPU, cooler, RAM, M.2 SSD) onto the motherboard first before installing the motherboard into the case.
- Build PC Inside Case: With this method you fit the motherboard into the case first and then install your components onto it.
So what's best? Should you put together all your PC parts outside or inside the case? Either can work, but the first option (external) is generally best and what I'd recommend for most people. It has more pros than cons compared to fitting the motherboard first.
Why You Should Install Parts Outside the Case First
It can be more difficult to reach in and install parts onto your motherboard when it's mounted inside your case. Working on your motherboard outside the case gives you much more room to move, makes it easier to see where to install things like the CPU, and makes it easier to firmly insert your RAM and CPU cooler (which can require a firm little push).
For example, pushing your RAM down firmly onto the board is a whole lot easier when it's on a flat surface; applying too much pressure to the motherboard when it's installed in the case could flex the board too much and damage something. Plus, installing your parts outside the case allows you to quickly check that all those parts are working fine by temporarily connecting your PSU to the motherboard (we'll get to that later).
You can install the graphics card onto the motherboard outside the case too, to include that in your quick component test, but you'll want to remove the GPU before installing the motherboard into the case (and install the GPU after). Don't worry if you're confused, as all will become clear.
* Safety Reminder *
Before touching your motherboard, or any other component for that matter, remember that you need to ground your physical body first to remove any static electricity build-up.
If you're not wearing an anti-static strap, you can do this by touching a metal surface/object such as the metal frame of your case for a couple seconds (refer back to step 1 for more on this).
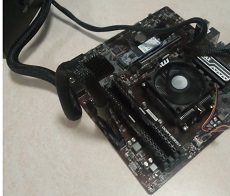
So, let's go ahead and prepare your motherboard. Carefully remove your motherboard from the anti-static bag it came with, and holding the board by its edges, place it on top of your motherboard box (or on your desk if you don't have the box).
 Carefully place motherboard on its cardboard box or your desk
You want to hold the motherboard by its edges and/or the big metal connectors (for the rear USB ports etc) - avoid touching any exposed circuitry on the top or bottom of the board.
Motherboards and other parts can be quite sturdy in general, but accidentally bending a pin or even getting oil from your skin on there could damage something.
Just take precaution with all your parts and carefully follow all instructions throughout this carefully-written walkthrough and you'll be fine, ad all you really need to remember is to hold components by their edges or metal backplates, and don't touch anything you're unsure about.
Sitting a motherboard on its cardboard box rather than directly on your desk makes it a little less prone to damage, and also makes it a little more stable to work with and less likely to move around when we install parts onto it (and less risk of scratching/damaging the underside of the board).
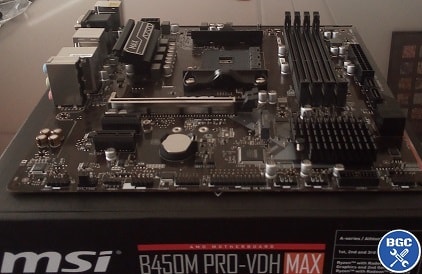 Our budget AMD build example ready to go
Extra Safety Tip
Do not sit your motherboard on top of the anti-static bag it came with, as the outside of the bag is not guaranteed to be a safe surface to work on.
There's differing opinions on this in computer science circles, but just use the motherboard box instead to be on the safe side.
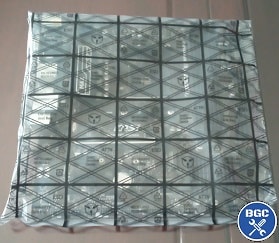 The inside of the bag safely protects the board, but the outside is a questionable surface to use
5. Insert Processor Onto Motherboard
It's time to install the new brains of your battlestation onto your motherboard, which deserves its own separate page to explain all the steps as well as answers to common questions about CPU installs.
If I included this entire gaming PC build tutorial on a single page it would be too long, so each step of the process is in its own guide.
So when you're ready, head over to the CPU installation section that will show you how to install an Intel or AMD processor:
Full Steps: How to Install a CPU Step by Step
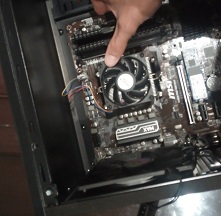
6. Mount Heatsink and Fan On Motherboard
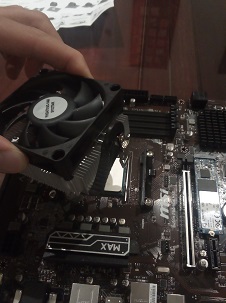
Now it's time to attach the CPU cooler (technically called a HSF: Heatsink and Fan) which will sit on top of your CPU to keep it cool. We'll be showcasing how to install a stock-standard Intel or AMD cooler (including 2 different AMD cooler variations for budget and high-end AMD stock coolers), which in other words is the cooler that comes included with Intel or AMD processors.
But we also have guides on installing popular aftermarket / third-party coolers too. Buying and using an aftermarket cooler isn't necessary as the stock coolers are just fine if you're not overclocking the CPU, but they do provide better cooling and noise reduction compared to stock-standard AMD/Intel models.
Full Steps:
How to Install a Stock AMD Cooler (Wraith Stealth)
How to Install High-End AMD Cooler (Wraith Prism RGB)
How to Install a Stock Intel Cooler (LGA 1700)
How to Install the Cooler Master Hyper 212 Series
How to Install the Noctua NH-D15 Series
7. Insert Memory Into Motherboard
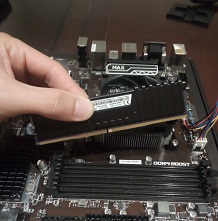
Fitting your memory modules is one of the easiest, quickest parts to install when assembling a computer, but there are some things to know including which specific memory slots on the motherboard to install them in (technically called DIMM slots, short for Dual In-Line Memory Module).
If you planned a smart PC parts list, you'll have gotten 2 memory modules for your PC build instead of just the 1 in order to take advantage of the performance benefits of running dual channel memory. Though if you're on a real tight budget, a single module isn't the end of the world.
If you were also wise about choosing your motherboard, and got one that has 4 memory slots so you can have 2 slots free for a future upgrade, the question is which 2 slots do you use now? It does matter, so head over to our full RAM guide for all the details and install steps.
Full Steps: How to Install RAM Step by Step
8. Insert M.2 SSD Onto Motherboard (Optional)
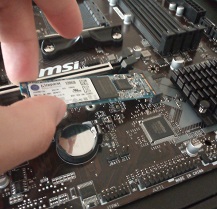
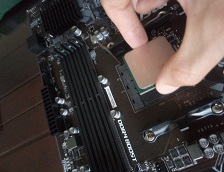
If you have an M.2 SSD to install, you'll also want to do that now (or even before the CPU if you want) while your motherboard is chilling outside the case because as mentioned you have all the space in the world to easily work within your motherboard. Plus, M.2 screws are smaller than regular computer screws and it can be frustrating if you lose it in the deep dark depths of your case.
M.2 SSDs are the thin-style SSDs that plug directly into your motherboard (and are powered by it; no PSU connection required), as opposed to regular 2.5 inch SSDs which are installed separately to the motherboard (in drive bays; explained later). For all the steps see our M.2 guide.
Full Steps: How to Install an M.2 SSD Onto Motherboard
9. Quickly Test Core Components (Optional)
This is another technically optional step when learning how to build a PC from scratch, but it is considered good practice and can be worth it in the event you get unlucky and end up having a component that's faulty or DOA (Dead on Arrival). It's something I recommend to most first-time builders, however feel free to skip this step if you're feeling confident and just want to finish your build sooner rather than later.
Doing a quick check that the parts you've installed thus far are all working is easy, and just requires you to temporarily plug in the PSU and jump-start the motherboard with your screwdriver, and it can save you time down the road because it's harder to do troubleshooting (or uninstall something) when everything is already fitted in the case.
Oh, and you might want to temporarily install your GPU for the test too, and then remove it to be able to mount your motherboard in the case (otherwise the GPU would get in the way). All is explained in our external test guide so head on over if you do want to give your parts a quick check for signs of life, which also explains how to quickly check your CPU temperature in the BIOS while you're at it (to confirm your CPU, cooler, and paste are all installed properly).
Full Steps: How to Test PC Parts Outside Case Before Building
10. Mount Motherboard Into Case
Once you've finished installing the CPU, cooler, and RAM (plus M.2 SSD if you have one), and you've done a quick external test to be on the safe side, it's finally time to lower your mothership into the deep dark depths of your case.
This first requires you to fit the motherboard backplate and install the case standoffs (screws that create a gap between the case and motherboard). Then it's a matter of carefully lowering the board in to first match up with the backplate, and then onto the standoffs. Lastly, you screw in the board to secure it.
After this key step of PC assembly, your construction will really starting to take form. For full steps and photos, plus an FAQ about standoffs and backplates (they can be annoying), don't miss our comprehensive beginner's guide.
Full Steps: How to Install a Motherboard Into a PC (& Fit Standoffs)
11. Mount GPU and Other PCIe Cards
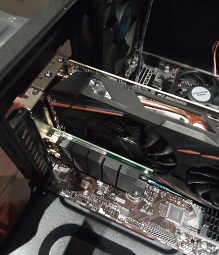
Technically speaking, this is yet another optional step when learning how to build a PC as some of you are going to be building an APU gaming PC without a graphics card (in other words, using the CPU's integrated graphics; shoutout to fellow low-spec gamers as I know what it's like to have to roll that way my whole life until only just recently).
But for most people assembling a gaming PC, chances are you'll have a graphics card to install. It's easy to do but check out our full step by step guide as there are a few things involved including using the right PCIe slot on larger motherboards that have more than one full-length PCIe slot (spoiler; it's almost always the top slot), removing the correct rear metal bracket on your case, securing the card with screws, and connecting it to the PSU (when your PSU is installed though).
You might also have other PCIe (PCI Express) cards to install such as a wireless desktop adapter card for WiFi or a sound card for audio production purposes, so now's as good a time as any to get that done.
Full Steps:
How to Install a Graphics Card
How to Install a Wireless Network Card
12. Mount SSD/HDD In Case (Optional)
Earlier we went over installing M.2 SSDs that live snugly on your motherboard, but for all other regular-sized SSDs and HDDs (2.5 and 3.5 inches respectively) you'll need to fit them within your case somewhere. Exactly where they go will depend on your specific case, but they'll typically be slotted into a drive bay.
Once you've found a home for your drive/s, you also need to connect them to your motherboard using a SATA data transfer cable (that should have been provided in your motherboard box). You also need to plug them directly into your PSU (using your PSU's SATA power connector; not to be confused with the SATA data cable).
We'll explain the cable connections later on in this guide after we've installed the PSU into the case (including tips on cable management), but for the physical installation of your HDD or SSD see our dedicated guide if you need full detail and photos.
Full Steps: How to Install a SSD or HDD in Case
13. Mount Optical Drive in Case (Optional)
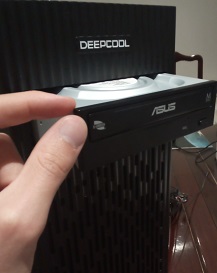
Once an essential part of assembling a computer, optical drives (DVD, CD, and/or Blu-ray drives) are becoming increasingly less important and less used as the digital age continues and physical media dies its inevitable slow death. But it's definitely not completely dead, and there's a lot of people who still include them in their PC builds for playing older games, watching physical movies, or burning discs.
So if you need to install one, it's a simple process of removing your case front panel, sliding it through a 5.25" drive bay, securing the drive to the case with screws, and lastly connecting a SATA data and SATA power cable to the motherboard and PSU respectively (oh, and popping in any driver/app CDs you received with the drive after you've installed your operating system).
Full Steps: How to Install a Optical Drive in Your PC Case
14. Connect Case Front-Panel Cables
Your case has a range of features on the front such as USB ports, power on button, reset button, headphone jack, mic jack, etc. These need to be plugged in to the correct connections on the motherboard (technically called motherboard headers), but exactly where they plug in on the motherboard will vary from board to board so you'll want to consult your motherboard manual and then dive into the steps.
You probably want to do this before installing the power supply in the case (the next upcoming step) - especially in smaller cases. Having the power supply already installed in your case can sometimes make reaching and connecting the front panel connections to your motherboard a bit harder, because these ports are on the bottom of your motherboard and the top of your power supply might get in the way.
Full Steps: How to Connect Front Panel to a Motherboard
15. Mount Power Supply In Case
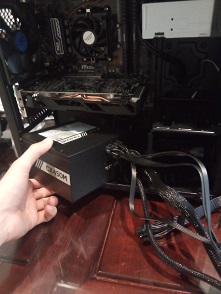
Physically fitting the PSU into your computer case is another quick and easy part of learning how to build a PC, but as with most PC assembly steps there's always a few little things to know and potential questions you might have as a first-timer. For example, you might wonder which way the power supply fan should face; a great question. We break it all down in the guide.
Full Steps: How to Install a Power Supply (& Which Way to Mount)
16. Connect Power Supply to Components
After you've physically mounted the PSU, all that's left is connecting the cables to various parts of your system and doing a little basic management of your cables to keep things nice and neat:
Full Steps: How to Connect Power Supply Cables (& Cable Management 101)
17. Last Checks and Booting Your PC
We're done covering all the physical installation steps of how to assemble a PC, but before you start up your machine for the first time there's a few extra steps and checks:
Full Steps: Booting Your New PC for the First Time (Checklist Before Starting PC)
Have trouble with booting up? No need to freak out, as it's usually something simple, and we've got your back:
Troubleshooting: How to Troubleshoot a New PC Build (What to Do if PC Doesn't Turn On)
18. Setup BIOS, Install OS, Update Drivers
Once your new computer is finally fully operational, there's still a few more things to do including entering the BIOS and checking/changing a couple things, and installing software like your operating system and other programs. Get the complete lowdown here:
Full Steps: What to Do After Building a PC (BIOS and Software Setup)
19. Game in All-New Graphical Glory
If you've read this far, and done all the steps - congrats! Welcome to the wonderful world of DIY PC. Time to celebrate a little in whichever way you like to roll, and then proceed to load up your game of choice to do what you do best. Or if you're like me and rarely have time for a gaming sesh these days, get straight back to work - although in a (hopefully) much faster, productive and load-free manner.
I hope this comprehensive guide has helped you learn how to build a PC more easily. After going through all the PC installation steps and building your first PC from scratch, you now have the knowledge, skill and confidence to easily build computers - for life! Once a builder, always a builder, and now you've seen behind the curtain so to speak, and how rewarding planning and assembling your own computer is, there's no going back to prebuilt PC land of doom.
 Started at the mobo now we're here ♪
Enjoy your new system, and if you've made it this far - a huge well done for pushing through and reaching the finish line! You have earnt my respect.
2024 Update: If you found these articles really helpful and want to support the countless hours that has gone into writing and fine-tuning them over the years, I've recently set up a Buy Me a Coffee page for anyone who wants to support the site directly. Thank you for reading and happy gaming/working.
Trusted VPN
VPN software can be important in this day and age, especially if you do lots of online banking and/or use public WiFi whilst travelling. Having a VPN adds an extra layer of security to your PC or laptop when online to help protect your data, passwords, financials, etc from hackers or malicious programs. It can also let you access region-locked content (eg US Netflix from overseas). For gamers their can be even more benefits to using a VPN.
Because they're so popular these days, there are countless VPN providers, and it can be confusing to pick one. If you want my 2 cents, after a lot of research I decided on NordVPN 'cause it's one of the fastest, most reliable VPNs for both gaming and general use, with a lot of credible reviews out there backing that up. They also quite often run very solid deals.
Popular Articles (see all)
Search the Site
About the Author (2025 Update)
I'm an indie game developer currently very deep in development on my first public release, a highly-immersive VR spy shooter set in a realistic near-future releasing on Steam when it's ready. The game is partly inspired by some of my favorites of all time including Perfect Dark, MGS1 and 2, HL2, Splinter Cell, KOTOR, and Deus Ex (also movies like SW1-6, The Matrix, Bladerunner, and 5th Element).
Researching, writing, and periodically updating this site helps a little with self-funding the game as I earn a few dollars here and there from Amazon's affiliate program (if you click an Amazon link on this site and buy something, I get a tiny cut of the total sale, at no extra cost to you).
Hope the site helps save you money or frustration when building a PC, and if you want to support the countless hours gone into creating and fine-tuning the many guides and tutorials on the site, besides using my Amazon links if purchasing something, sharing an article on socials or Reddit does help and is much appreciated.

|
ABOUT BGC Helping you build better systems for less, here at Build-Gaming-Computers.com you'll find simultaneously comprehensive yet simplified guides and tutorials, including continuously updated PC build examples. Always as objective and unbiased as possible with product recommendations, and with little to no ads. |
Intro | Best PC Builds | Best Cases | PC Assembly | Prebuilt PCs | PSU Guide | VR Headsets | Privacy | Contact | Donate | Archives

Copyright (C) 2006-2025 Build-Gaming-Computers dot com All Rights Reserved
As an Amazon Associate we earn from qualifying purchases
For the Love of Gaming + Flawless Frame Rates