Home > PC Assembly > Testing Parts
How to Test PC Parts Outside Case Before Building (and Should You?)
+ How to Jump Start a Motherboard Without a Power Button and How to Check CPU Temperature in the BIOS to Confirm the Cooler & Thermal Paste Was Applied Properly

Last Updated: February 2, 2023
Quickly testing parts externally outside the case before building your PC allows you to quickly confirm they're all working properly and that nothing is faulty or DOA (Dead on Arrival). This quick and easy "bench test" (which some people call it) also allows you to avoid the potential nuisance of having to go back and uninstall something later on from within the case if you find out later that you indeed have a faulty component that needs to be sent back to the manufacturer for a replacement.
This would be especially annoying if you also did a little cable management during the build process (which is always recommended as leaving cable management only until the very end just makes it harder). It also allows you to confirm that you installed thermal paste properly onto your CPU for those of you who are applying your own paste (most coolers come with pre-applied paste though).
Plus, testing parts outside the case before installing them in said case can also make troubleshooting easier in the first place. If you end up having a problem with your PC build when trying to boot up (or after a few days or weeks even), it can be harder to pinpoint which part is causing the issue.
But when you test PC parts before building, you can effectively rule out a bunch of potential causes (such as improper contact between the motherboard and case just to name one example) and there's only a small handful of potential things that could be issue. That said, it's not completely necessary to do this external test so if you're a beginner building their first PC you might wonder whether doing this little extra step is actually worth it.
So, should you test parts outside the case before building? Or is it a waste of time?
There's no hard rule in DIY circles saying you should or you shouldn't. Plenty of builders do the test and swear by it, but plenty of others don't (and never have) as the chances of getting a dead part is pretty low. There's also something to be said about building the entire PC from start to finish and feeling that genuine excitement when you go to boot it up for the first time (and the little bit of exhilaration and satisfaction when everything runs first time).
Up until fairly recently I've never tested parts outside the case first when building PCs, and I've luckily (or rather quite predictably based on low failure rates of good hardware models which I always stick to) never received a DOA piece of hardware. Though it definitely can and does happen if you get unlucky, and the odds increase if you use lower quality, cheaper parts or if you're including a used component.
 Testing parts is quick and easy and can save you time down the road
Therefore, the most responsible and overall practical thing to do is test parts before building, as it really doesn't take long and can save you a headache later on. And the more PCs you build, the more important it comes. Since only quite recently, it's something I've introduced into my process for every build that I do, just to be extra safe. I feel it's worth the very minimal time investment - if you're building a PC for the first time this test may take you 5-10 minutes all-up, but once you've done it before you can get it all done literally within a couple minutes.
Testing parts before building is considered good practice, so I recommend it for most people.
So how do you actually test parts then? Thought you'd never ask. Full steps are below but in a nutshell, once you've installed all your core components onto the motherboard as explained step by step in How to Assemble a PC for Beginners, it's simply a matter of temporarily connecting your power supply to the motherboard (and GPU), connecting peripherals, and jump-starting the motherboard using a screwdriver (unless your motherboard has a power-on button on the actual board). The aim is to successfully enter the motherboard's BIOS.
Here's exactly how to test parts outside the case by safely jump-starting the motherboard:
1. Have Core Parts Properly Installed on Motherboard
Make sure all the parts you want to test are properly installed onto the motherboard, which you should sit on a cardboard box or other non-conductive surface (motherboard box is perfect). Sitting it directly on a table will do, but sitting on a box is better. But do NOT sit the board on the bag that it came with, as the outside of the bag is not necessarily safe.
The parts you can test externally on the motherboard are:
- CPU
- CPU air cooler with thermal paste applied (never run a CPU without the cooler and paste otherwise as it may cause damage even if you only want to fire up the CPU for a few seconds)
- AiO liquid cooler if using one, with thermal paste applied (see FAQ below for more on this)
- RAM
- Graphics Card, but remove it before installing the motherboard into the case otherwise it will get in the way. Note that you must have a graphics card installed to test your PC if your CPU does not have integrated graphics.
There's no need for storage drives to be connected as we're simply trying to boot into the motherboard BIOS.
2. Ground Yourself by Touching Metal
As you should do before handling any computer components, if you're not already wearing an anti-static strap then don't forget to ground yourself (ie discharge any built-up static electricity on your body) by touching a metal object for a couple seconds before you pick up a part or touch the motherboard.
3. Temporarily Connect Power Supply to Motherboard (and GPU)
Place your PSU (Power Supply Unit) on your desk next to your motherboard. You're going to need to plug it into the motherboard to be able to do the test. If your PSU is a modular or semi-modular unit, you'll need to first attach these two cables to the unit and then plug them into the motherboard:
- The large 24 pin main ATX power cable, which plugs into the corresponding 24 pin port on the motherboard.
- The 8 pin CPU power cable, which goes into the corresponding 8 pin port on the motherboard (should be labelled CPU_PWR or CPU_PWR1 on the actual board).
If you're also testing your GPU (graphics card) then you'll also need to plug the PSU directly into it if your card requires external power (most mid to high-end GPUs do). See the Power Supply Cable Connections Guide if you need more detail and photos on this.
4. Temporarily Connect Power Supply to Wall and Turn On
Now that you have the PSU plugged into the motherboard, go ahead and plug the PSU's main power cable into the wall and turn on both the actual PSU (the switch on the unit) and the wall.
5. Connect Monitor, Mouse and Keyboard
Since this external test is all about checking to see if we can enter the BIOS just fine, you'll need to see something on a screen so go ahead and plug in your monitor cable to either the graphics card (if you have one installed for this test) or straight into the HDMI/DVI/DP port on the actual motherboard. To be able to navigate the BIOS to quickly check that all your parts are being detected properly, you'll also need to connect your mouse and keyboard to USB ports on the motherboard (use standard USB 2 ports, not the blue ones which are USB 3).
6. Turn on Motherboard (or Jump Start if No Button)
Some modern motherboards (especially high-end models) have a power button on the actual board. If yours does (check your manual if unsure) then go ahead and press it. But many motherboards don't have this button, in which case you'll need to jump-start the motherboard. Don't worry as it's safe to do and just requires a screwdriver or other metal object.
How to Jump Start a Motherboard Outside the Case
All you need to do to jump start a motherboard is first locate the header/pins on the motherboard where the case front panel connectors would usually go. In other words, where your case's power on and reset buttons connect. These pins should be in a group of 9 and labelled as "JFP1" on the actual board:
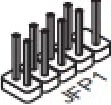 The pins you're looking for
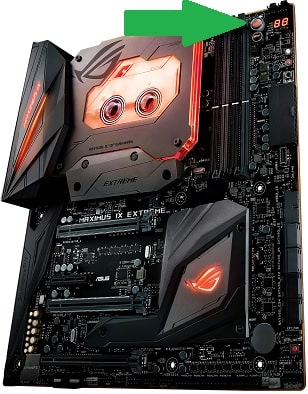 The power button on the Asus Maximus IX Extreme Z270 motherboard
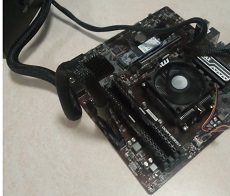
The pins are located in the corner of our MSI B450 Pro-VDH Max motherboard:
But they're located in the middle on our MSI B450 Tomahawk Max motherboard:
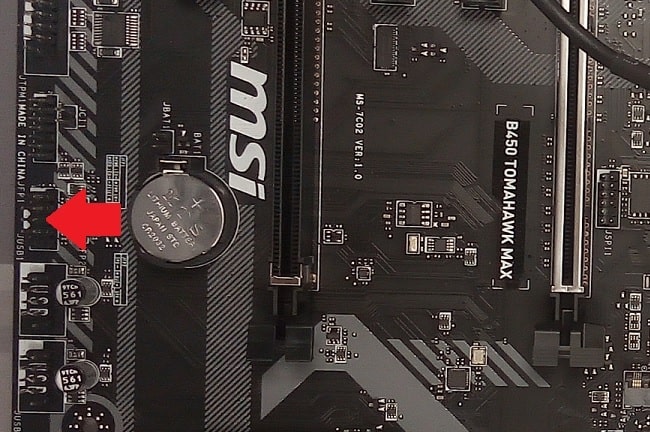
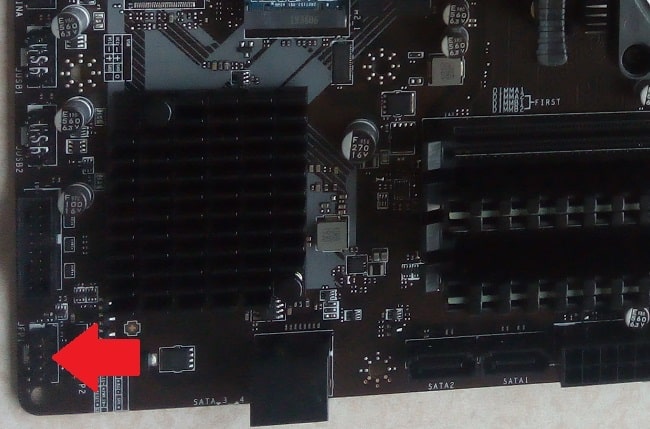
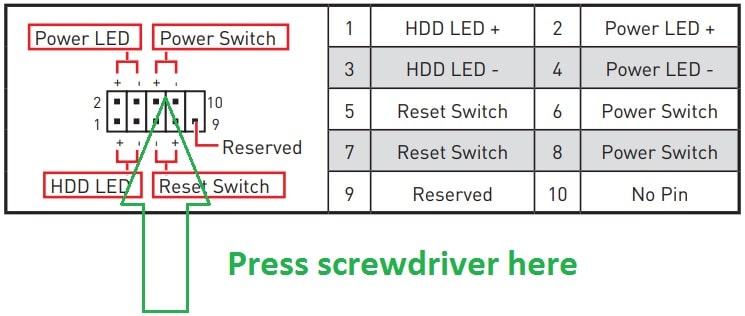
Once you've located these 9 pins on your particular motherboard, you need to specifically find the 2 pins (within the 9 pins) where the case's power button/switch would normally connect to. Check your motherboard manual to locate these 2 pins: they should be labelled as "Power Switch"
Then, to jump start the motherboard all you need to do is gently tap/prick the end of your screwdriver on the top of both these 2 pins at the same time. You're essentially trying to "bridge" the 2 pins together for a split second. Remember, you are only touching the top of just 2 of the 9 pins of the JFP1 header (not all 9). This will turn on the motherboard and you'll (hopefully) see everything turn on.
 The 2 pins to press on the B450 Pro-VDH Max (consult your motherboard manual to find the right pins)
7. Enter Motherboard BIOS
After turning on (or jump-starting) your motherboard, you should see any lights on your motherboard light up, your CPU cooler fan should spin, and if you have your GPU installed then its fan/s should also spin (but not always as GPUs sometimes only spin fans when they hit a certain temperature).
If you witness those things and then you see something come up on the screen, that's good news. Now you want to enter the motherboard BIOS (the built-in software of the motherboard)- press the DEL key on your keyboard when it mentions on screen that you can do so (a few seconds after your motherboard turns on). Alternatively, you might need to press another key to enter the BIOS (check your manual).
When in the BIOS, on the main screen you should see your CPU and RAM being detected (ie listed on the screen somewhere). That means your CPU and RAM is working (and your motherboard), but now you might as well quickly check your CPU temperature to further confirm your construction is proceeding exactly as you had foreseen. Oh, and don't worry if your RAM is showing the incorrect speed as you can change that later by overclocking it as explained in What to Do After Building a PC.
8. Check CPU Temperature in BIOS
Checking your CPU temperature will confirm that it's installed properly and the CPU cooler and thermal paste is properly applied and cooling your CPU. This is especially important to do if you applied your own thermal paste to confirm you did a good job.
CPU temps might be displayed in your BIOS on the main screen that first pops up when you enter it (as is the case for our MSI B450 Pro-VDH Max shown in the image below), but if you don't see the CPU temp on the main screen then navigate into the hardware/CPU monitoring section of the BIOS. Check your specific motherboard's manual for how to access this, but the instructions to go there should be clearly listed on the screen somewhere.
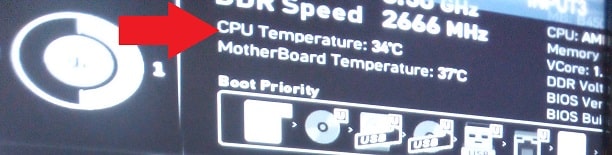
Leave your system for around 5 minutes just to be sure, and monitor if your CPU stays under around 115 degrees Fahrenheit or under around 46 degrees Celsius. These are safe temperatures for an idle CPU. If your CPU goes above these temperatures, you should uninstall the cooler, re-apply the paste, and do the test again until your CPU is showing normal temps when idle.
Otherwise your CPU, cooler and paste are ready to rock and your external bench test is complete. You can now go ahead and exit the BIOS and shutdown the PC by following the on-screen instructions to do so (usually be pressing ESCAPE) and then proceeding to finish the remaining steps to assemble your computer.
Related: Checking for Safe GPU Temperatures
Can You Do External Test With AiO?
As for whether you can test your build with an AIO (All in One) liquid cooler, that's a great question. Whenever I have built with an AiO I skipped the testing process, though to be fair I skip it for a lot of air cooler builds that I do too. I like trying my luck as I've rarely had boot issues with builds and it's not the end of the world if I have to troubleshoot a fully-assembled rig (sometimes it makes no difference as you don't often have to remove the motherboard to pinpoint the issue).
But if you do want to do the external test, that would work as normal by just attaching the AiO to the CPU (applying paste first). And then just let the tubing and radiator rest off to the side of the motherboard, connect the AiO power to the PSU using the SATA cable (or Molex if your AiO has that instead), and connect the AiO pump header to the motherboard pump header. Don't worry about attaching the fans to the radiator for the test, but don't keep the system on for longer than a couple minutes.
When it's time to install the motherboard, I would not uninstall the AiO and I would just keep it attached to the CPU. Otherwise you run the risk of the paste needing to be re-applied - if you remove the AiO the paste could be fine and you won't have to reapply it, but I'm a bit of a perfectionist in that I would want to re-apply the paste if I removed the AiO (hence why I wouldn't un-install it). Installing the motherboard with the AiO attached to the CPU can be a little tricky, but definitely doable if you rest the radiator and tubing on top of the motherboard somewhere whilst doing it, or get someone else to hold those 2 things while you lower the motherboard into the case.
You could even have the radiator and tubing hanging over the side of the case while lowering in the motherboard - whatever is easiest when it comes down to doing it. Just try not to put too much pressure on the tubing such as having it hang over the edge of the motherboard with the radiator pulling at them too hard (when lowering in the motherboard).
Can't Get Into BIOS on External Test?
The first thing to ask yourself if you can't enter the BIOS when doing an external test of your PC parts is are you getting any sort of output on the monitor at all? If so, you need to time the pressing of the key at the precise moment when it says something like 'press DEL to enter setup'. But check the motherboard manual to be sure you're pressing the right key as it could be something else you need to press. It doesn't give you long to press the key either, so if you press a second too late you have to restart (by jumping the reset button) and try again.
But if you don't see anything on the monitor at all, make sure there's a light on the monitor somewhere indicating that it's actually turned on, and then try connecting the monitor cable into different ports on either the motherboard or graphics card (if you have a graphics card installed for the test).
Related: Troubleshooting New PC Builds
Trusted VPN
VPN software can be important in this day and age, especially if you do lots of online banking and/or use public WiFi whilst travelling. Having a VPN adds an extra layer of security to your PC or laptop when online to help protect your data, passwords, financials, etc from hackers or malicious programs. It can also let you access region-locked content (eg US Netflix from overseas). For gamers their can be even more benefits to using a VPN.
Because they're so popular these days, there are countless VPN providers, and it can be confusing to pick one. If you want my 2 cents, after a lot of research I decided on NordVPN 'cause it's one of the fastest, most reliable VPNs for both gaming and general use, with a lot of credible reviews out there backing that up. They also quite often run very solid deals.
Popular Articles (see all)
Search the Site
About the Author (2025 Update)
I'm an indie game developer currently very deep in development on my first public release, a highly-immersive VR spy shooter set in a realistic near-future releasing on Steam when it's ready. The game is partly inspired by some of my favorites of all time including Perfect Dark, MGS1 and 2, HL2, Splinter Cell, KOTOR, and Deus Ex (also movies like SW1-6, The Matrix, Bladerunner, and 5th Element).
Researching, writing, and periodically updating this site helps a little with self-funding the game as I earn a few dollars here and there from Amazon's affiliate program (if you click an Amazon link on this site and buy something, I get a tiny cut of the total sale, at no extra cost to you).
Hope the site helps save you money or frustration when building a PC, and if you want to support the countless hours gone into creating and fine-tuning the many guides and tutorials on the site, besides using my Amazon links if purchasing something, sharing an article on socials or Reddit does help and is much appreciated.

|
ABOUT BGC Helping you build better systems for less, here at Build-Gaming-Computers.com you'll find simultaneously comprehensive yet simplified guides and tutorials, including continuously updated PC build examples. Always as objective and unbiased as possible with product recommendations, and with little to no ads. |
Intro | Best PC Builds | Best Cases | PC Assembly | Prebuilt PCs | PSU Guide | VR Headsets | Privacy | Contact | Donate | Archives

Copyright (C) 2006-2025 Build-Gaming-Computers dot com All Rights Reserved
As an Amazon Associate we earn from qualifying purchases
For the Love of Gaming + Flawless Frame Rates