Home > PC Assembly > PSU Cables
How to Connect Power Supply Cables
A Detailed Yet Simplified Step-by-Step Beginner's Guide to Wiring a PSU to the Motherboard and Other PC Components (Including Cable Management 101)
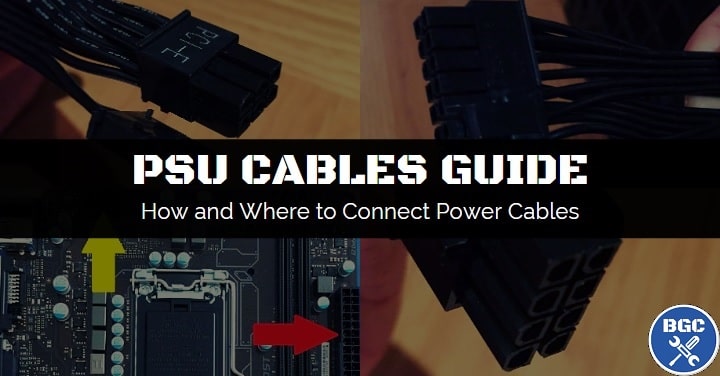
After you have finished installing the power supply into your computer case, the next step in the PC building process is to wire the PSU to the correct locations within your new system.
In this beginner friendly walkthrough we will go over everything you need to know about this process, including full instructions and photos on how to connect power supply cables to your components like the motherboard, CPU, graphics card, SATA drives and any other accessories that require a direct connection from your PSU.
We'll also cover basic cable management and provide answers to common questions about connecting PSU cables.
Note: For all PC installation steps, see Assembling a Computer
If you're building your first PC and are a little intimidated about wiring a power supply (perhaps due to seeing the fair amount of steps to be done below) - don't be!
Learning how to connect power supply cables with some basic cable management along the way isn't hard to do. Just take each step below one at a time at your own pace, and you'll be just fine and done in no time. Let's get straight into it.
How to Connect Power Supply Cables
1. Attach Power Cables to Modular PSU (Optional)
2. Understand PSU Cable Management Basics
3. Find PSU Connections on Motherboard (Diagram)
4. Connect 24 Pin Power Cable to Motherboard
5. Connect 8 Pin CPU Power Cable to Motherboard
6. Connect PCIe Power Cable to Graphics Card (Optional)
7. Connect SATA Power Cables to Storage and Accessories
8. Connect Molex Power Cables to Accessories (Optional)
9. Finishing Off With More Cable Management Tips
1. Attach Power Cables to Modular PSU (Optional)
If your power supply is either a modular or semi-modular model (it will say on the box or in the specs; see the gaming PSU buyer's guide for more on this), if you haven't already done so go ahead and attach the power cables that you'll require for your particular PC build to the correct slots on the rear of the unit.
If you're not sure which cables you'll need for your PC components, don't worry about it and just attach whatever cables you need as you through this guide. But for any PC out there you'll definitely need to connect the large 24 pin motherboard cable and an 8 pin CPU power cable. Set aside any unused cables somewhere safely such as in your PSU box to potentially use in future.
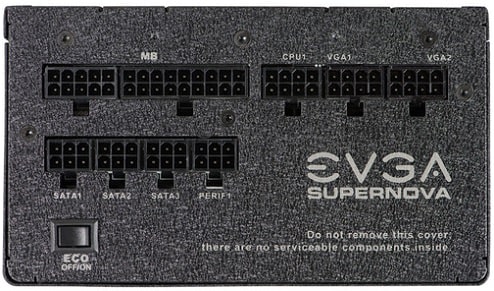
Attach the cables you'll need if you have a modular power supply
2. Understand PSU Cable Management Basics
We'll cover more tips on cable management in the last step of this power supply cables guide, but before connecting your PSU cables it's good to be aware of some basics so you can try and do a little cable management as you go along with each step (instead of leaving it all until after which could mean having to unplug and reconnect all cables).
As you go connect each power supply cable to the motherboard and other components, you want to thread the PSU cables through any cable holes you have on your case's motherboard tray. The amount and location of these cable management holes will differ from case to case, but here they are on our Cooler Master N200 (the case used for our example build):
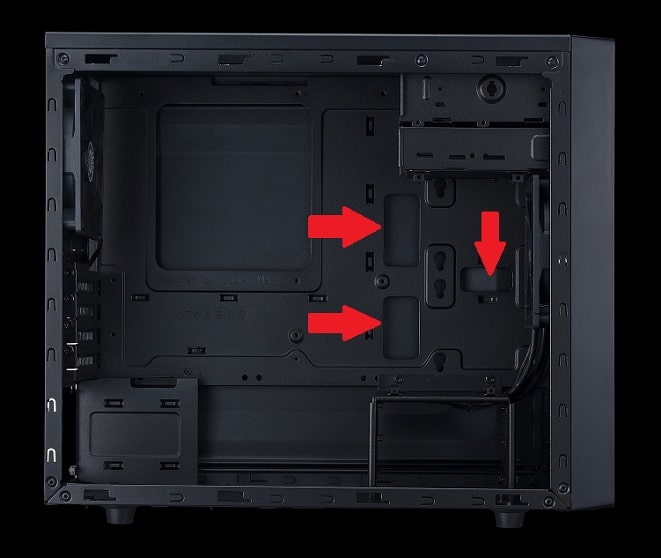
The motherboard tray holes for routing cables in the Cooler Master N200 Mini Tower
The aim is to make full use of the gap between the motherboard tray and the rear side panel of your case, as this is where you should be able to hide a good majority of your cables in most modern cases. Just make sure when routing cables in this back area of your case that you will be able to easily replace the case's side panel later on without damaging your cables (in other words, make sure the side panel doesn't squish cables when you close up your case).
Besides utilizing the back of the case to hide cables (as in, the back when looking at your case side-on, ie behind the motherboard), you can use other areas to hide excess cables such as attaching them to the bottom of the case, within a PSU shroud if your case has one (ours doesn't), or even within an unused drive bay. Every case is slightly different. We'll revisit some cable management tips later, but for now let's move on.
3. Find PSU Connections On Motherboard (Diagram)
Before you physically connect the power supply cables, just a quick heads-up. Plugging in power supply cables will require a firm push to make sure they're in all the way properly (to avoid having an unstable system thanks to loose power connections). You might even have to push quite hard to get that 24 pin motherboard power connector in.
My point? Before plugging in any PSU cable, be sure you're inserting it the right way around (there's only one correct way) by matching the pin patterns on the underside of the PSU connection with the pin patterns on the motherboard (or on any other components you're plugging the PSU into such as a graphics card). You don't want to firmly push a power cable the wrong way in and risk bending or breaking the pins.
What if a Power Supply Cable Doesn't Reach?
Also, if during the steps to connecting power supply cables below you find that a certain power cable doesn't reach to where you need to plug it in (perhaps you're building in a large case and your PSU is a fair distance from the motherboard), or in the rare chance your PSU is missing a certain connector that you require, you may be able to buy an extension and/or adapter.
Power Supply to Motherboard Diagram
Every PSU installation will require 2 direct connections to your motherboard. One for the main motherboard power, and one for the CPU power. The locations where you plug these in on a motherboard will generally be around the same area from board to board. Here's where you connect the power supply cables to the motherboard for our example build:
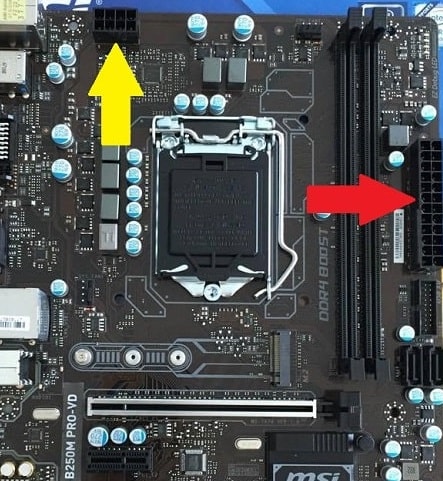
Where to plug the 8 pin CPU cable (YELLOW) and 24 pin motherboard cable (RED)
4. Connect 24 Pin Power Cable to Motherboard
Now you know where to connect the power supply cables to the motherboard, let's go ahead and do that, starting with the big 24 pin main motherboard power cable. On modern power supplies this will either be a straight 24 pin connector, or a 20+4 pin connector. Some motherboards only require a 20 pin motherboard power connection, in which case you would only plug in the 20 pins (and not plug in the 4 pins). But modern motherboards will require a 24 pin power connection.
See the motherboard diagram above for what the 24 pin connector looks like on a motherboard, and go ahead and plug it in. If you're having trouble finding where to connect the 24 pin (20+4) pin connector, see your motherboard manual. In our MSI manual it's labelled as 'ATX_PWR1' so it should be something similar for yours, and it should also have it written in small writing on the actual motherboard next to the connection.
Line up the pins the right way around, and plug in the 24 or 20+4 pin connector nice and securely. You might need to give it a firm push in to make sure it's inserted all the way in to avoid it potentially coming loose in future. Hold your motherboard if you need to while firmly pushing it in.
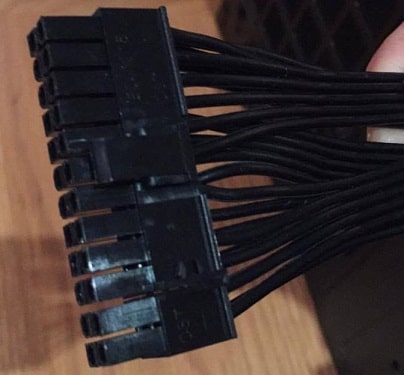
The wide 24 pin cable plugs into the matching 24 pins on the motherboard
5. Connect 8 Pin CPU Power Cable to Motherboard
The 8 pin power supply cable needs to connect to the motherboard too, and is used to provide your CPU with power. It will be in a 4+4 pin arrangement, so look for the same 4+4 pin connection on your motherboard which should be near the CPU socket. See the motherboard diagram from earlier to see what it looks like. In our motherboard manual it's labelled as "CPU_PWR1", so check your own manual for something similar if you get stuck.
Most modern motherboards will require the full 8 pins to be plugged in, but some may need just 4 in which case you can just plug in either of the two 4 pin headers. Line up the pins carefully, hold the motherboard for better control, and push the cable nice and firmly into place.
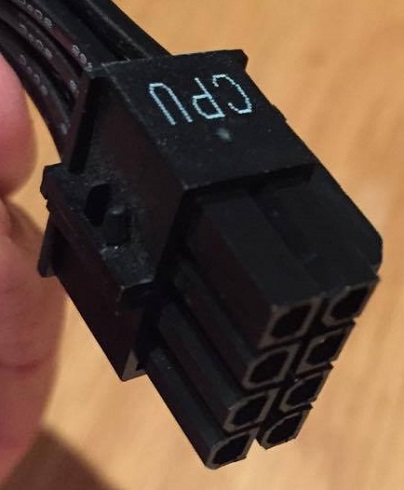
The 4+4 pin power connector plugs into the motherboard
6. Connect PCIe Power Cable to Graphics Card (Optional)
Most modern graphics cards these days will require a direct power connection from the power supply, however some lower-powered GPUs like the NVidia GTX 1050 Ti don't require dedicated power (and receive all required power directly from the PCIe slot on the motherboard).
If your GPU does need a direct power connection (it will say so in the specs, or just look for the pin connectors like the ones pictured below), it will either be a 6 or 8 pin connector, or dual 6 and/or 8 pin connections for more power-hungry GPUs. For example, the MSI GeForce RTX 2070 Super Ventus OC requires both a 6 pin and a 8 pin power connector:
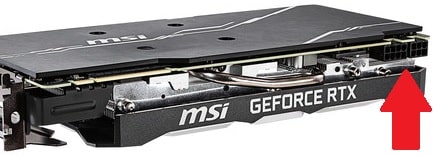
Any decent modern power supply will come with two PCIe power connector cables (at least), which will come in the form of 6+2 pin connectors so you can connect to either 8 or 6 pin connections on a GPU.
Go ahead and plug in any PCIe power cables that you need to for your particular video card. If your graphics card has 2 lots of 6/8 pin connectors, make sure to use 2 separate PCIe power cables from your power supply for maximum stability and power delivery (do not just use the one PCIe cable that has multiple heads on it).
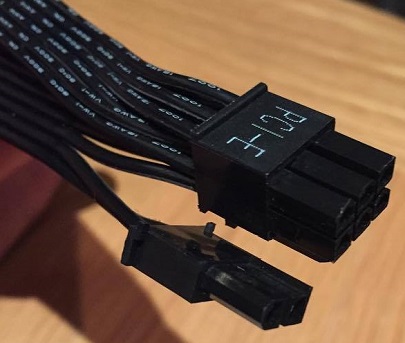
The 6+2 pin power supply cable which connects to a video card
In the rare case your power supply doesn't have enough PCIe power cables for your graphics card, you could use a Molex to PCI-E adapter (some GPUs come with them), although this is only recommended as a last resort as it's not ideal.
7. Connect SATA Power Cables to Storage and Accessories
Not to be confused with the SATA data transfer cables that should have come with your motherboard (and which you plug from the motherboard to the hard drive), these SATA connectors power your storage drives (SATA SSDs or HDDs), optical drives, and some accessories like certain CPU liquid coolers.
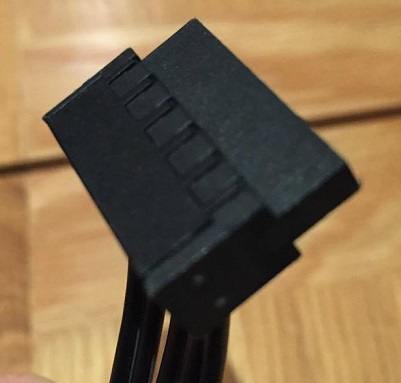
Connect the SATA power cables into your SATA drives or accessories
If you have a ton of SATA drives/accessories and your PSU doesn't have enough SATA power cables to connect them all, you can use the Molex connectors on your power supply using a Molex to SATA adapter. Go ahead and plug your power supply SATA cables into any HDD/s, SSD/s, or optical drive/s that you have in your desktop.
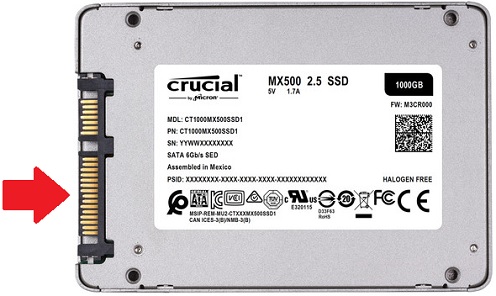
Plug the SATA power cable/s into any SSD, HDD, or other SATA parts
Note that if you have an m.2 SSD, these storage drives do not require power cables (or data cables) for that matter, so this step does not apply to them. These super-thin SSDs slot directly into the motherboard and are powered solely by the motherboard.
8. Connect 4 Pin Molex Power Cables (Optional)
Molex connectors have been almost completely replaced by SATA connectors, however some power supplies still have them and you may still need to use them for accessories like some CPU liquid coolers or case fans. They are the 4 pin connectors that look like this: (and might be labelled as "peripheral" cables in your PSU specs)
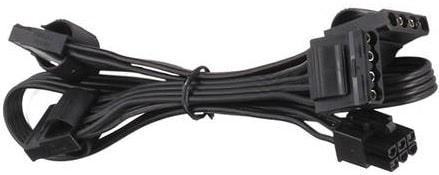
Molex power connectors may be needed for certain accessories
For example, for our example PC build used in our complete PC building tutorial, because we can't plug in our case fans directly into our motherboard due to only having the one fan header on the board, we'll connect the case fans into the Molex connectors of our PSU.
Go ahead and connect your case fans if this applies to you, although ideally you want to plug case fans into the motherboard fan headers. The downside of having case fans connected to your PSU directly is that you have no control over them and they'll always run at 100%.
Being able to plug fans directly into the motherboard (if your board supports it) allows you to use software to control how fast the fans spin. You probably don't need to worry about this, but it's just something to keep in mind. Sometimes fans can be louder than you like and you'll want to adjust their settings.
If you don't need Molex connectors, and you're using a modular PSU, simply keep them in your PSU packaging, otherwise you'll have to tuck them into your case somewhere. Another thing I'll say about Molex connectors is that they sometimes need a real, REAL firm push to connect them properly, so don't be afraid of using a little force with these guys.
9. Finishing Off With More Cable Management Tips
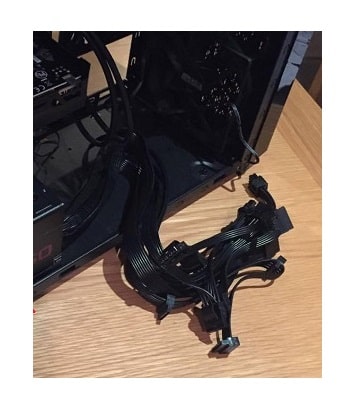
After connecting the cables you need, you'll want to tuck away any unused cables of a non-modular PSU neatly within your case somewhere
As explained earlier, while you're connecting power supply cables to your PC you want to be threading each cable through holes in your case and/or behind the motherboard tray area wherever possible to keep things nice and neat.
In other words, you don't want to simply plug in the cable to the rear of the PSU and then just go straight to the component you're connecting and plug it in; if you did that, you'll have loose cables everywhere that will stick out in the open, making for an unsightly setup but also once that can be a hassle to work with (and that can collect dust faster and easier, or even damage something if a loose cable gets into contact with something such as a fan).
Once you've connected all the cables, you also want to finish off with some extra tidying up of cables wherever you can such as by simply tying them up using zip or cable ties (well, you don't have to, but it's ideal and isn't hard to do).
Why Do Cable Management?
This is good to do even if you don't have a see-through case that shows off your internal components, as cable management isn't just for aesthetics but for practicality and extending the life of your computer (by maximizing airflow, limiting dust build-up, and avoiding loose cables potentially damaging other parts).
The amount of cable management you do after you've connected your system together will depend on your build, and how much you care for your new system. Truth is, some first-time builders will just rush over it (or not do it at all), and there's nobody forcing you to do cable management. A messy build isn't the end of the world, but we do recommend spending a little time now to clean things up as best you can. It doesn't have to take you long, and a simple 30 mins to an hour of tidying up cables could be well worth it for your new system in the long-run.
Non-Modular PSU Cable Management
If you have a modular PSU, cable management will be easier as you have less cables to manage neatly. If you have a non-modular PSU, such as the one we've installed for our example build in this tutorial, as well as threading any cables you connect through the back of the case first you'll want to then tuck away the cables you didn't connect (the ones still attached to the PSU) nice and neatly within the case somewhere such as under the hard drive cage/caddy which is what we'll do in our build.
Avoid Cable Clumps of Doom
Besides cable management 101 we explained earlier in this guide, which is primarily about threading cables through any available holes in your case, you also want to use cable/twist ties to bundle any stray cables (or groups of cables) together into the same direction and position them against the side panel. You want to avoid having any big bulges/clumps of cables within your system. Some cases go the extra mile here and have quick release cable ties and small lugs built-in to the back of the case you can conveniently attach cables to.
Just Do Your Best
As you're doing any cable management, keep airflow in mind and try not to cover your coolers or case fans with cables if possible. If your case doesn't have too many options for cable management, don't worry too much, but do your best to make do with what you have.
Don't Forget the PSU Main Power Cable + Power Switch
That wraps our guide to connecting power supply cables to your PC components as a beginner. Hope this detailed tutorial helped, and that you enjoyed reading as much as I did creating it. Oh, and by the way, we didn't mention plugging in the PSU to a wall socket (mains power), as that should only be done once you're ready to boot-up your PC build for the first time which we cover in the next step of building a PC from scratch (see below). When you do plug the PSU into the wall, don't forget to also flick the On switch on the back of the PSU as well!
Next: Successfully Booting a Custom PC for the First Time
Trusted VPN
VPN software can be important in this day and age, especially if you do lots of online banking and/or use public WiFi whilst travelling. Having a VPN adds an extra layer of security to your PC or laptop when online to help protect your data, passwords, financials, etc from hackers or malicious programs. It can also let you access region-locked content (eg US Netflix from overseas). For gamers their can be even more benefits to using a VPN.
Because they're so popular these days, there are countless VPN providers, and it can be confusing to pick one. If you want my 2 cents, after a lot of research I decided on NordVPN 'cause it's one of the fastest, most reliable VPNs for both gaming and general use, with a lot of credible reviews out there backing that up. They also quite often run very solid deals.
Popular Articles (see all)
Search the Site
About the Author (2025 Update)
I'm an indie game developer currently very deep in development on my first public release, a highly-immersive VR spy shooter set in a realistic near-future releasing on Steam when it's ready. The game is partly inspired by some of my favorites of all time including Perfect Dark, MGS1 and 2, HL2, Splinter Cell, KOTOR, and Deus Ex (also movies like SW1-6, The Matrix, Bladerunner, and 5th Element).
Researching, writing, and periodically updating this site helps a little with self-funding the game as I earn a few dollars here and there from Amazon's affiliate program (if you click an Amazon link on this site and buy something, I get a tiny cut of the total sale, at no extra cost to you).
Hope the site helps save you money or frustration when building a PC, and if you want to support the countless hours gone into creating and fine-tuning the many guides and tutorials on the site, besides using my Amazon links if purchasing something, sharing an article on socials or Reddit does help and is much appreciated.

