Home > Gaming PC Builds > Water Cooling
How to Build a Custom Water Cooled PC: Beginner's Guide to Your First Open Loop
Water Cooling 101, Open vs Closed Loops, Loop Design, Picking Parts, & Installation
 Custom water cooling loops are rarely needed from a practicality standpoint, but it sure add to aesthetics
Last Updated: May 18, 2021
Ever wondered how to plan and install a custom water cooling loop into your gaming PC? Today's your lucky day; in this comprehensive introduction to the wonderful world of water cooling PC builds we'll dive into everything you need to know as a beginner in an easy to understand way so no noob gets left stranded at sea. Super bad puns aside (for just a second; brace yourselves), learning how to build a water cooled PC is far from necessary for the far majority PC builders, but there's just no escaping the fact that there's really nothing cooler when it comes to a DIY PC.
Up to the slight challenge? Have levels of patience rivaling Master Windu or his little green friend? NOT a total newbie assembling your very first computer? This comprehensive guide to building a water cooling PC is your roadmap to getting your feet wet in this almost-always overkill yet awesomely-alluring feature, and will explain all the basic fundamentals to get your liquid quest off on the right foot.
 This is the way (Source: Imgur)
Some people make building a water cooling PC seem like this extremely elusive, near-impossible task reserved only for savvy computer engineers, Tech Jesus AKA Steve from Gamer's Nexus, and Elon Musk. Yes, it takes time and patience to learn how to install water cooling components, maintain your loop, and choose the right combination of water cooling parts in the first place. But it isn't rocket science. Just like building any high performance PC, it's about taking one step at a time and following instructions. Though as mentioned, if you're building a PC for the very first time and perhaps just learned what an SSD is this past week, for the love of Half Life do give custom loops a miss (for now).
So, whether you're a low-spec gamer just here to come along for a tire-kicking ride down the rabbit hole of water cooling, still weighing up the pros and cons to installing an open loop in your PC, or have already decided to take the plunge into your first custom water project (either for practical purposes or just for the fun flex of it) - you’ll find as you go further along in this PC water cooling guide that it's really doable for anyone who's built a high-end PC before, and nothing to be intimidated by if you simply allocate the required time (days, not hours).
Water Cooling Introduction
What is Water Cooling?
Computer hardware can generate a ton of heat, especially when under heavy load such as demanding applications/games, and/or when you overclock your components to push them to their limits. The standard way computers cool down your hardware components to keep them running at a safe temperature is by moving air, such as with a typical heat-sink-and-fan combination for your CPU (ie CPU cooler).
But compared to air, water is on another level of effectiveness because it has high thermal conductivity, meaning it can absorb heat more easily. With a full water cooling PC build (there is such a thing as a partially water cooled build, ie AiO liquid coolers; more on that below), instead of air blowing on your components, water is run over them to very effectively transfer the heat those components generate to a radiator that then dissipates that heat. A water cooled PC not only reduces heat more effectively than air, and reduces or straight-up eliminates noise (fans can be loud when they have to work hard), but it can also increase the maximum performance you can squeeze out of your parts when overclocking.
With a well-designed water cooled rig, enthusiasts looking to overclock their components to the limit will have the safety net to push their parts further and faster than what air cooling would generally allow. Whilst custom loops are usually only tackled by power-hungry users with large budgets who are building a monster system or interested hardware enthusiasts who perform highly demanding tasks with their computers such as intense overclocking, using water-cooling in your PC doesn’t have to mean you go all-out and design and implement a custom loop.
You could simply go the much simpler, common way of using a pre-built, closed-loop CPU liquid cooler (also called AiO liquid coolers; “All in One”) which we will also talk about in this guide. But overall, nothing beats a full custom loop for maximum cooling capacity, effectiveness and noise elimination. Oh, and aesthetics; a custom loop adds a really unique touch to any build.
Air Cooling vs Water Cooling
To compare air cooling and liquid cooling your PC hardware components, we'll use the CPU as an example which is the most commonly water-cooled piece of hardware. Keep in mind though that with custom water cooling setups you can water-cool pretty much any component that your heart desires. With a standard, air-cooled CPU, the heat generated by the processor is transferred into the heat sink. The fan sucks air past the heat sink, drawing heat away from the heat sink as it does so. The hot air is then pushed out of your case through the rear by your case fans.
As for a water-cooled CPU, instead of air being used to transfer the heat generated by the CPU, water is used. The coolant is pumped through a tube and the heat is transferred through an inlet into what's called a cooling block, which is basically a hollow heat sink, and then the heated coolant is pumped into a reservoir and then into a radiator which is then cooled by a fan. The coolant than continues its merry journey to the cooling block and the glorious cycle continues. As mentioned, water cooling is more effective and quieter than standard air cooling, but air cooling is still the most common method used in computers today. As time goes on who knows whether that will change as water cooling becomes more easily accessible to everyday consumers, but for the time being water cooling will remain a luxury.
 Air? Good to Great. Liquid? Great to Legendary.
Open vs Closed Loop Water Cooling
What is an open loop water cooled PC? What about closed loops? These are the two main types of water cooling you can include in your build, and in this water cooling guide we're covering how to build a full open-loop system. An open loop water cooling system is one that travels around your PC in, well, a loop. A closed loop system is limited to just one component - usually the CPU.
These are referred to as AiO (All in On) liquid coolers, and it's the easy way to get into water cooling for the first time. They're much simpler to install and maintain than a full open loop setup, and will effectively keep a CPU cool and quiet. Examples of AiO/closed-loop systems include Corsair’s popular Hydro Series and the NZXT Kraken range - both common inclusions in our best gaming PC builds of the month so see our latest build recommendations for specific recommendations for certain CPUs.
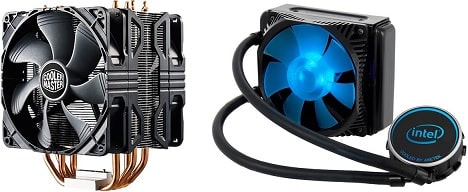
 A closed loop water cooling system, technically called an AiO
Performance of AiO liquid coolers vs air coolers can actually be very close though, and some high-end air coolers from leading companies like Noctua can hold their own against the best AiO liquid coolers out there.
Generally speaking, a good AiO cooler will beat most air CPU coolers overall in both temps and noise, but the truth is, getting a top air cooler for your CPU can provide the same level of performance as a liquid AiO, and sometimes for a little less cost if you know which models to pick (for example, the Dark Rock Pro 4 is a beast and goes toe to toe even with higher-priced AiO coolers).
So, there's usually no practical need to get a AiO liquid CPU cooler over a good CPU cooler unless you're on the extreme end of the spectrum and doing heavy overclocking on an extreme-tier CPU (where a high-end $150+ liquid cooler can be justified in terms of actual practicality).
However, liquid coolers sure do look a lot cooler in a finished system, and so while there's often little need for them over a high quality air solution in most builds, AiO liquid coolers are a popular choices in high-end systems for this reason. Air coolers on the other hand can look quite unappealing, though it depends on the model and some can look great, too (but have you seen those beige Noctua's? Amazing performance, but far from pretty).
But to extract maximum benefits from a water cooling PC build, the next level is to build your own custom loop (open loop, that is) which is where the real fun begins and cannot be matched in terms of temperatures, noise reduction and of course aesthetics. When you build a custom water cooling loop you have the freedom to cool any or all components in your rig, whether that’s your CPU, your graphics card/s, and other components such as your RAM, motherboard, and even storage devices are fair game. But there are pros and cons to building an open loop, and it's not for everyone.
Downsides to Water Cooling
First let’s look at the potential bad news; while water cooling sounds like the coolest thing ever, there are some potential drawbacks to consider. Although it’s fair to say these cons aren’t really an issue for patient enthusiasts with a healthy budget who also find this kinda stuff fun, but it’s worth discussing both sides of the coin.
First of all, besides AiO liquid coolers I just mentioned above (closed-loop water cooling), a custom open-loop system is more complicated to plan, setup and maintain. There's quite a few more parts that go into it including water blocks, radiators, pumps, reservoirs, tubing, fittings, and so on, and so a fair bit more little nuances and details to think about. That naturally also means there's more that could possibly go wrong (read: that you or I might just screw up).
Maintenance isn't THAT involved to be honest as you'll see later in this water cooling guide, as coolants probably only need to be replaced about once every 6 months to a year or so in a typical loop, but it's definitely more maintenance than a standard water-free rig.
As for worst-case scenarios like water leaks which could damage your entire system, it's a very rare thing if you set things up properly (install your PSU intake fan facing downwards to avoid leaks getting in) but it can happen so there's that risk to take into account. Price is also another downside as water cooling parts can add up in cost quite fast, especially if you buy premium like good old EKWB (highly recommended). Even a fairly basic custom loop will set you back at least a few hundred dollars on top of the cost of your core system.
Benefits to Water Cooling
As for the advantages, well for one it's pretty freakin' awesome and I can't imagine anything more satisfying within the hardware community than having successfully built your own custom water-cooled machine. You'll be in a rarer, elite category of PC builders that had the courage and the know-how (and let’s face it, the wallet) to make it all happen.
And besides the benefits we've already mentioned such as water cooling being the most effective cooling method for your hardware at the lowest levels of noise (or should I say whisper silent), it also looks seriously cool in action. For many enthusiasts who venture into water cooling territory, the unique aesthetic possibilities of a water-cooled PC is a big drawcard. A well kitted-out air-cooled PC can look pretty damn awesome with the right combination of parts and accessories, but water cooling is the pinnacle. Nothing looks, well, cooler! Not even a dual GPU SLI gaming PC looks sweeter in action.
On top of having the most effective cooling, lowest noise, and best looks, installing a custom water cooling loop in your PC will also lengthen the life of your components as they’ll be running at peak efficiency thanks to the lower heat. Lastly, with a well water-cooled PC you have the ability and safety net to overclock your gaming PC further than you safely could otherwise. Therefore, with a full open loop water cooling system in your PC you're opening up the floodgates to unlocking the maximum potential of your high-performance system.
Choosing the Best Parts for Water Cooling
Now we get to the good stuff and the heart of PC water cooling; custom water loops. They're quite involved, as you'll see by all the various pieces of the puzzle that we'll explain here, and we don't recommend creating one unless you have the interest, time, money and patience to do your own thorough research to design and install the right setup for you, and to do it right.
Keep in mind there are all-in-one kits that can save you time and money as well, but here we’ll explain how to setup a fully customized loop by sourcing each part individually which gives you the most control. As we go through each individual component of a custom water system and what to look out for when selecting the right one for your setup, keep in mind this is just an overview and you should do your own extra research to take into account your specific aims and needs.
Each loop is a little unique and we won’t be recommending specific parts here, but researching and designing your own custom loop is part of the fun. This introductory guide is meant to set you off on the right foot, but don’t let your learning stop with this guide as water cooling has many little nuances and technicalities and is the type of thing that needs to be thoroughly researched for your own situation if you are to pull it off effectively.
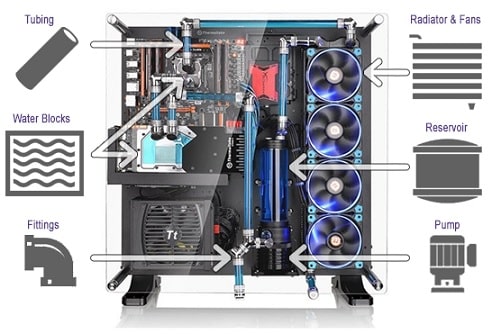
Parts Needed for Open Loop Water Cooling
These are the components required to build a full water cooled PC:
- Water Block/s
- Radiator/s (with fans)
- Pump
- Reservoir or pump/reservoir combo (optional but recommended)
- Tubing (soft or hard)
- Fittings (2 per item)
- Coolant (distilled water + additives or kill coil, or special coolant)
For the rest of this section we'll cover tips on choosing each component, but also check out these handy configuration tools which will help you plan a compatible water loop:
Aluminium vs Copper Water Cooling Parts
The cheapest water cooling parts you find may be made of aluminium, which is okay if on a budget but isn't ideal. Besides being cheap, aluminium water cooling parts do have the advantage of being lightweight, but they provide less performance compared to other metals like copper or brass. Plus, you should avoid mixing aluminum parts with other metals, as when doing so a phenomenon known as galvanic corrosion can occur and damage your parts (or even create leaks). See this for more on corrosion.
For this reason, aluminium water cooling parts are less flexible in terms of future upgrades too, as if you start your build with aluminium then you're kinda restricted in the upgrades you can make later down the road if you want to avoid issues. But again, for a budget water cooling PC build, aluminium isn't the end of the world IF you remember to avoid mixing it with other metals within your loop.
Planning Your Loop Complexity
You can make your open water cooling loop as simple or complex as you like, and the possibilities these days are endless and you can water-cool just about anything in your PC. Your most basic option is to set up a single loop that just cools your CPU. This is the first step up from using a pre-built/closed-loop liquid cooler (AiO), but is still relatively simple to undertake as a beginner.
This first stage of a custom water cooling PC will still include all of the core parts that make up more complex loops; you’ll need a water block for your CPU, radiator, reservoir, pump, tubing and fittings. If you’re brand new to the water-world and not wanting to delve in too deep, this is a good place to start as you’re limiting potential problems and you’ll gain some confidence in the process. It’s also going to save you money as you won’t have to shell out a ton of cash for additional parts, and you can always add to your loop later.
The next step up in complexity for a custom loop PC build would be to throw your graphics card into the mix. For this you’ll need a suitable GPU water block, and possibly a larger radiator than the one that would have been used for a CPU-only loop. Or, you could add a second radiator instead to increase the overall cooling capacity of the loop.
Beyond that you have the option to cool other components such as your RAM modules and motherboard, which will all need their own water blocks. Going even further and you get into dual-loop territory for advanced enthusiasts, but that's entering ridiculous territory and beyond the scope of this already way-too-long water cooling guide.
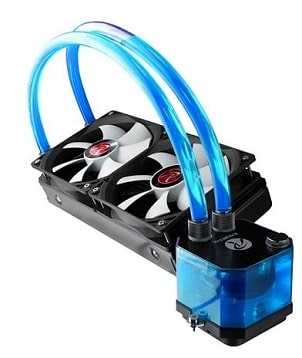
All-in-One Water Cooling Kits
Not to be confused with All-in-One CPU liquid coolers, you can also find all-in-one complete water cooling kits that usually contain everything you need for a basic water cooling PC build. These are definitely worth considering if you're trying to keep things simple as they'll help take compatibility issues out of the equation. They may also save you some coin. I'm not here to recommend specific models as what you should buy depends on various factors such as your particular PC specs, budget, level of interest, and so on, but for examples of what's out there, these two water cooling kits from Thermaltake and EKWB are popular for beginners:
Thermaltake Pacific C360 DDC Soft Tube Water Cooling Kit
EKWB EK-KIT Performance Series PC Watercooling Kit P360
How to Choose Water Cooling Blocks
A water block is what you mount onto each hardware component that you wish to include in your loop, and is used to transfer heat energy from that component and into the water in your loop. Water blocks rely on surface area to exchange heat effectively, with more surface area equalling more heat being transferred and therefore more effective cooling.
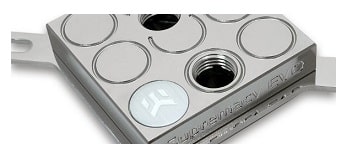 What a CPU water block looks like
A water block is what you mount onto each component you want included in the loop, and is used to transfer heat from the component and into the liquid within the loop. Water blocks rely on surface area to exchange heat effectively, with more surface area equalling more heat being transferred, and therefore more effective cooling. Water blocks use either pins, fins and/or channels to increase surface area, with CPU water blocks typically using pins and fins.
GPU water blocks come in two varieties; full cover and universal blocks. Full cover blocks will fit the one specific GPU model while universal blocks will, you guessed it, fit a variety a different graphics cards. Motherboard water blocks are like GPU ones; they have universal and model-specific versions. RAM, storage drive, and even PSU water blocks are out there, but rarely worth it, and only the most hardcore enthusiast would consider getting blocks for these components. Including these components in a water cooling loop would be more for looks than practicality.
So, you’ll need a suitable water block for every component you want to include in your loop. If you can’t find blocks that fit your particular parts for whatever reason, then I’m sorry to be a dream-killer but your water-cooling aspirations may not be possible. But don’t worry; most common, modern parts will have suitable blocks for sale somewhere.
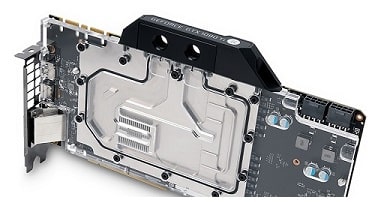 What a GPU water block looks like
Here are some things to keep in mind when choosing the right water blocks for your PC:
- Ideally look for a water block with a high-flow design and low hydraulic restriction.
- Water blocks for CPUs tend to support either Intel or AMD CPUs, but some will support either. Either way don’t forget to check it supports your CPU’s socket type, and ideally your specific CPU model too (but socket type should be all you need).
- Search around online for reviews and extra advice before buying a water block to foresee any potential problems you might have with it.
- Make sure the water block/s you buy comes with all the pieces you need to install it, such as a backplate, mounting mechanism and mounting screws etc, otherwise you’ll have to source these yourself.
- You’ll also need thermal paste just like when installing an aftermarket CPU cooler; some blocks will come with some, some won’t, and some blocks might have it pre-applied. Yes, you’ll need thermal paste for a GPU water block too, and not just for CPUs.
- For cooling a GPU, a full cover block (as opposed to a universal block) is the most effective, best-looking, yet most-expensive option. It may or may not cover your entire card, but either way it’ll cover all the important bits of the card that needs to be cooled. Full cover GPU blocks will only support the one specific GPU model.
- To reduce corrosion you should stick to blocks made of the same metal; if you have a copper CPU block then try to also get a GPU block made of copper.
How to Choose Water Cooling Radiators & Fans
Radiators function to keep the water cool as it moves around the loop. It does this by exchanging heat with the surrounding air via the copper fins that make up the radiator’s core. Heated water flows through these fins and are cooled by the radiator’s fan.
They come in various shapes, sizes, thicknesses and fin densities. In general, the bigger the overall surface area of your radiator, whether that’s one big radiator or multiple smaller ones, the more effective your loop will be dissipating heat, which also leads to less noise as fans can be run at slower speeds (the faster fans rotate, the nosier they can be).
You have to choose a radiator (or multiple radiators) that’s going to comfortably fit in your case. A good rule of thumb to follow is to shoot for a minimum of 120mm/140mm of radiator surface area for each component you are cooling in the loop, and to add another 120/140mm if that part will be overclocked.
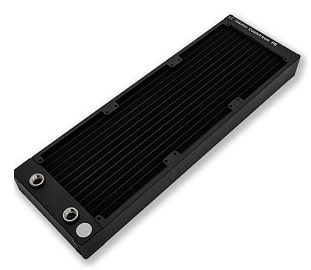 What a water cooling radiator looks like
For example, if you’re designing a custom loop with only an overclocked CPU to be included in the loop, you’ll need 240mm of radiator space, whether that’s 2 x 120mm radiators or 1 x 120mm radiator.
The thickness and fin density of your radiator, measured in FPI (fins per inch), are also fairly important considerations and will dictate what type of fan you want to use on your radiator. Thickness is measured in mm and can range quite a lot from say 20mm to all the way up to around 80mm.
The higher the FPI of a radiator, the higher the static pressure you'll require to effectively circulate cool air through that radiator. An FPI of 30 and above is on the high end, while 10 and under is considered low.
A radiator with a high FPI of over 30 should ideally be paired up with static pressure optimized fans, while lower FPI radiators of say under 15-20 may not see much of a difference with static pressure fans (over airflow fans).
Radiators also have other features such as Crossflow, where there's an inlet on either side of the radiator, as opposed to the standard inlets on the one side, which may help some water loop setups. Some radiators also have various fin materials which can improve performance. Then there's shrouds which are often made of plastic and used to separate the fan and radiator by roughly an inch or so to decrease the size of what's called the “dead zone” - the place of no air that a radiator-mounted fan has. Enthusiasts also use them solely for aesthetic purposes as well.
Video Guide: How to Pick the Right Size Radiator (EKWB)
How to Choose a Water Cooling Pump
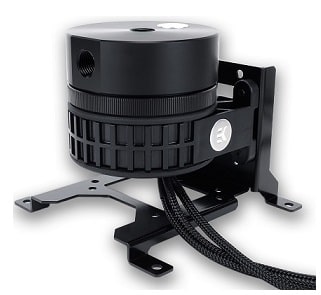 What a water cooling pump looks like
For a custom water cooling setup you'll need a pump to circulate the coolant around your joyous merry-go-round loop of glory. Pumps are the heart of a water cooling configuration and come in all manner of different designs and sizes with varying power requirements and noise output. It's a basic yet crucial component that sets the whole thing in motion, and the more components you wish to water-cool, the stronger your pump needs to be.
The flow rate of the pump measures how much water your pump can circulate without restriction, and is a fairly important consideration to account for. However, the maximum flow rate of a pump that manufacturers mention on their products assumes a zero static head pressure, meaning the actual flow rate would be quite a bit lower than the maximum listed flow rate.
The most common type of water pump these days is called a DC pump, which is the most cost-effective and is generally highly reliable with only the single moving part, although there are more powerful pumps out there for more involved, high-end custom loops. The thing is though, if you want increase cooling performance, you may be better off getting a bigger radiator instead of a stronger pump. As always, don't take our word for it and do your research.
How to Choose a Water Cooling Reservoir
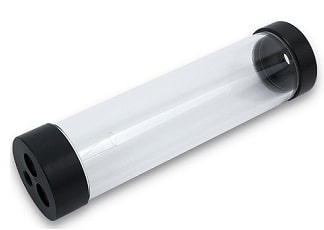 What a water cooling reservoir looks like
In a water cooling loop a reservoir is used to hold the coolant in the loop, making bleeding out bubbles easy. In other words, it allows air bubbles to slowly be replaced by water as it circulates. It's also the filling point for the coolant. Reservoirs come in stand-alone form or as a pump and reservoir combination. Most are designed to be mounted inside your case, while others are mounted inside a 5.25 inch external drive bay.
Some reservoirs also come with pump mounts and other handy features that may come in handy for your particular setup. A reservoir is not technically required for a complete, working water cooling loop but having one is definitely recommend as they can help reduce temperatures and they make filling and bleeding the air out of your loop quite a bit easier.
Choosing Water Cooling Tubing, Springs & Coils
The function of the tubing part of a water cooling setup is pretty self-explanatory, and is what allows the coolant to flow around through all the parts of the system, however it does come in many different types, materials and sizes and so there are a lot of options to consider. The first thing to consider is whether you want to get soft or hard tubing. Soft tubing is more flexible, easier to bend, cheaper and easier to work with so is suggested for beginners.
 You must choose between soft or hard tubing for your loop
Hard tubing requires more work and will need to be heated and bent into shape to reach your fittings, and is only recommended for more experienced hardware enthusiasts or beginners willing to put in the time. When it comes to size, tubing is measured in three ways:
- ID - Short for Inner Diameter, this is the diameter of the inner wall of the tubing and is commonly 1/2 inch, 3/8 inch or 7/16 inch.
- OD – Short for Outer Diameter, this is the measurement of the outer wall of tubing with common sizes being 1/2 inch, 5/8 inch or 3/4 inch.
- Wall Thickness – The difference between the OD and the ID (in other words; OD minus ID).
The tubing you get will be based on both the space you have inside your rig as well as personal preference. Oh, and your budget too, as tubing can really add up if you go for premium-quality. You’ll want to make sure the tubing you get will work with the fittings you get, and that the ID and OD of your tubing is compatible with the ID and OD of your fittings (we will talk a bit about fittings in a bit).
This basically means that they should be the same measurements, however you can generally use tubing that’s smaller than your fittings for a tight fit. If you’re going to be using 1/2 inch tubing or larger, you’ll probably need to get clamps to hold them in place. Tubing also comes in various material types:
- Vinyl – The cheapest option and recommended to avoid if you can as it can quite easily create kinks.
- Clearflex – Better than vinyl and a nice middle-ground option.
- Tygon – The most expensive yet highest-quality, most flexible option for tubing.
What you can also do with your tubing, if you opt for the most economical materials, is add springs or coils made of plastic to the inside and outside of the tubing to keep it round. Springs that go on the inside of the tubing (yet hardly hamper water flow) must fit the ID of your tubing. The coils will go on the outside (and are sometimes used for aesthetic reasons as well) and will need to fit the OD of your tubing.
As for the length of tubing to get, that will depend on your particular setup, but in general you may need around 5-10 feet of tubing for a typical loop. Ideally, you’ll want to get a little extra length than you think you need to have some available headroom, and you may want to get an extra couple of fittings than you think you’ll need too. It would be annoying going to put your system together only to find you’re missing a bit of tubing or a fitting and having to re-order and play the waiting game.
Choosing the Right Water Cooling Fittings
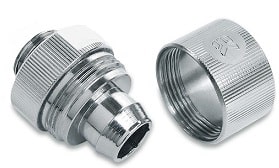 What water cooling fittings look like
The fittings are what allow you to connect your tubing with the other parts in your loop, and they come in various shapes and sizes. Their style will also depend on whether you’re using soft or hard tubing, and in general you’ll be needing two fittings for every part of your loop (ie your water blocks, radiators, reservoir etc).
When it comes to choosing fittings you have the option of either barb fittings, which are basically just a spout that fits onto your loop parts and are the economical option, or compression fittings which are like barbs but with a compression ring on the outside for extra security and a tighter fit.
Compression fittings are more expensive but look better, and they come in either a traditional or acrylic style, with acrylic fittings designed to be used around hard tubing. You can also get angled fittings which can improve the aesthetics of your loop. When looking for barbs you’ll need to make sure the ID of your tubing matches the barb size. As for getting compression fittings, you’ll need to check that both the ID and OD of your tubing will be compatible.
Choosing Water Cooling Coolant & Additives
 Coolant comes in all sorts of colors
Now to the actual liquid that will be gloriously flowing around your loop, coolant is made up of distilled water and additives that kill living organisms and prevent corrosion, and you can either buy specific water cooling coolant or you can buy the additives separately and make up your own.
If you go the do-it-yourself route then make sure to use distilled water, as tap water can contain impurities that may cause algae to grow in your system, which could then lead to clogged up tubing and corrode the water blocks. Reminder to self: avoiding drinking unfiltered tap water whenever possible!
As for the additives to add to your distilled water, a couple of popular options are Biocide and Silver Kill Coils. With Biocide you add a few drops in the water and it’ll prevent anything from growing, with PT Nuke being a good, popular brand.
On the other hand, a Silver Kill Coil is a small piece of silver that you place inside your loop where the water flows that will also prevent life growth (because silver is a natural biocide).
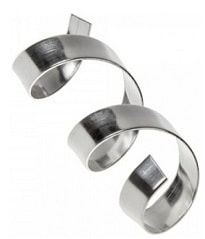 What a kill coil looks like
As well as either Biocide or a Silver Kill Coil, if your custom loop contains more than one type of metal then you’ll want to add an anti-corrosive product to your coolant to, you guessed it, stop corrosion. For example, if you’re using a copper block along with an aluminium radiator, you’ll want to add an anti-corrosive. A good brand for this is Fesser Base.
While not necessary, some people also like to add a hint of dishwashing liquid which can help get rid of bubbles and acts as a surfactant (which is, to avoid getting too technical, something that lowers the surface tension).
As for adding coloring to your coolant; it’s a mixed bag as it can very well cause your system to gum up. If you want a colored water loop, the most reliable option is to get colored tubing which still looks awesome. If you do get colored coolant, do your research as to what others have been experiencing with that particular product.
Choosing the Best Case for Water Cooling
Don’t forget that your selection of computer case is an important part of building a custom water cooled gaming PC, as you’ll need to find one that can accommodate all the parts of your custom loop, and that doesn’t make building your loop too difficult as it’s complex enough as it is.
Your chassis will need the extra room for the radiators; with a standard air cooled system your case only needs fan mounts and 25mm of space as most case fans are that thick. But water cooling radiators start at 25mm thickness and can go all the way up to 80mm, so you need to take that into account plus the extra space for the fans as well. You also need more room for the reservoir, pump and tubing.
When choosing a case for a water cooled gaming PC build it’s not just the size of the chassis that’s important but the internal layout. In fact, it’s possible to use a smaller case for a custom water cooling loop if it’s designed well, although in most cases you will want to get a mid tower at the very least with a full-tower being ideal for the most flexibility.

You want a case that’s actually designed with water cooling in mind, and sticking to brands like Phanteks, Fractal Design, Corsair, In Win, Caselabs, and NZXT who are known to produce great water cooling friendly cases is a good idea. Other brands may also have suitable cases, but the brands just mentioned are among the best of the best when it comes to water cooling setups.
You’ll have to do your own thorough research on the exact case you choose to make doubly sure that it’s going to suit your exact custom loop without issues. The cases we include in the higher-end builds of our monthly best gaming PC builds section (ie the builds $1500 and over) are almost always water-cooling friendly, so those may be solid choices for installing a loop. Check out the completed water cooling PC builds at PCPartPicker for ideas too, and check out this great guide by EK for more tips on choosing a case.
Where to Buy Water Cooling Parts (Stores)
Below we’ve listed some of the current most popular stores across North America, Canada, UK, and Australia where you can buy a good range of water cooling components (besides Amazon, which kinda goes without saying these days as most people know to check Amazon prices first as they are always competitive). Apologies if your country is not included below as the below countries are the ones I know well in terms of the hardware market; I'm less savvy about the hardware market in other countries.
How to Install a Water Cooling Loop
Accompanying photos for the below steps on installing your custom loop coming soon once my next PC build is complete (which will hopefully have a loop!). You can stay notified as soon as the updated edition of this guide with the new photos releases by subscribing to our email newsletter at the bottom of the page. For now, below are the general steps and precautions to install all the parts to a custom loop once you've finished installing all your main PC hardware components (assuming you're building an entire water cooled PC from scratch). But see the linked video later in this guide for further help too (under our 2020 recommended RTX 2080 Ti water cooled build).
Tools Needed to Install a Water Cooling Loop
Once you have all the parts you need for your loop and you’re beaming with excitement to finally put this thing together and claim your rightful place alongside the hardware elite, there are a couple things to know about first before you jump headfirst into mounting your parts.
See Also: Tools Required to Build a PC (& ESD Equipment)
One of those is to make sure you have everything you need to finish the installation process. It’s ideal to install a custom loop all in the one day so you don’t lose track of what you’ve done and what remains to be done, so if you’re new then make sure you have a nice chunk of time set aside to get your build finished.
Give yourself 4 hours minimum but you may very well need even longer for unforeseen obstacles you may have to work through. Since building a water cooling loop is quite a bit more involved than a typical PC build, you’ll be needing more tools than you would normally need for a standard build, especially if you want to be fully prepared:
- Screwdrivers – You may only need the one size as with building a normal PC (phillips-head #2) but it’s best to have a range of different screwdrivers as your water cooling installation may call upon them.
- Allen Key – Also called Hex Keys, you may need this to tighten certain screws within your loop setup.
- Measurement Instrument – You may need a ruler or measuring tape during the planning process to map out exactly where your components can fit.
- Flashlight – PC cases can really block out light well, so get a flashlight and have someone to hold it for you if possible, or a get headlamp or adjustable lamp.
- Paper Towel – To clean up any spillages you make along the way, and to dry your parts when washing them before installation.
- Needle-Nose Pliers – A handy multi-purpose tool used for gripping, pulling, bending and cutting.
- Funnel – Using a funnel makes filling and flushing your loop a lot easier. Make sure it’s big/small enough to fit inside the tubing size you choose.
Plan the Installation Ahead
If you haven’t already done so, it’s the time to plan and think through your installation now, such as exactly where your parts are going to mount in your case, the order of your loop, and where your tubing will run. Knowing these things before you start will make the installation process a lot simpler and you’ll have a basic roadmap to refer to. It might help to actually draw a basic sketch on paper if that’s how you roll. You don’t want to just wing the process and then find out you have to backtrack and uninstall your hard work and start something again. Even though you should already be fairly familiar with your case, as you would have needed to research its viability for your water cooling setup, now is the time to get fully accustomed with its inside and think about exactly where everything is going to go.
Water cooling setups are pretty flexible, but one thing you’ll definitely want to plan for is to have your reservoir sitting just before your pump in the loop order. This promotes maximum flow, encourages air bubbles to float away from the pump, and ensures the pump never runs dry. Your case will determine where your reservoir fits, and you may be able to install it in a drive bay just like you would install a DVD drive. Alternatively you may need to mount it elsewhere and use Velcro or the mounting hardware it should have came with. Same thing with the pump.
Your water blocks will simply fit onto your CPU, GPU/s, and any other parts you’ll be cooling. Your radiator will usually mount either on the vent where your case fans would go or on the bottom of your case if it’s big enough. Otherwise you’ll need to mount it using brackets that should have come with the radiator. After planning your loop to have the reservoir before the pump, you can basically map out the rest of your loop in any order that you wish, so keep it simple and do what is easiest to install, easiest to maintain, and looks the best to you.
You’ll hardly notice a difference in performance with different loop orders, unless you’re a high-end enthusiast creating an extreme and complicated setup and you care about the miniscule details and every little 1%. In that case you also want to consider setting up a separate, parallel loop using splitters so that the last component in your loop doesn’t get the leftover heated coolant from all the previous parts in the loop order, but for most building a typical water cooling setup the order doesn’t matter so long as you make sure your reservoir is before your pump.
Build & Test Base System
If you’re adding a water cooling loop to an already functioning machine, don’t worry about this step, but if you’re building a new PC build from scratch then you’ll want to build your PC as per normal without the water cooling first to test that everything is working fine and dandy. The last thing you want to do is build your PC along with your custom loop without testing your components, and then having issues with booting up and having to go back and undo the work you put in to install the loop to remove components for testing if they’re dead.
As well as making sure your PC is running without issues before going ahead and installing your loop, be sure your cable management is nice and neatly done so you don’t have any cables in the way, you have maximum room to work with, and your PC’s cooling is maximized. Lastly, ensure your install your PSU with the intake fan facing down (if you have bottom vents on your case like any good modern chassis will). The last thing you want is any water leakage dripping into your PSU and potentially wreaking havoc on your system.
See Also: How to Assemble a Computer from Scratch
Clean Loop Components Beforehand
Yep, you haven't even started building your water cooled PC and it's maintenace time already :) There’s no need for preliminary cleaning when installing standard PC hardware, as parts are ready to install straight from the box, but when it comes to water cooling parts it’s likely (and recommended) that you will need to clean your components first. You can simply rinse your water blocks, reservoir and tubing under a tap, and with your radiators you’ll want to heat up some distilled water (or tap water if you don’t have any) and pour it inside. Plug up the holes and shake it well for 30 seconds or so and then empty it. Repeat until no debris comes out with the water. Dry everything off by leaving your parts out for a while or use paper towels.
How to Install a CPU Water Block
First of all, you want to mount the CPU water block which is very similar to installing an aftermarket CPU cooler. Your water block may or may not have come with instructions, but they’re all fairly similar to install. Before handling any of your components such as your motherboard, don’t forget about static electricity best practices. Either wear an anti-static wrist strap or continually ground yourself throughout the installation process by regularly touching the metal part of your case or another metallic object.
If your water block has a plastic backing for the backplate then go ahead and secure that to the backplate. Then prepare the four corners of your backplate with the corresponding standoff screws and a single washer for each hole. The standoff screws should be the longest screws that came with your block. Then you’ll have to remove your motherboard so you have better access, and line up each of the four corners of the backplate with the holes on your motherboard that surround your CPU, and add another washer to each screw and then a nut which you should tighten evenly and carefully. Once the backplate is securely fitted it’s time to return the motherboard to its rightful place inside your case (if you prefer) and then mount the block.
Before installing the block you will need to apply thermal paste to the top of your CPU by placing a tiny blob (grain of rice) in the middle and evenly spreading it around the CPU using your finger wrapped up in a bit of plastic or some other means. You can use any paste provided or buy your own such as the high-quality Artic 5 paste which is popular among enthusiasts. If you’ve had to uninstall an air cooler that was installed onto your CPU, make sure to fully remove any old thermal paste that is left over on your CPU as well.
Now place the water block over your CPU and the backplate screws, and add a washer and a spring to each screw. Use the thumb screws provided to secure each corner evenly by gradually tightening each screw a few twists at a time instead of fully tightening one at a time. You want to apply even, gradual pressure to your CPU and motherboard. You also want to avoid tightening the block too much; as long as the block is well secured to the CPU and the motherboard, that’s all the pressure you need.
Also, be very careful when installing and/or adding custom parts like this to any PC. Keep a look out for anything that may damage your existing hardware; for example a common potential issue is your mounting hardware screws or washers putting too much pressure on a resistor on the back of your motherboard. Don’t rush anything and be gentle.
Video Steps for AMD:
Installing the EK-Supremacy Classic CPU Block on AMD Socket AM4 (EKWB)
Video Steps for Intel:
Installing the EK-Supremacy Classic CPU Block on Intel Socket 115x (EKWB)
Installing the EK-Supremacy Classic CPU Block on Intel Socket 20xx (EKWB)
How to Install a GPU Water Block
If you’re not just cooling your CPU, and going full beast mode with an all-water (or mostly water) rig, your graphics card/s, RAM, and other components will need a water block installed. How you go about this will depend on your build, but here's a good place to start:
Video Steps: How to Install a Full-Cover EK GPU Water Block (EKWB)
How to Install a Water Cooling Radiator
Your radiator can either mount on the vent your fans usually go, or on the bottom of your case if you have a large enough chassis. If neither of these work for you, you’ll need to install it externally using the brackets that it came with. Installing the radiator should be fairly simple but will vary slightly in procedure depending on the radiator/s you’re using and your case. Just remember PC building 101; don’t overtighten the radiator screws as it’s possible they may go right through the fins and create a leak.
Your radiator should come with all the screws necessary, but perhaps not so be prepared with extra mounting hardware like longer screws and more washers if you can. For the radiator fans you probably want to install them so they blow air from inside the case up through the radiator and out the top of the case.
Video Steps: Install the Radiator (EKWB)
How to Install a Water Cooling Reservoir
If you’re using a separate reservoir and pump (as opposed to a pump-reservoir combo) then setting up your reservoir first will give you an idea of how the pump will be positioned as well as how the loop will have to be routed to connect to the ports on the reservoir.
A common location to install the reservoir is the spare area in your case where extra HDD brackets would be installed, and you can mount it either using any mounting hardware than came with the reservoir or by using Velcro. If you have a bay reservoir you would simply slide it into a spare drive bay and screw it into place just like when installing a DVD drive.
When using the mounting hardware to install the reservoir, you may already have spare evenly spaced holes in your case to attach the clamps, otherwise you may want to create these holes carefully using a drill (and using a drill bit that is just a fraction larger than your screws).
How to Install a Water Cooling Pump
How you install the pump will vary from model to model, and it may or may not be one of the trickier parts to install. Most pumps will have a single inlet and outlet port and you’ll need to route your tubing in a way that takes this into account.
Some pumps can simply be secured at the base of a 5.25 inch drive bay and held tight with Velcro, others may have a set of tabs that hold the pump in place and can be secured using screws. You could also use a foam pad with double sided tape on both sides. When the time comes don’t forget to connect your pump to a motherboard header or your power supply (you may need an adapter).
Video Steps: Installing the Pump (EKWB)
How to Install Water Cooling Tubing and Fittings
Now that your water block/s, radiator/s, pump and reservoir are all properly in place within your case, it’s time to add the tubing and fittings which connects everything together. For each connection in your loop, attach the fittings making sure they’re nice and tight before attaching the tubing so as to avoid leaks.
Line up your tubing between the two connection points and cut off the tubing using sharp scissors or a special cutter, and keep a little bit more than you think you’ll need (around 1/2 to a full inch more). Better to have more than you need that you can simply trim off after, rather than cutting it too short. Try to cut the tubing as straight as possible otherwise it may not seal on the fitting properly and could cause a leak.
Do this for all connections, and then start attaching those measured tubes to the fittings, making sure they’re going to the correct fitting. Your block/s, pump and reservoir will have an inlet and outlet labelled. As for the radiator, it doesn’t matter which holes you use. If you have trouble with fitting the tubing, some needle-nose pliers can come in handy to gently stretch the tubing a little bit so you can more easily install it. Using swivel fittings can make this process quite a bit easier as they’ll allow you a more flexible range of angles to use.
While installing your tubing you may find that a piece makes too sharp of a turn and creates a kink. This is not good for water flow, and if this occurs you may want to use some longer tubing or rearrange the order of your loop. Disconnecting tubing from your fittings may be quite hard to do, and in some cases you may even need to cut it off unfortunately. If using barb fittings, use zipties or hose clamps to secure them further and make your loop that little bit safer, even if your fittings do indeed feel tight. Tubing can slowly slip off the barbs over time.
Video Steps: Measuring, Cutting and Installing the Tubes (EKWB)
How to Prepare the Loop for Filling
Now that all the parts of the loop, the tubing, and all the fittings are securely and snugly installed in your PC, do a final check over everything to ensure your loop is ready for that holy water. Make sure your PC is turned off on both the case and the wall, and make sure to disconnect all the power supply cables. We’ll be using your PSU later to solely test the pump, but we don’t want it to power anything else in your system.
If you’re wondering how to start your pump without your PC powered on (it shouldn’t be!) – you can use a 12V power supply with enough current to run your pump, or you’ll need to jumpstart your power supply using a 24pin jumper (female 24pin with wire running from the green power wire to any of the grounds which tricks the PSU into thinking it’s plugged into your motherboard).
You could also use a paperclip to start your PSU (by bridging the two power points on the PSU) or use a special bridge connector. Some water cooling kits will come with an ATX bridging plug for this purpose. Whatever you do, be careful and make sure you know what you’re doing when it comes to the power supply. Place paper towel down inside your case in a way that covers your components as best you can. This is to help absorb any small leaks and to more easily spot a leak in the first place.
If you do encounter a leak as you go through the upcoming filling of your loop, and some water gets on your hardware components, relax as there’s a very small chance of damage if you’re using distilled water and there’s no power being drawn to those components. Simply absorb the leak with paper towel, slowly drain out your loop, fix the leak, and then continue. Using non-conductive coolant also helps to keep your hardware safe but is not necessary.
Make sure that your reservoir is above your pump (height-wise) so that the liquid will flow into the pump via gravity, and attach a fitting and a bit of spare tubing into the fill port on the top of the reservoir. You might need to use a multi-port top adapter, depending on your reservoir. You might also be able to do without the bit of tubing and simply stick a funnel straight into your reservoir.
You could fill your loop another way such as using a fill bottle, but this method of using spare tubing and a funnel is cheapest and still works well for beginners. Although there is a potential disadvantage to this method: depending on your reservoir, you may not have a vent port on the top of the reservoir which means the air in the loop being replaced by water has got to exit the same way that the water goes in. This will cause an air plug, but you can simply try raising the funnel higher or tilt your case around to get around this.
How to Fill a Water Cooling Loop
Carefully pour your coolant in through the reservoir using the funnel until you can’t fit anymore in. When you first fill a loop it will only fill to a certain point backing up into the reservoir. When that happens it’s time to turn the pump on which will move the water into the rest of the loop and draw water from the reservoir, but before you turn on the power supply and the pump (using whichever method you’ve decided on) you want to “prime” the pump.
Priming the pump means being sure your pump has water in it before you turn it on or continue running it, as using the pump when dry can damage it quickly (literally within a few seconds) as water is its only source of lubricant. It may be difficult to tell if the pump has water inside or not without actually turning it on, so after turning it on you’ll want to immediately check to see if it starts moving water (you should hear it). If it doesn’t, then turn it off straight away and re-fill the reservoir to continue.
If when re-starting the pump it seems to not move any water at all, shake your case a little form side to side or let gravity work its magic by positioning your case so that the pump is at the bottom of your loop. So, continue filling your reservoir with coolant and then carefully running the pump (checking immediately that there is water in the pump) until the coolant gets back around to the fill area and can keep going around the loop without extra coolant.
Do so until the air bubbles start to get pushed out; you may need to carefully tip your case left right, back and forth. As bubbles come out your pump should begin to run quieter. Don’t worry if there are few bubbles left as they should go away in time.
Video Steps: Filling the Loop (EKWB)
Testing Your Loop
You should let your loop run for at least 12 hours, 24 ideally, to check for leaks as they sometimes take a while to be noticed. You want to be confident the loop is working securely before running your PC as normal. Set up fresh paper towel before you leave your loop to run, and come back every now and then to check if they’re damp at all. You could also keep an eye on the water level in your reservoir; water does evaporate which is natural, but large amounts of missing water could be a sign of a leak.
If there is a leak you will need to drain the loop by disconnecting a tube near the bottom of the loop and draining the water out. Then try to locate the source of the leak; check if any fittings were over-tightened or not tight enough, check the seals in the fittings, and look carefully for any mini cuts in the tubing. Once you find and fix the leak, you can refill the loop.
After you’ve tested the loop for 12-24 hours and you’re happy with operations, it’s time to remove that 24pin jumper from your power supply (or remove whichever temporary power solution you used) and return your PSU to normal operations by plugging all the power connectors back in.
Get your PC up and running properly, and put yourself on the back for completing your very first custom loop! It’s a solid achievement, and you’re now a true PC enthusiast or modder. Or genius. Or Elon Musk. Next step; invent a Starship. Oh, wait - too late. Mars here we come. If it's only the Moon in my lifetime, I'll take that any day. Just like Tintin. Ok, let's get back on track here, writing this long-winded, super detailed guide has taken its toll on my mental state methinks. Where were we?
Stress-Test Those Temps (Translation: Run Crysis)
It’s now time to do some monitoring to check your loop is doing its job and nothing is overheating. If a part is overheating, it could mean a badly mounted water block or another issue. When monitoring temperatures of your new water cooling PC, it goes without saying but just remember that the temperatures you'll see when your system is idle probably won’t be impressive. It’s only when under load such as heavy gaming or when you overclock your PC that your loop starts to work its magic on temps and/or noise reduction.
There's plenty of options out there but a decent free program for monitoring your CPU and GPU temperatures (among other features) is NZXT’s CAM which is very beginner friendly. Over the first few weeks of your new water cooling system, you also want to occasionally check inside your case for any abnormal water levels, sneaky leaks, and to make sure everything continues to run well.
See Also: Best Software for a New Gaming PC
Open Loop Water Cooling Maintenance
Once you've installed the loop into your rig, you can't just set and forget it forever as there's a bit of periodic maintenance to be done to keep everything running nice and smooth. The water in your loop will start to get pretty dirty over time, so it’s a good idea to refill with new liquid every now and then. Thankfully, maintaining a water cooled PC is very easy and doesn't require much of a time investment. Though I guess that's subjective, as for some it can be perceived as quite the headache to drain your loop empty and rinse all the parts (as in, all water blocks, radiators, and the reservoir; don't go rinsing that motherboard).
Sounds annoying, but the good news is the general consensus on this from Reddit's helpful water cooling community is you only need to do this every 6 months minimum, and once a year is okay if you're feeling a little lazy and don't mind risking it. But it does depend on the coolant you're using, too. For clear coolant like biocide, doing the clean once a year is fine, but for dyed or swirly coolant, every 6 months (and even 3 months if you want to be super safe) is recommended.
Refilling every now and again will also help to keep your loop working optimally with hardware temperatures at their lowest. If you want to care for your system even further, when you do your routine 6 month (or more frequent) maintenance you may wish to also replace the tubing with new tubing if it has gotten quite stained.
Anyway, that's just a couple pointers, but for full details on how to maintain your loop, and until I add my own video tutorial on this one day (it's one of many future to-do's) enter a couple usual tech suspects, Paul and Linus, to take it from here:
Water Cooled RTX 2080 Ti SLI Build (Example)
Now let's put everything together into a full sample PC build with a custom water loop, based on this guy's water build using mostly EKWB parts (a high quality manufacturer of water cooling components). This build has dual GPUs using NVidia SLI, but this setup would also be great for a single GPU build. Also, if you want to use a RTX 3080 or RTX 3090 instead of the RTX 2080 Ti, make sure to get a compatible GPU water block since they are different.
See Also: SLI Requirements & Compatibility
The video I linked has a time lapse for the build too, which doesn't explain installation in detail but if you watch it at like 0.25 speed and combine it with the steps I outlined above it should be enough for you to finish installation (assuming you already have PC building experience; this build is NOT recommended for first-time builders). Also make sure to give the guy a like on his excellent video. Anyway, here's his build, with a couple of minor tweaks for the US market (the guy is in Germany).
The Extreme Water Cooled Gaming PC Build:
- CPU: Intel Core i9-9900K
- Graphics: 2 x EVGA RTX 2080 Ti Black (SLI Mode)
- Motherboard: ASUS ROG Maximus XI Formula
- RAM: Corsair Dominator Platinum 32GB 4000MHz (4x8GB) (or 2 x Corsair Dominator Platinum 16GB 4000MHz (2x8GB))
- SSD: Samsung 970 PRO NVMe M.2 1TB
- Case: INWIN 909 Silver
- PSU: Corsair AX1600i Titanium or EVGA SuperNOVA 1600 G2 Gold
- Front Intake Fans: 2x be quiet! Silent Wings 3 Highspeed 140mm (install on front)
- Rear Exhaust Fans: 3x Corsair SP120 RGB
- Radiator 1: EK-CoolStream SE 280
- Radiator 2: EK-CoolStream XE 360
- CPU Waterblock: EK-Velocity RGB Intel (Nickel)
- GPU Waterblock: 2 x EK-Vector 2080 Ti RGB (Nickel + Acetal)
- GPU Backplate: EK-Vector RTX Backplate (Nickel)
- Pump: EK-XRES 140 Revo D5 RGB PWM
- Reservoir: EK-RES X3 TUBE 250
- Tubes: EK-HD Tube 10/12mm
- Fittings: EK-AF G1/4 (Black Nickel)
- Fittings: EK-HDC G1/4 (Black Nickel)
- Coolant: EK-CryoFuel Solid Cloud White Concentrate
At first, learning how to build a custom water cooling computer may sound like some far-fetched, out-of-reach dream as a gamer - and even as a hardware enthusiast of sorts - and a topic that sounds like it belongs as part of a rocket science curriculum or Elon Musk's day to day. But as you'll start to realize through the steps explained in this guide, there's really nothing to be afraid of, even if you're still fairly new to building computers. If you had no trouble assembling a standard PC then you should be good with some patience and interest in making it work.
That said, building a water cooled PC - at least an open-loop system and not a simpler closed-loop AiO liquid system - is definitely not for everyone and more a passion project for those who feel drawn to spending the time to do it. Hope this guide helped give you a good general overview for you to continue your research and learning; I don't claim to be a water cooling expert by any stretch of the imagination, and writing this guide was a way for me to also learn a ton along the way myself.
|
ABOUT BGC Helping you build better systems for less, here at Build-Gaming-Computers.com you'll find simultaneously comprehensive yet simplified guides and tutorials, including continuously updated PC build examples. Always as objective and unbiased as possible with product recommendations, and with little to no ads. |
Intro | Best PC Builds | Best Cases | PC Assembly | Prebuilt PCs | PSU Guide | VR Headsets | Privacy | Contact | Donate | Archives

Copyright (C) 2006-2025 Build-Gaming-Computers dot com All Rights Reserved
As an Amazon Associate we earn from qualifying purchases
For the Love of Gaming + Flawless Frame Rates