Home > PC Assembly > Connect Front Panel
How to Connect Front Panel Cables to Motherboard
Step-by-Step Installation Walkthrough Tutorial for Beginners (& Photos)

Installing the case front panel connectors to the motherboard is not hard to do, but might take you a few minutes or more to figure out which exact motherboard headers (just a fancy word for connections) you need to plug your front panel connectors into as every case and motherboard will be slightly different.
In this guide we'll give you some tips on how to do this, with photo examples from our own build example. This guide is part of our main How to Assemble a PC tutorial, so see that article for all the other before and after steps.
1. What are Front Panel Connections?
Before we get into how to connect motherboard front panel connectors, let's take a step back for a sec and cover the absolute basics for anyone wondering what the front panel connectors on a motherboard are for. The front panel of your computer case will have a number of easy-access features such as USB and audio ports, as well as basic functions for your system like the power-on and off buttons.
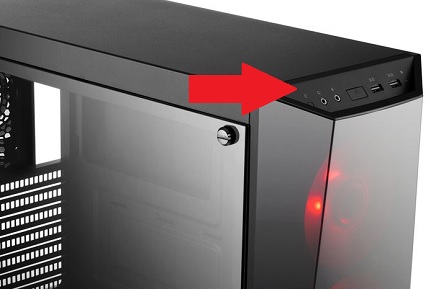
A typical case will have the following front panel features:
- Power switch: Switches your system on or off.
- Reset switch: Used when you need to return the PC to a known state if it freezes.
- Power light: The light you see illuminated when your PC is turned on.
- Hard drive light: Indicates that one or more of your hard drives is active.
- Headphone jack: Where you plug in your headphones/headset.
- Mic jack: Where you plug in audio recording devices such as microphones.
- USB ports: There are various USB speeds including USB 2.0, USB 3.0, USB 3.1, USB-C, etc, and a case will often color-code different types. Thanks, case. On ours for this tutorial, 3.0 ports are blue and 2.0 ones are black.
Some cases might have some fancier features on the front panel, but you must ensure your motherboard actually supports all the front-panel features of your particular case if you want to be able to use them all. This is something to consider when choosing a motherboard for your computer case, especially if you're using a high-end case with fancy features.
The front panel features of a case must be plugged directly into the motherboard, which is what this guide will explain. Before learning how to connect motherboard front panel connectors though, you want to have finished installing your motherboard securely into your case. Done that? Let's get into it.
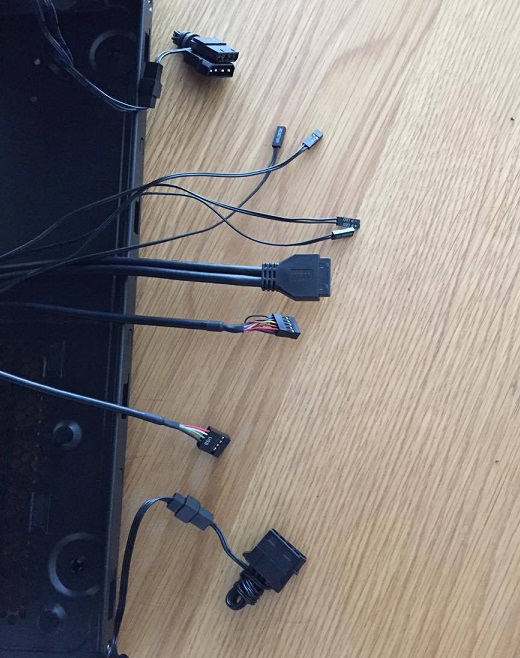
Your case will have pre-attached front panel cables like these, which plug into the motherboard
2. Locate Front Panel Headers on Motherboard
Before you connect front panel connectors to the motherboard, you'll want to first locate where all the cables need to plug in on your motherboard. It might not be immediately apparent where to connect the front panel connectors to your motherboard, and the way they are labelled varies from board to board. This is one step of building a PC that you definitely want to consult your (motherboard) manual for.
Below is what our particular MSI motherboard for our example build includes in the manual on this, but go and find this section in your own manual to know exactly where to connect the front panel connectors for your particular motherboard and case. Our motherboard didn't come with a full manual, and only a quick installation guide which didn't cover how to connect front panel connectors, so we had to download the full manual from the manufacturer's website. You may have to do the same if there's no information on front panel connections in the manual you had shipped out.
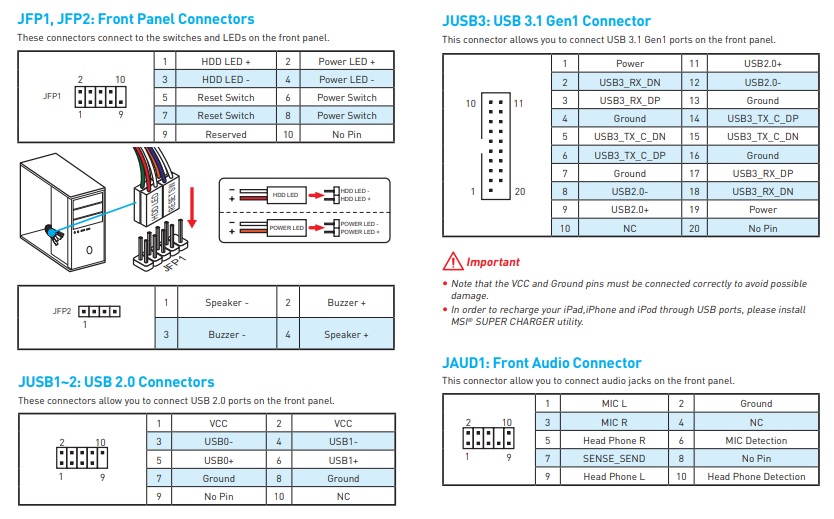
Check your motherboard manual to know where to connect your front panel cables (Source: MSI)
3. Route Front Panel Cables Through Back of Case
As well as first finding out where the cables must go, before you actually connect the motherboard front panel connectors you also want to think through a little basic cable management. The aim is to minimize any loose/excess front-panel cables that hover around your motherboard and the middle inside area of your case. This will promote better airflow, keep your build looking neat, and make components easier to access now and later on.
By knowing exactly where everything plugs in and pretending to connect everything, you get a sense of how loose the cables will be once they're plugged in and can therefore plan ahead to tuck the cables away more neatly somehow.
If a certain front panel connection will seem quite loose once connected, try to thread/route the cables through any holes available in the back (as in the rear side panel) of your case which will help you avoid having loose cables that hangs around in the middle of your case/motherboard area.
Most cases will have these cable management holes on the back which are designed for this exact purpose. Our case has some holes, and so we've threaded the front panel connector cables through them as you can see:
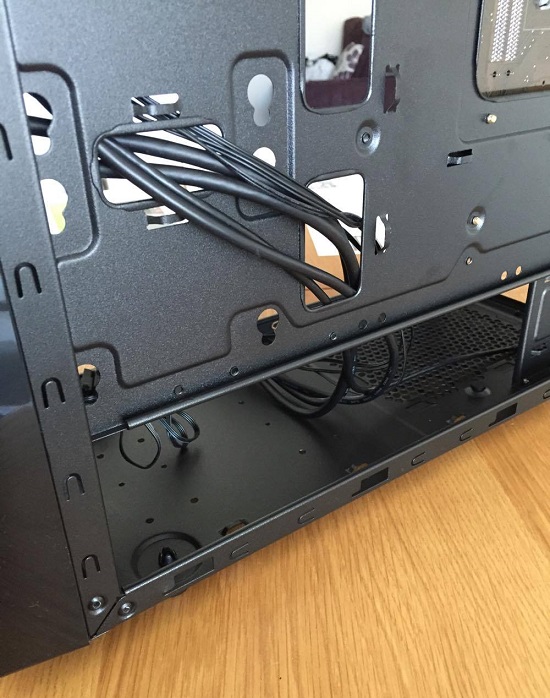
Most cases have space in the back for excess cables to hang out in peace (& out of sight)
4. Connect Front Panel Cables to Motherboard Headers
Ok, now you've considered a little basic cable management to save you trouble later on, and you're certain of where the front panel cables connect to, it's time to plug them all in. Do this carefully and don't force anything too hard as they should naturally plug in without much effort. The exception being the USB 3.0 connector which is a bigger connector and may need a little extra push to insert correctly, but make sure you've aligned it the right way before adding any force to it so you don't damage anything.
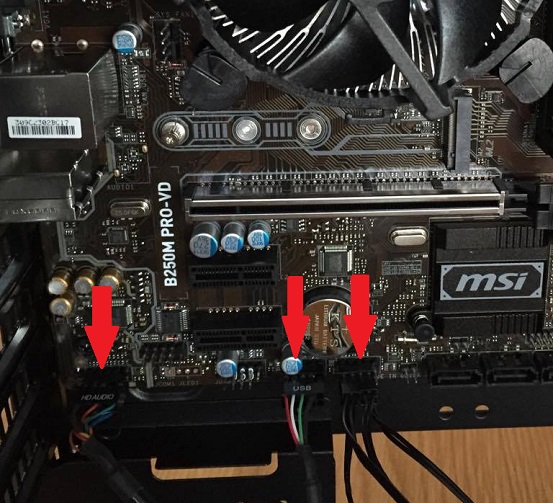
Connect your case's front panel connectors to the correct motherboard headers
Also be aware some of the front panel connections (the power switch, HDD LED and power LED for our particular board and perhaps the same for you) have both a positive and negative connection to link up to the corresponding positive and negative port on the motherboard. These three (or six if counting the + and -) wires will likely need to connect onto the same port on the motherboard (a row of double pins) side by side, and without spacing between them. Incorrectly installing the front panel connections may lead to damaging the board and/or first boot problems, so don't rush this process and get the connections right.
Related: Power Supply Cable Management Basics
Trusted VPN
VPN software can be important in this day and age, especially if you do lots of online banking and/or use public WiFi whilst travelling. Having a VPN adds an extra layer of security to your PC or laptop when online to help protect your data, passwords, financials, etc from hackers or malicious programs. It can also let you access region-locked content (eg US Netflix from overseas). For gamers their can be even more benefits to using a VPN.
Because they're so popular these days, there are countless VPN providers, and it can be confusing to pick one. If you want my 2 cents, after a lot of research I decided on NordVPN 'cause it's one of the fastest, most reliable VPNs for both gaming and general use, with a lot of credible reviews out there backing that up. They also quite often run very solid deals.
Popular Articles (see all)
Search the Site
About the Author (2025 Update)
I'm an indie game developer currently very deep in development on my first public release, a highly-immersive VR spy shooter set in a realistic near-future releasing on Steam when it's ready. The game is partly inspired by some of my favorites of all time including Perfect Dark, MGS1 and 2, HL2, Splinter Cell, KOTOR, and Deus Ex (also movies like SW1-6, The Matrix, Bladerunner, and 5th Element).
Researching, writing, and periodically updating this site helps a little with self-funding the game as I earn a few dollars here and there from Amazon's affiliate program (if you click an Amazon link on this site and buy something, I get a tiny cut of the total sale, at no extra cost to you).
Hope the site helps save you money or frustration when building a PC, and if you want to support the countless hours gone into creating and fine-tuning the many guides and tutorials on the site, besides using my Amazon links if purchasing something, sharing an article on socials or Reddit does help and is much appreciated.

|
ABOUT BGC Helping you build better systems for less, here at Build-Gaming-Computers.com you'll find simultaneously comprehensive yet simplified guides and tutorials, including continuously updated PC build examples. Always as objective and unbiased as possible with product recommendations, and with little to no ads. |
Intro | Best PC Builds | Best Cases | PC Assembly | Prebuilt PCs | PSU Guide | VR Headsets | Privacy | Contact | Donate | Archives

Copyright (C) 2006-2025 Build-Gaming-Computers dot com All Rights Reserved
As an Amazon Associate we earn from qualifying purchases
For the Love of Gaming + Flawless Frame Rates