Home > PC Assembly > Install GPU
How to Install Graphics Card on Motherboard
PCIe GPU Installation Walkthrough for Beginners (With Photos & Diagrams)

Learn how to install a graphics card onto your motherboard with this detailed yet easy to understand step by step guide. For most gaming PC builds, installing your graphics card and securing it to your computer case shouldn't take you more than a few minutes. Once the GPU is installed correctly, it's simply a matter of connecting cables and you're done, but we'll get to all of that. Firstly, you want to know which PCIe slot to install your graphics card in.
See Also: How to Choose the Best GPU
1. Find the Best PCIe Slot to Install the GPU
All modern graphics cards fit into a PCIe (PCI Express) slot on your motherboard. Specifically, you install the GPU into a PCIe x16 slot, which is a full-sized slot and not one of the short PCIe slot which are used for other components like wireless desktop adapters. If your motherboard only has one full-sized (x16) PCIe slot, that's where your bad boy is going to go just like with our own microATX motherboard for this example build:
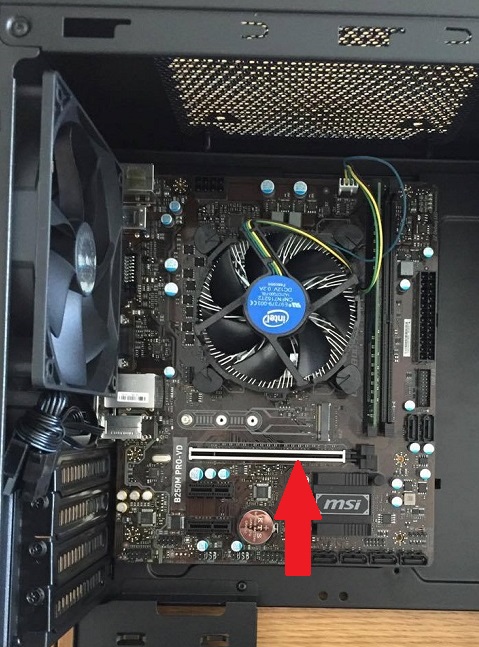
mATX motherboards will only have 1 full-sized PCIe slot for GPU installation
For full-sized ATX motherboards (or larger) you might have 2, 3 or even 4 full-length PCIe slots, in which case you'll want to install the graphics card into the top/first PCIe slot (the one closest to the CPU) unless there's a reason for you not to do so, such as having an extra large CPU cooler in the way that means you would have to install the graphics card in the second slot.
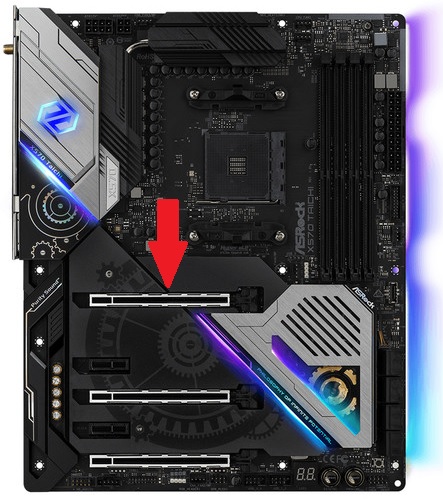
If your board has more than 1 PCIe x16 slot, install the GPU in the top slot if you can
Does it Matter Which Slot You Install the GPU?
The first PCIe x16 slot is guaranteed to run at x16 speed, but with the second or third PCIe slots, there's no guarantee it will run at x16 - even if your motherboard specifications list those additional slots as x16. The thing is, it could physically be a x16 slot, but actually run at x8 (confusing, I know).
If that's true for your particular motherboard, try to use the first slot somehow but don't worry too much if you have to install the graphics card in the second slot as the performance difference between a GPU running at x16 vs x8 isn't something you're going to notice. If you install the GPU in the second slot and want to check what speed it's running at, you can use a tool like GPUZ.
To learn more, see the test done by GamersNexus on PCIe 3.0 x16 vs x8. Their conclusion on this was as follows:
"From a quick look, there is a little below a 1% performance difference in PCI-e 3.0 x16 and PCI-e 3.0 x8 slots. The difference is not even close to perceptible and should be ignored as inconsequential to users fretting over potential slot or lane limitations." - Steve Burke, GamersNexus
2. Remove Case Expansion Bracket/s
Depending on how big/wide your graphics card is, you'll need to remove either one or two rear metal brackets in the back of your case by simply unscrewing them (some cases may require you to snap them off instead). If your GPU is either a 1 or 1.5 slot model, just remove one bracket. For 2, 2.5, 2.75 slot GPUs, you'll need to get rid of 2 brackets. See our guide to different GPU slot sizes if you're interested to learn more about this, but most modern GPUs will take up 2 case slots (as in, 2 rear metal brackets, not to be confused with PCIe slots) unless you're installing a small or thin graphics card.
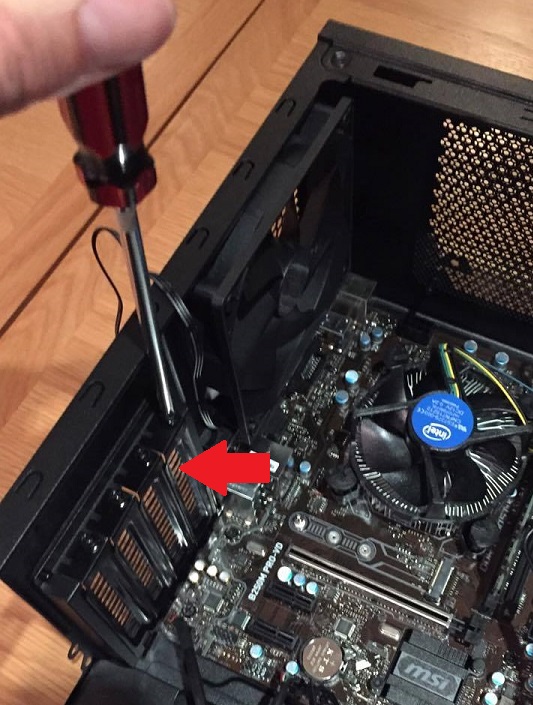
Unscrew the metal bracket/s next to the PCIe slot
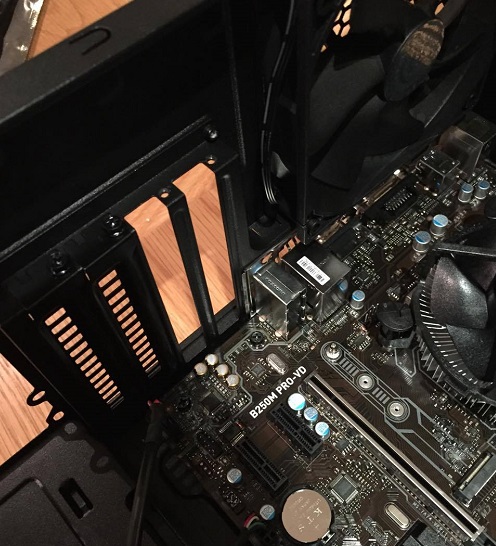
Our Gigabyte 1050 Ti OC is a dual-slot model, so we need to remove 2 brackets
3. Unlock Retention Clip and Remove Cover
Like with RAM slots, the graphics card PCIe x16 slot might have a clip (ie retention clip) that you need to unlock before you can install the graphics card. On some motherboards (like ours) the PCIe clip will also automatically lock back into place once you insert the GPU.
Now it's finally time for the king's entrance. As with handling all hardware components, before grabbing your GPU you want to ground yourself by touching a metal object (if you're not using anti-static PC building equipment like a strap or mat). Hold your GPU by its metal edge, and remove the cover over the bottom cutout of the card (the bit that you physically connect to the motherboard slot) if your card has one like our Gigabyte does.
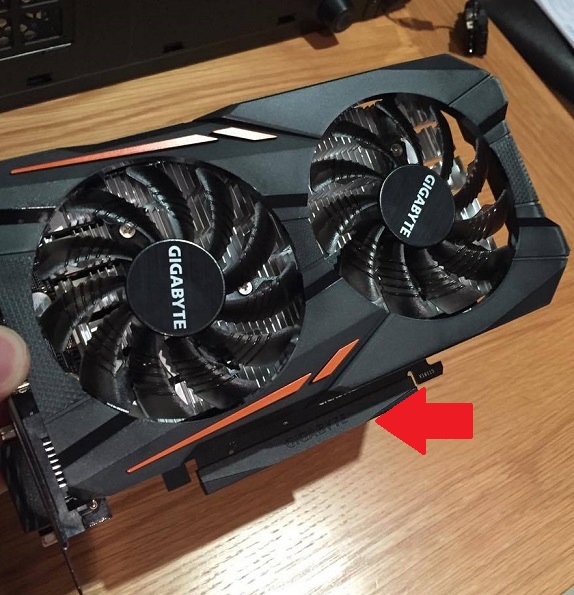
If there's a cover on the bottom, remove it before installing the GPU
4. Fit and Secure Graphics Card
Now, carefully lower your graphics card into the case, first aligning it to the back of the case in the proper position, then carefully inserting the bottom of the card into the PCIe socket on the motherboard. Ensure you've lined up the back and the connector of the card properly and securely, and give it a gentle but firm press down from the top of the card until you feel it's firmly in place.
As mentioned before, on some motherboards the PCIe retention clip may automatically lock back into place when the card is fully inserted. Otherwise you'll need to manually lock the clip by pushing it back into place. Check from the rear of your case that the connections (HDMI/DisplayPort etc) are lined up properly.
Now, re-screw the same screw/s that you removed in step 2 back into the top of the metal brackets to fully secure your graphics card into the case:
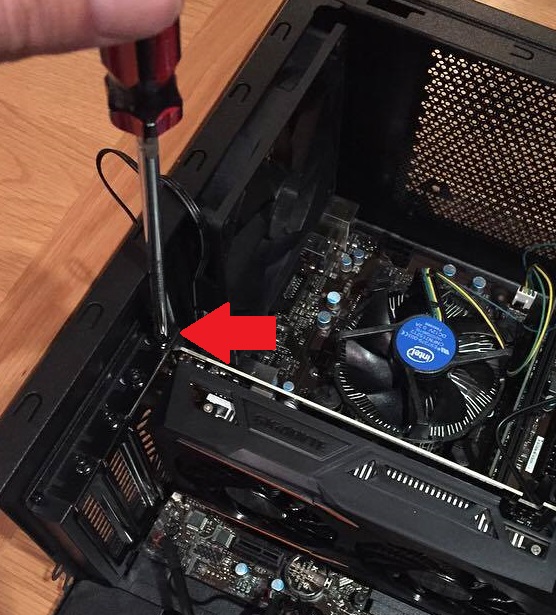
Screw your graphics card into place nice and tightly (but not TOO tight)
5. Optional Graphics Card Installation Steps
Connecting GPU Power Cable to PSU
Modern mid-range or high-end graphics cards require a direct power connection to the power supply to work, but we'll cover that in the PSU cable connection guide. For our GPU install example here, the GeForce GTX 1050 Ti doesn't require a direct power connection to the PSU as it's a low-powered, efficient card that will be automatically powered by the motherboard.
Installing SLI/CrossFire GPUs
Lastly, if you're installing multiple graphics cards for SLI (see that guide for the steps and more details on SLI) or for AMD CrossFire, go ahead and install your additional card/s now. It's just a matter of installing all your cards in the right PCIe slots, and then installing your SLI bridge on top of them to connect the GPUs together (modern CrossFire setups won't need a bridge though).
See Also:
- Safe GPU Temperatures (& How to Check)
- How to Overclock Your GPU (Step by Step)
- Should You Ever Replace GPU Thermal Paste?
- The Best Budget Graphics Cards (Cheap GPUs)
Trusted VPN
VPN software can be important in this day and age, especially if you do lots of online banking and/or use public WiFi whilst travelling. Having a VPN adds an extra layer of security to your PC or laptop when online to help protect your data, passwords, financials, etc from hackers or malicious programs. It can also let you access region-locked content (eg US Netflix from overseas). For gamers their can be even more benefits to using a VPN.
Because they're so popular these days, there are countless VPN providers, and it can be confusing to pick one. If you want my 2 cents, after a lot of research I decided on NordVPN 'cause it's one of the fastest, most reliable VPNs for both gaming and general use, with a lot of credible reviews out there backing that up. They also quite often run very solid deals.
Popular Articles (see all)
Search the Site
About the Author (2025 Update)
I'm an indie game developer currently very deep in development on my first public release, a highly-immersive VR spy shooter set in a realistic near-future releasing on Steam when it's ready. The game is partly inspired by some of my favorites of all time including Perfect Dark, MGS1 and 2, HL2, Splinter Cell, KOTOR, and Deus Ex (also movies like SW1-6, The Matrix, Bladerunner, and 5th Element).
Researching, writing, and periodically updating this site helps a little with self-funding the game as I earn a few dollars here and there from Amazon's affiliate program (if you click an Amazon link on this site and buy something, I get a tiny cut of the total sale, at no extra cost to you).
Hope the site helps save you money or frustration when building a PC, and if you want to support the countless hours gone into creating and fine-tuning the many guides and tutorials on the site, besides using my Amazon links if purchasing something, sharing an article on socials or Reddit does help and is much appreciated.

|
ABOUT BGC Helping you build better systems for less, here at Build-Gaming-Computers.com you'll find simultaneously comprehensive yet simplified guides and tutorials, including continuously updated PC build examples. Always as objective and unbiased as possible with product recommendations, and with little to no ads. |
Intro | Best PC Builds | Best Cases | PC Assembly | Prebuilt PCs | PSU Guide | VR Headsets | Privacy | Contact | Donate | Archives

Copyright (C) 2006-2025 Build-Gaming-Computers dot com All Rights Reserved
As an Amazon Associate we earn from qualifying purchases
For the Love of Gaming + Flawless Frame Rates