Home > Best GPUs > Replace GPU Paste
Should You Replace GPU Thermal Paste?
Whether or Not It's Worth Re-Pasting Your Old or Used Graphics Card (& How to)

Like CPUs, GPUs (AKA graphics cards) also require thermal paste (or thermal compound, same thing) to be applied between the PCB (Printed Circuit Board) and the heatsink in order to more efficiently transfer heat, which is then blown out by the GPU fan/s.
But unlike applying thermal paste to a CPU - a sometimes necessary step when assembling a PC from scratch if your CPU cooler doesn't have pre-applied paste - applying thermal paste to a GPU is rarely something we as gamers or PC enthusiasts ever have to do. But there are certain circumstances, such as after buying an older used GPU or if your card is getting on and having temperature issues, when you perhaps should consider replacing/reapplying the thermal paste on your card.
Related: How to Overclock GPUs
When is Replacing GPU Thermal Paste Worth It?
If you bought a used mining GPU, or even a graphics card that wasn't used for cryptocurrency mining but that's been through years of use, you may have heard people recommend replacing the graphics card's thermal paste in order to refurbish it somewhat to improve its condition (and extend its longevity). Even if you didn't just purchase a second-hand card, if the card you own isn't performing as it once was (running at higher temperatures or even thermal throttling), common advice given out in hardware circles is to give that GPU paste a makeover to make things run better.
But should you replace GPU paste, and is it worth it? Generally speaking, yes, replacing thermal paste on a GPU can work wonders if a card is a few years old (say, 3-4 years or older, but it depends on how much it was used). Replacing the paste is also easy to do (explained later), and if you do some digging around online you'll see plenty of success stories of those who noticeably reduced their GPU temperatures, with some even seeing slightly better gaming performance as a result (higher FPS).
That said, there's no guarantee that your particular setup will benefit from a GPU re-paste. It all depends on how dry, hard, and therefore inefficient the thermal paste on your particular card has become over time, which will mostly depend on how heavily you've used the card.
Even if a graphics card is a few years old, replacing its thermal paste may not change anything whatsoever, and there is the slight risk of actually making things worse if you were to get lazy and mishandle your card when disassembling it or if you incorrectly applied the new paste (too much or too little thermal paste can cause temperature issues).
Disassembling your GPU and replacing the paste may also void the warranty, though to be fair that's a moot point for most people because of the fact that you should only consider replacing GPU paste on older cards, which will almost always be past their warranty period anyway.
Furthermore, replacing thermal paste isn't the only way to solve your GPU temperature or performance problems, and before going ahead with the job you want to first consider other simpler solutions such as improving case ventilation if you think that could help (ie adding or upgrading computer case fans) or simply removing any dust buildup on your GPU fan/s.
If after doing some research you come to the conclusion that replacing your GPU thermal paste could indeed be the answer, let's look at what's involved in doing so, including links to further resources I can recommend if you want to go deeper on the details (this guide is meant as an overview for the hardware novice). Alright, let's get into the technical stuff.
How to Disassemble GPU and Reapply Thermal Paste
If you decide to go ahead with replacing your GPU's paste, here's what you'll need:
- A screwdriver (or two; GPU screws may come in varying sizes depending on the model)
- Lint-free cloth/wipes or paper towel/tissue
- Isopropyl alcohol, ideally one designated as 99%, but less is okay (or alcohol swabs)
- Can of compressed air or small brush (to dust off the GPU fan/s and heatsink)
Oh and don't forget to check your GPU temperature as well as monitor your frame rate when gaming before going ahead with the paste reapplication. When you're ready, here are the steps to cleaning and reapplying GPU paste (videos linked at the end if you need to see someone do it in action).
Step 1: Unplug Power Cables
Make sure your computer is turned off and unplugged from the wall. Before touching components, ground yourself by touching a metal object or wearing an anti-static wrist strap if you're working in an area prone to static electricity build-up (ie carpet everywhere). Now open up your computer case and unplug any power cables connected to the graphics card from your power supply.
Step 2: Remove GPU from Case
Using a screwdriver, undo the screws securing your graphics card to the rear of the case. Now, find the small lever (ie release clip) underneath the card that is securing it to your motherboard's PCIe slot. Unlock it by pressing it down or to the side (you may also need to hold it while lifting the card up).
Now gently lift the card up and out of the slot, holding it by its sides. Gently place the card on your bench or table, with the fans facing downwards so that you can access the back (where the screws are).
Step 3: Unscrew and Detach HSF
To access the actual GPU chip (metal block) where the thermal paste is, you need to disassemble the card. Exactly how you must disassemble a graphics card can vary from model to model, but on many cards it's simply a matter of removing the 4 screws that surround the GPU core (around the middle of the card) as shown in the image below.
Once these are removed you should be able to detach the HSF (Heatsink and Fan) module from the PCB (Printed Circuit Board, the main electronic board of the GPU) module. Just make sure to do it gently and don't pull too card, since the fan/s of the card are plugged into the circuit board (you don't want to accidentally pull on these cables as you could damage them).
Once you've detached the two main modules of the card from each other (if they don't come apart fairly easily, make sure you've removed all necessary screws, though you may need to pry them apart with gentle force if the thermal paste has really dried up), unplug the fan cable/s from the GPU if you want extra room to move (and remember to plug them back in later).
As I said, you might only need to remove 4 screws, but some cards may require other smaller screws on the back of the card to be removed as well (perhaps all of them) in order to be able to detach the HSF, and sometimes even screws on the side of the card. Oh and make sure to remember which screws go where, for when you have to reassemble the GPU (lay out any screws you need to remove onto your work bench in the same pattern/location if you get what I mean).
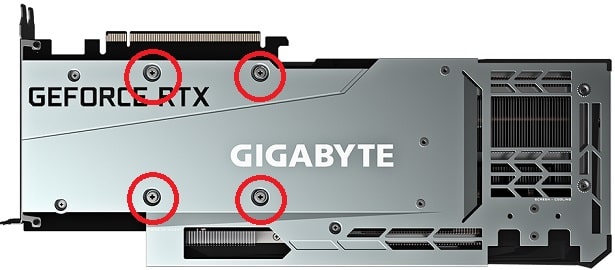 To disassemble a GPU, you'll often just need 4 screws to be removed
Step 4: Remove Thermal Paste
Once you've removed the necessary screws on the back of the card and gently detached the HSF from the PCB, it's time to get rid of the existing paste. Add a small amount of isopropyl alcohol to your lint-free wipe/cloth or paper towel/tissue, and wipe away all the thermal paste from the main GPU chip (the metal block in the middle of the card) and from the heatsink as well. Use as many wipes/cloths/towels as necessary to completely remove all paste.
Step 5: Clean GPU of Dust
Before going ahead and applying new paste, you want to make sure the GPU chip (metal block where the paste will go) is completely clean of any dust or debris. Even small amounts of this can get in the way of optimal cooling performance, and the cloth/wipe you used may have left behind some residue. Use your can of compressed air or a small brush to dust off the GPU chip. While you're at it you want to also remove dust from the heatsink and the GPU fan/s.
Step 6: Apply New Thermal Paste
Once the GPU chip is clean, apply a small blob of new thermal paste onto the middle of the GPU chip. Applying GPU and CPU thermal paste is the same process, and it's also fine to use the same thermal paste you used when installing your CPU cooler for your GPU as well. You also do not need to spread the paste to cover the whole GPU chip (some people do this, but it's not necessary).
As for how much thermal paste to apply to your GPU, you want to use roughly the same amount as for a CPU, so a blob in the center the approximate size of a green pea (or a couple of grains of rice). A little bit more than that is fine, but you don't want too much as it could negatively impact performance (as could not using enough). What you're aiming for is a blob that's not too big, and not too small, that will be enough to cover the GPU chip once you press the heatsink on top of it.
Step 7: Reassemble GPU and Test Card
Reassemble the graphics card, making sure you tighten the screws in a slow, methodical manner where you do a few turns on one screw, move to another screw on the other side of that screw and do the same, and continuing in this manner until they're all nice and tight. In other words, you don't want to fully tighten one screw at a time, as this could lead to uneven assembly (or could even damage something).
This is good practice when installing PC parts in general. Oh and you don't want to over-tighten the screws either - turn them until they're nice and firmly tight, but don't continue turning with excessive force. Once your GPU is assembled again, install the GPU into your case and load up your favorite game to re-test those temperatures and frame rates. Fingers crossed your efforts have made a difference.
Learn More
The steps I've outlined above are meant as an overview of what's involved in the process, so if you're inexperienced with hardware I recommend checking out this video, this video and/or this one to see someone disassemble a GPU, clean it, and re-apply paste. Just one of these videos is enough, or watch all three if you want slightly different perspectives on whether you should replace/upgrade GPU thermal paste and how to go about it.
Related: Should You Buy Used Mining GPUs?
Trusted VPN
VPN software can be important in this day and age, especially if you do lots of online banking and/or use public WiFi whilst travelling. Having a VPN adds an extra layer of security to your PC or laptop when online to help protect your data, passwords, financials, etc from hackers or malicious programs. It can also let you access region-locked content (eg US Netflix from overseas). For gamers their can be even more benefits to using a VPN.
Because they're so popular these days, there are countless VPN providers, and it can be confusing to pick one. If you want my 2 cents, after a lot of research I decided on NordVPN 'cause it's one of the fastest, most reliable VPNs for both gaming and general use, with a lot of credible reviews out there backing that up. They also quite often run very solid deals.
Popular Articles (see all)
Search the Site
About the Author (2025 Update)
I'm an indie game developer currently very deep in development on my first public release, a highly-immersive VR spy shooter set in a realistic near-future releasing on Steam when it's ready. The game is partly inspired by some of my favorites of all time including Perfect Dark, MGS1 and 2, HL2, Splinter Cell, KOTOR, and Deus Ex (also movies like SW1-6, The Matrix, Bladerunner, and 5th Element).
Researching, writing, and periodically updating this site helps a little with self-funding the game as I earn a few dollars here and there from Amazon's affiliate program (if you click an Amazon link on this site and buy something, I get a tiny cut of the total sale, at no extra cost to you).
Hope the site helps save you money or frustration when building a PC, and if you want to support the countless hours gone into creating and fine-tuning the many guides and tutorials on the site, besides using my Amazon links if purchasing something, sharing an article on socials or Reddit does help and is much appreciated.

|
ABOUT BGC Helping you build better systems for less, here at Build-Gaming-Computers.com you'll find simultaneously comprehensive yet simplified guides and tutorials, including continuously updated PC build examples. Always as objective and unbiased as possible with product recommendations, and with little to no ads. |
Intro | Best PC Builds | Best Cases | PC Assembly | Prebuilt PCs | PSU Guide | VR Headsets | Privacy | Contact | Donate | Archives

Copyright (C) 2006-2025 Build-Gaming-Computers dot com All Rights Reserved
As an Amazon Associate we earn from qualifying purchases
For the Love of Gaming + Flawless Frame Rates