Home > PC Assembly > Install Case Fans
How to Install Extra Fans in a PC Case (& Connecting to the Motherboard or PSU)
The Complete Beginner's Guide to Installing Aftermarket Case Fans (Airflow Basics)
Most modern PC cases come included with at least 1 fan pre-installed (usually a rear/exhaust fan), which could be okay for some cheaper lower-powered builds but probably not enough for more powerful gaming PCs that ideally should have 2 fans minimum for good airflow.
But the good news is that the best gaming PC cases worth buying almost always come shipped with 2 fans minimum (even some of the better budget cases and many mid-range cases). That means that for many typical gaming PC builds, it's unlikely that you'll need to buy and install extra case fans (also sometimes referred to as aftermarket case fans).
Note: This article is part of the full Assembling a PC guide.
But there are situations where you would want to buy and install an extra aftermarket case fan (or 2, or 3, or more) including:
- For really powerful PCs to maximize airflow and keep temperatures as low as possible.
- If you'll be overclocking (which generates more heat).
- If your PC will be sitting in a fairly warm room.
- If you want to add more lighting effects (case fans can include LED or RGB).
- To replace a stock fan/s that came with your case with a larger, better quality, and/or less noisy fan/s.
So if you have an extra case fan or two (or 3, 4, or a gazillion) in this guide we will cover all the basics of where and how to install them in your case, how to position them the correct way, the basics of PC airflow, and how to connect case fans to either your motherboard or power supply.
1. Where to Install Fans in Case (PC Airflow 101)
Ideally you should have decided where to install extra case fans before buying them, but if you're still planning your fan setup, let's briefly go over how computer case airflow works in absolute basic terms. The role of computer fans is not to simply blow air onto your components to cool them. That's not how effective PC airflow works. Instead, most computer cases are designed in a way where air flows from the front to the back (and from the bottom to the top if your case has the option for bottom and top mounted fans).
The relatively cool air from outside of your case (the cooler the room where your PC will live, the better) is sucked/pulled in through the front of the case by one or more front fans (called intake fans). That cool air is pushed through the inside of the case, cooling your components in the process, and is then pushed/expelled out the back of the case by one or more rear fans (called exhaust fans).
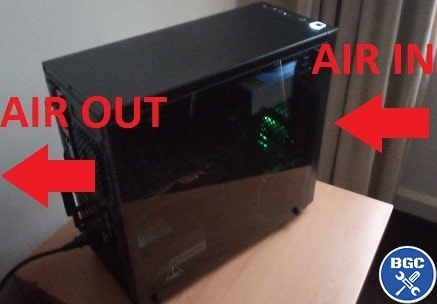 PC Airflow 101: Cool air pulled in through the front (right side of this pic) and pushed out through the back
How Many Fans Should a Gaming PC Have?
Exactly how many fans you need to install in your gaming PC and exactly where they should be placed depends on various factors, and there's no one size fits all answer. Computer airflow optimization can get a little complex though, and is beyond the scope of this article (will discuss in future on the site at some point though). But let's go over the absolute basics in a nutshell, and without getting too technical.
As a general rule, for most gaming PC builds you should have 2 fans minimum (1 rear and 1 front).
Remember this is talking strictly about case fans, and NOT including the fans included with the PSU, CPU, and graphics card. And make that 3 fans minimum for high-end builds with powerful gaming CPUs and GPUs. Anything more than 3 or 4 fans is likely to only give small, diminishing returns, and when you see people fully kit out a build with a boatload of fans it's usually for aesthetics and not practicality (but again, it completely depends, and so certain monster setups may benefit from a ton of fans).
For lowered-powered PCs such as a light gaming build using an APU like the Ryzen 3 3200G or Ryzen 5 3400G (integrated graphics, ie no graphics card), or for a basic home office PC, you wouldn't even need to add a front fan and could actually get away with just having a single exhaust fan. I mean, even more powerful gaming builds with a GPU could even be fine with just a single exhaust in the entire build, but I wouldn't personally recommend it.
What About Positive vs Negative vs Neutral Air Pressure?
As for balancing the number of intake vs exhaust fans to maximize airflow and/or reduce dust buildup, that's a more complex topic beyond the scope of this guide. But to summarize, there's no real clear-cut answer on whether a positive pressure fan setup (more intake fans than exhaust fans), negative pressure setup (more exhaust than intake), or neutral (same amount) is best and it all depends on the case (among other factors).
They all have their pros and cons, and it's a heated debate (pun intended) with different opinions on the matter, with a positive pressure airflow setup helping to avoid dust (to extend longevity of your system and make maintaining/cleaning easier) and negative pressure airflow setup generally helping airflow (but increasing dust).
A neutral pressure case is another viable option where you have an equal amount of intake vs exhaust fans. Also remember that when calculating the number of intake fans compared to exhaust fans, you need to take into account fan speeds too (which can alter the type of pressure in the case). But don't count the CPU, GPU or PSU fans in your calculations.
The general consensus in the DIY community is to setup a slightly positive pressure fan setup with say 2 intake fans and 1 exhaust (or 1 intake and 1 exhaust which is another common setup that works fine for many) because you'll get the benefits of less dust build-up and because there generally isn't much difference in temperatures between positive and negative airflow.
A neutral airflow setup is also fine and an easy option if you have an even amount of fans to install (eg if you have a total of 4 fans, use 2 as intakes and 2 as exhausts). If you want to learn more about air pressure, see this guide on positive vs negative vs neutral pressure PC airflow.
The good news is that you don't have to get your fan setup perfect the first time around, and you can always adjust things later on (adding fans or changing their placement) if you want to try and lower temperatures (or noise).
Anyway, as a basic demonstration for this guide we'll be installing a Cooler Master SickleFlow 120mm LED fan as a front (intake) fan in the DeepCool Matrexx 30 case (which only came with 1 pre-installed exhaust fan). This is a good budget fan for anyone wondering, though there are better options out there if you want the most effective cooling for your gaming PC (and willing to pay for it).
The best brands for case fans are Noctua and Be Quiet, but there's nothing wrong looking at other brands that sell case fans like Arctic, Cooler Master, Thermaltake, Corsair, DeepCool and Cougar. As always, it all depends on the specific fan model in question.
 We'll install the Cooler Master SickleFlow 120mm LED as a single front intake
2. How to Know Which Way Case Fans Should Face
Before installing a fan, you want to figure out which side of the fan blows/pushes out air and which side pulls/sucks in air so that you install it the correct way around. Installing fans in the incorrect direction will mess up the airflow and lead to potential overheating or damaging of your parts.
For example, if you want to install a fan in the front of your case to act as an intake fan (to suck air in from outside and flow it through the inside of your case), if you position it the wrong way around then instead of pulling air in from the front it will be pulling air in from inside the case (and expelling it out the front). Not good.
But the question is, how do you actually know which side of the fan blows the air out?
It's not immediately obvious if you're doing this for the first time, but some case fans will have an arrow printed on the outside of the actual fan (on the top or the side) to indicate which direction the air will blow. When mounting front intake fans, you want the arrow pointing into the case, and for mounting rear exhaust fans the arrow should point outside the case. Some will have two arrows to indicate both the direction of the air as well as the direction that the fan physically spins.
Some fans won't have any arrow though, in which case you can figure out the direction by either noticing which side the spokes/grille is on (the bits that hold the fan motor to the frame), or by looking at which side the brand sticker is on (the label on the middle of the fan). The side of the fan with the sticker and the spokes is almost always the side where air will blow out. So for installing a front fan for example, the spokes/sticker should be facing inwards into the case.
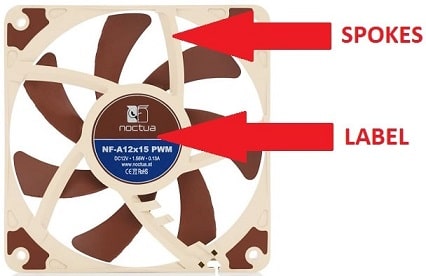 The side with the spokes/grille and label is where air blows out
Confirming Your Fans Are Installed Properly
If you want to absolutely make sure you've installed fans the proper direction, when you turn on your PC hold a tissue or other very light material in front of each fan to test it. If you see the tissue being slightly pulled towards the fan, that side is the intake (pull). If the issue blows outwards a bit, that's the exhaust side (push). For example, if you hold a tissue outside the case just in front of a front intake fan, the tissue should move slightly towards the fan.
3. How to Remove Front Panel of PC Case
To install a fan in the front of your computer, you need to first remove the front panel. Front panels can typically be opened by simply pulling firmly on either the bottom or the top of the panel (without having to unscrew anything). It may require quite a bit of force to get off though, so don't worry if you have to really pull at it.
Just don't go too crazy with it as the front panel connectors (cables that need to be plugged into the motherboard later) are attached to the front panel. If you get annoyed trying to pull off the front panel, angrily turn full Hulk mode, and proceed to yank the panel off with overkill force, there is a small chance you could damage something. So pull firm, but not too firm. If you're worried about breaking something, refer to your case manual (if it came with one) to find a diagram on removing the front panel.
Safety Reminder
If you're installing extra case fans as an upgrade for an existing desktop computer, remember to turn off and unplug your PC from the wall before opening up your tower. Also, remember to ground yourself by touching a metal object prior to reaching inside your case to install a fan (to avoid static electricity potentially damaging a component like your motherboard).
For our example build using the DeepCool Matrexx 30 case, you pull from the bottom of the panel to remove it. It doesn't matter if your case is sitting upright or lying on its side when pulling off the front panel - just position it whichever way is easiest for you to get a good, controlled grip:
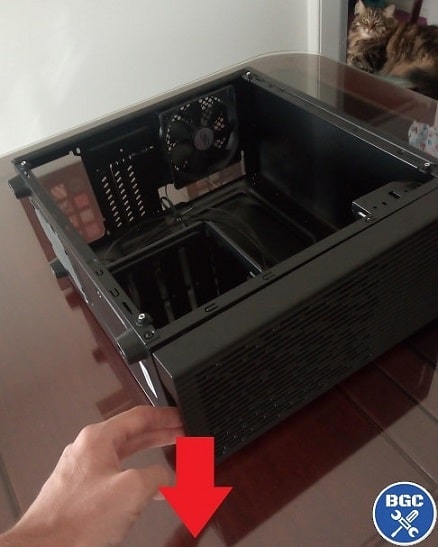 Pull firmly to take off your case's front panel
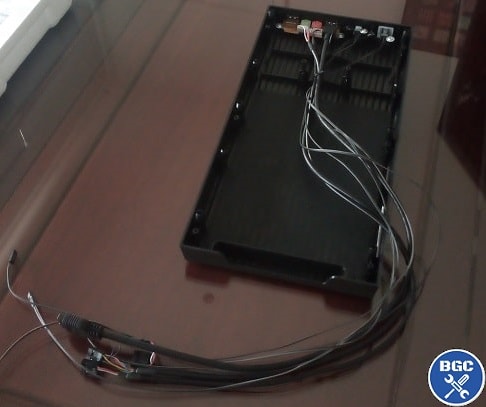 Front panel connectors are attached to the front panel so take it off carefully
4. How to Mount and Screw Fans Into PC Case
In most cases, you'll have the freedom to install front fans at different heights. If you're just installing one front intake fan, you're probably best off installing it at the bottom as pictured below, though in certain setups it might be better to position it in the middle of the front so that it directly blows air onto the motherboard area. If in doubt, just install it in the front bottom:
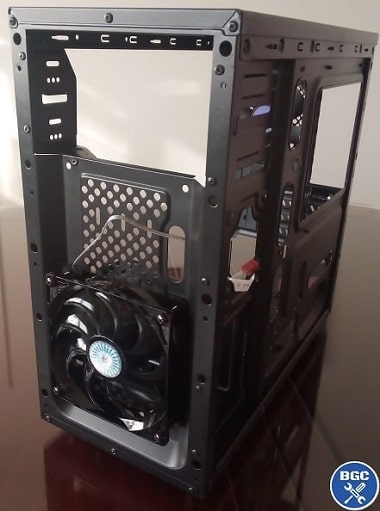 Mounting our intake fan to the bottom of the front of the case
You also want to position the fan so that the cable (that will plug into the motherboard or PSU in the next step) has the easiest access to the inside of the case. Otherwise, the fan cable might not be able to reach all the way to the motherboard. Just keep in mind that if the fan cable doesn't reach the motherboard no matter which way you install the fan, don't worry as you can either buy a fan cable extender (3 or 4 pin depending on your fan) or you can use a molex adapter (which may have come with your fan) to connect the fan to the PSU instead. We'll cover this in a bit, but let's finish mounting the fan.
To physically install the case fan, line up the 4 corner holes of the fan with 4 matching holes on the case, and screw them in using screws that were either supplied by your case (should be labeled as 'fan screws' or something along those lines in the case manual) or with screws that may have come with the fan itself. We're using the 4 long screws provided by Cooler Master (came with the SickleFlow 120mm fan):
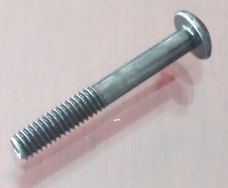 Use screws that either came with the fan itself or your PC case
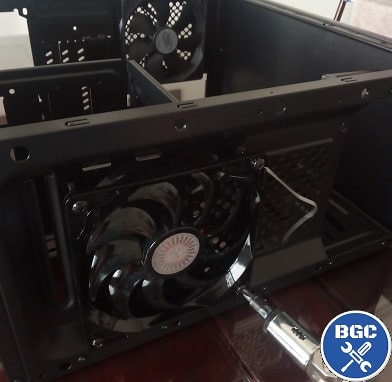 Mounting a fan is as simple as using 4 screws on each corner
Screwing the fan in might require a fair bit of force if the fan holes are unthreaded, which is usually the case with plastic fans (Acrylic fans are typically pre-tapped/threaded already as Acrylic cracks more easily). So when screwing in the mounting holes for the first time, you're going to need a decent amount of force to thread the holes for the first time (and then in future it'll be easier to screw in should you ever need to remove and re-install the fan).
In terms of how tight to screw the fan in, you want the fan nice and tightly mounted to avoid vibration/rattling noises, but as with installing any other PC components, you don't want to go crazy and over-tighten the screws so much that it would make uninstalling them later a job fit only for a Greek god like Zeus. Tight, but not too tight.
5. How to Connect Fans to a Motherboard or PSU
Now you've installed the fan/s, all that's left is to plug them into your system. If you're installing these fans as part of a full new PC build, you obviously can't plug them in just yet until you've finished installing all your PC components (specifically, until the motherboard is in your case). But if you're here mounting extra case fans as an upgrade to an existing PC, go ahead and plug them in now.
Case fans can be connected to your PC in 2 main ways:
Connecting Fans to a Motherboard
The best way to connect a case fan is to the motherboard, as this allows you to control the speed of your fan inside the motherboard BIOS. But that's if your fan has a 4 pin cable, as fans with 3 pin cables don't have this capability.
Motherboards usually have at least 2 fan headers, with many good ones having at least 3-4. These fan headers will usually be scattered around the motherboard, and depending on your motherboard they will be labelled on the actual board as either:
- SYS_FAN (system fan)
- CHA_FAN (chassis fan)
Refer to the motherboard manual if you can't find them as there should be a diagram in there pointing out where they are.
Try to plug your fans into the closest fan header on the motherboard to avoid excess cables dangling around (to keep things neat). If you need to, use cable ties to avoid fan cables from getting messy.
Your motherboard might also have a PWR_FAN (power fan) header, but avoid using that if you can as it's typically meant to be used to monitor power supply fans. But technically, if you have to, you could use the PWR_FAN for a case fan without problems (but without the ability to change fan speeds).
But whatever you do, don't use the CPU_FAN header as that's only for connecting a CPU cooler fan. Same goes for PUMP_FAN (for AiO liquid CPU coolers only).
Can You Plug a 3 Pin Fan Into a 4 Pin Header?
Yes, it's fine to plug a 3 pin case fan cable into a 4 pin header on the motherboard, but just make sure you're inserting the cable into the correct 3 pins (they should easily slide in without too much force). It's also fine if you have to connect a 4 pin case fan cable into a 3 pin motherboard header. In both these situations though, you won't be able to control the fan speeds (which is what the 4th pin is used for).
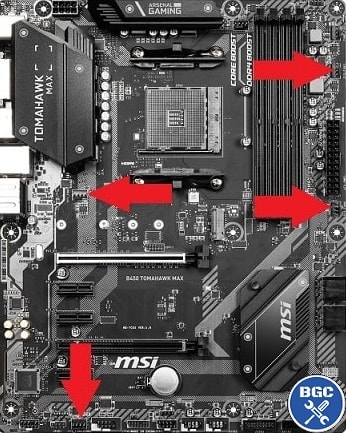
Where the 4 fan headers are on the MSI B450 Tomahawk Max
What if Your Motherboard Doesn't Have Enough Fan Headers?
If you don't have enough fan headers on your motherboard to plug in all your case fans, you can simply plug the remaining fans into the PSU (explained next). Or you could get a fan splitter (called a Y-splitter) which will connect 2 fans to one motherboard fan header like this popular one from Rosewill:

But avoid using a triple splitter (3 fans into 1 motherboard header) as you may run the risk of overloading the fan header's amperage limit.
For managing many fans you want a fan hub or controller that's powered directly from the PSU for stable voltage (to avoid the amperage limits of a motherboard fan header). This Silverstone 8 port fan hub is a popular, reliable choice at a (usually) good price:

Connecting Fans to a Power Supply
If you plug case fans directly into the PSU (Power Supply Unit), you won't be able to control the fan speed and the fan will always run at full speed. Sometimes you have to plug a fan into the PSU though (if your motherboard perhaps doesn't have enough fan headers for all your fans), but it's not really a problem unless you really wanted to control fan speeds.
To plug a case fan into the PSU, your PSU you will need to have 4 pin molex connectors (not all PSUs have these, but many will). You'll also need a 3 pin to molex adapter (some fans come with this), which you plug into the fan to be able to then plug into the PSU's molex cable.
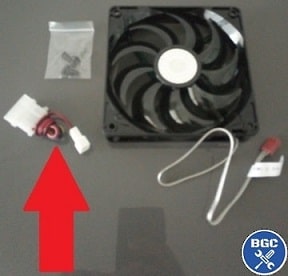 Like our Cooler Master SickleFlow 120mm, some aftermarket fans will come with a 3 pin to Molex adapter
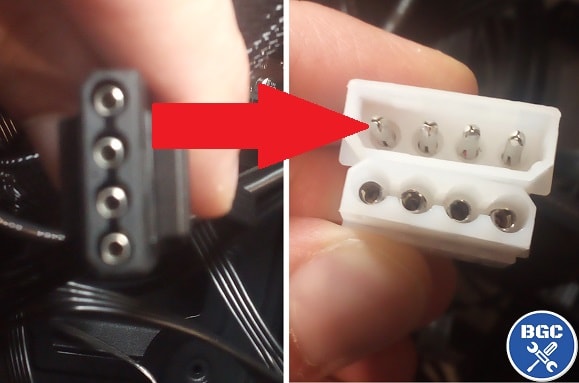 Connect a case fan directly to the PSU using a molex adapter
Trusted VPN
VPN software can be important in this day and age, especially if you do lots of online banking and/or use public WiFi whilst travelling. Having a VPN adds an extra layer of security to your PC or laptop when online to help protect your data, passwords, financials, etc from hackers or malicious programs. It can also let you access region-locked content (eg US Netflix from overseas). For gamers their can be even more benefits to using a VPN.
Because they're so popular these days, there are countless VPN providers, and it can be confusing to pick one. If you want my 2 cents, after a lot of research I decided on NordVPN 'cause it's one of the fastest, most reliable VPNs for both gaming and general use, with a lot of credible reviews out there backing that up. They also quite often run very solid deals.
Popular Articles (see all)
Search the Site
About the Author (2025 Update)
I'm an indie game developer currently very deep in development on my first public release, a highly-immersive VR spy shooter set in a realistic near-future releasing on Steam when it's ready. The game is partly inspired by some of my favorites of all time including Perfect Dark, MGS1 and 2, HL2, Splinter Cell, KOTOR, and Deus Ex (also movies like SW1-6, The Matrix, Bladerunner, and 5th Element).
Researching, writing, and periodically updating this site helps a little with self-funding the game as I earn a few dollars here and there from Amazon's affiliate program (if you click an Amazon link on this site and buy something, I get a tiny cut of the total sale, at no extra cost to you).
Hope the site helps save you money or frustration when building a PC, and if you want to support the countless hours gone into creating and fine-tuning the many guides and tutorials on the site, besides using my Amazon links if purchasing something, sharing an article on socials or Reddit does help and is much appreciated.

|
ABOUT BGC Helping you build better systems for less, here at Build-Gaming-Computers.com you'll find simultaneously comprehensive yet simplified guides and tutorials, including continuously updated PC build examples. Always as objective and unbiased as possible with product recommendations, and with little to no ads. |
Intro | Best PC Builds | Best Cases | PC Assembly | Prebuilt PCs | PSU Guide | VR Headsets | Privacy | Contact | Donate | Archives

Copyright (C) 2006-2025 Build-Gaming-Computers dot com All Rights Reserved
As an Amazon Associate we earn from qualifying purchases
For the Love of Gaming + Flawless Frame Rates