Home > PC Assembly > Install CPU
How to Install a CPU on the Motherboard
4-Step Beginner's Guide to Safely Fitting an Intel or AMD Processor (& Photos)

Last Updated: February 8, 2023
Learning how to install a CPU onto the motherboard is straightforward, but there are couple tips to know before and during CPU installation to ensure a properly-installed and secure processor, and to avoid damaging something. CPUs are fragile so you're going to want to take your time with this part to make sure you do things correctly.
These steps on how to install a processor are part of our main how to assemble a PC tutorial. Refer to that guide if you need to learn the steps before and after installing your CPU (such as getting the motherboard ready).
This CPU install walkthrough explains and shows both how to install an Intel CPU, and how to install an AMD CPU (specifically, using the Intel LGA1151 socket and AMD AM4 socket). The steps are very similar for installing Intel and AMD CPUs, but there are a couple small differences which we'll get to.
CPU Safety Reminder
Before proceeding with the CPU installation steps below, just keep in mind the following safety precautions:
- Always handle the CPU with great care.
- Hold a CPU only by its edges/sides (don't touch the bottom or top).
- Keep your CPU in the anti-static safety bag that it came with until the moment you're ready to install it. Don't leave it lying around in the open.
Lastly, before we get straight into the CPU install steps, you'll notice the photos used in this CPU install guide show how to install a CPU onto the motherboard outside the case. But don't worry if you're installing a CPU inside the case (when your motherboard is already inside), as it's the same process.
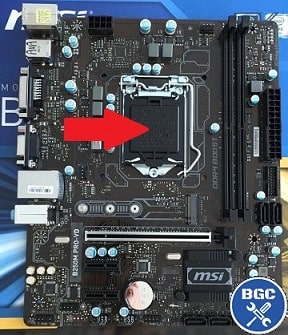
1. Locate the CPU Socket
Yup, we weren't kidding when we said the chief aim of our guides and tutorials is to ensure absolutely no noob ever gets left behind. We keep things as simple as is possible.
So, first go ahead and find the CPU socket on your motherboard. You can't miss it - look for the large square socket somewhere near the middle of your motherboard that has a little metal lever alongside it.
This is where your trusty new CPU will happily reside for the next few years (well, hopefully). Intel and AMD sockets look slightly different, as you'll see below, but they're in the same location.
Related: How to Choose the Best CPU
2. Open the CPU Socket
To open up the CPU socket on the motherboard, you need to first lift up the retention arm (the small metal lever on the side of the socket). Unlock the retention arm by pulling it out to the right (away from the socket) so that it's free to then be lifted up. Lift the arm up all the way, and then open up the socket cover. Only Intel CPU sockets have covers - AMD sockets do not.
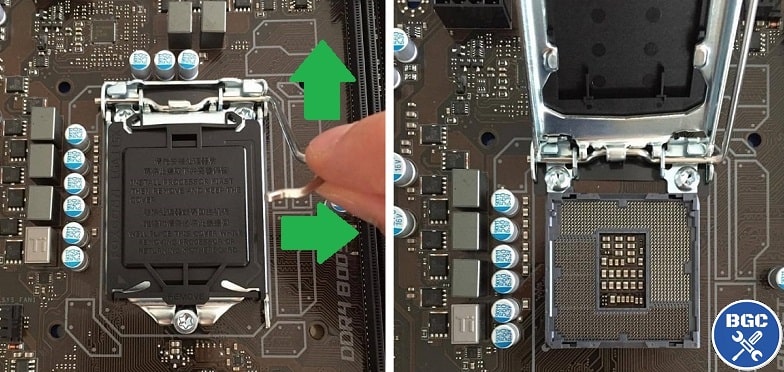 Opening an Intel CPU socket: Pull the retention arm out to the right and then lift it up. Then open the socket cover.
For installing AMD CPUs (AM4 socket) you also have a little retention arm to lift out to the side and then up, but there is no socket cover to open. Instead, when you lift the retention arm up to a 90 degree angle, it automatically opens up the middle of the socket to expose the middle.
Unlike Intel sockets, AMD sockets don't have covers. If you're wondering, this is because Intel CPUs have the actual contact pins on the motherboard, whereas AMD CPUs have the contact pins on the CPU itself.
 Opening an AMD CPU socket: Lift the lever to 90 degrees so that the middle of the socket slightly opens up
3. Match Arrow and Lower CPU Into Socket
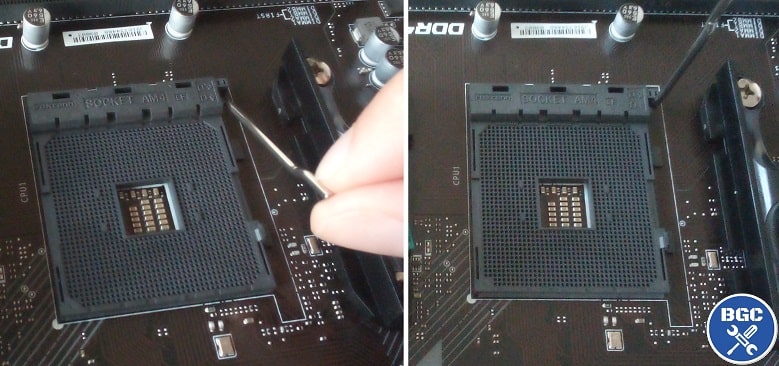
Before picking up your CPU, first look closely at the CPU socket and look for the small mark/icon in the bottom left corner. This indicates which way to install your CPU, as there will be an arrow on the CPU itself that goes in this corner:
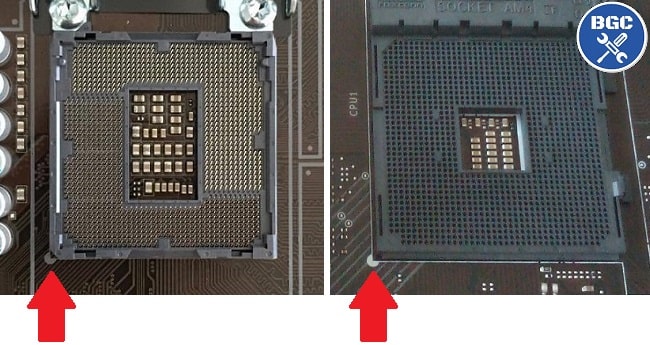 Both Intel (left) and AMD (right) sockets have a mark on the bottom left
Before grabbing your CPU, ground yourself by touching the metal part of your case or another metal object (if you're not using anti-static equipment like a wrist-strap or mat). It's also worth mentioning again that you shouldn't ever touch the bottom of the CPU. Avoid touching the top of the CPU too, as this is where the thermal paste of your CPU cooler will be so you want the surface as clean as possible).
There's only one correct position to install an Intel or AMD CPU into the socket - by placing it so that the arrow on the CPU matches the mark on the bottom left of the socket (as pictured above). You don't want to accidentally lower in the CPU in the wrong way, as you risk damaging/bending pins, so before lowering it in make sure you're aware of the arrow and which way to install it.
Be very careful not to drop the CPU, and slowly and carefully lower it into the socket as far as you can without letting go. When the CPU is fully lined up with the socket, you can very, very gently let it go and it will naturally fall into place. Do NOT force or push the CPU in - if you have lowered it in the correctly aligned way, it will effortlessly sit into place. To confirm it's fully installed, VERY gently try to nudge it a fraction to left or right. If it wasn't already properly seated, it will gently fall into place when you do this.
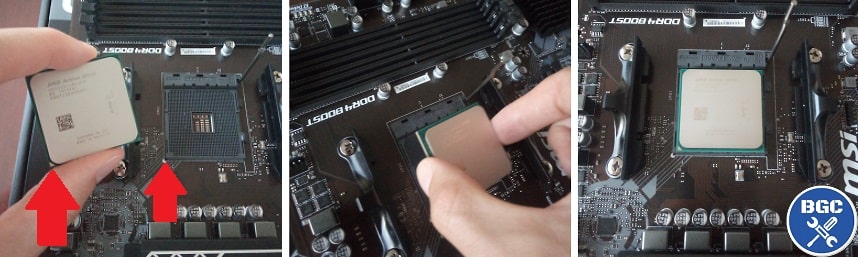 Match the arrow on the CPU with the mark on the socket, and very gently lower in the CPU
4. Lock the CPU Socket
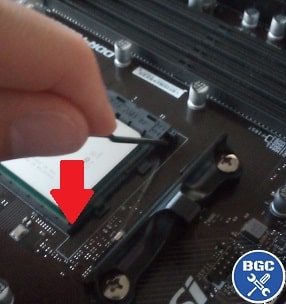
Now you need to lock the CPU socket. For Intel CPU installs, lower the socket cover, then lower the retention arm (the small lever) and clip it back into the hook. The CPU socket cover should then automatically come off (store it in a box in case you need it in future). For AMD CPU installs, to lock the socket you simply lower the retention arm down and lock it into place.
That's your CPU installation done and dusted! Very simple to do, and hard to screw up if you simply take your time and understanding each step in advance before actually doing it. Now that the brains of your new machine is in place, it's time to keep that little guy cool and quiet by fitting the heatsink and fan (CPU cooler).
Next:
How to Install a Stock AMD Cooler
How to Install High-End Stock AMD Cooler
 Pull the retention arm back into place
FAQ
How fragile is a CPU?
CPUs are relatively delicate components and can be easily damaged if not handled carefully. They have many small pins that can bend or break if the CPU is dropped or subjected to excessive force (not all CPUs have pins on them though - the ones that don't will have pins on the motherboard's CPU socket instead).
Also, the internal components of a CPU are extremely small and can be damaged by static electricity, which can build up on your body and other objects. To avoid damaging your CPU, it's important to handle it only by the edges and to ensure that you are properly grounded to dissipate any static charge. When installing the CPU into a socket, it is important to take care not to bend or break any of the pins and to ensure that the CPU is properly seated and locked into place.
Do I need to install any software for the CPU?
No, you do not need to install any software or drivers specifically for a CPU. Modern CPUs are plug-and-play and automatically recognized by the operating system. However, in some cases, you may need to update the BIOS (basic input/output system) or UEFI (unified extensible firmware interface) to ensure compatibility with a new CPU that has been released after a certain motherboard model has (but only if the motherboard supports the CPU). Keep in mind you can update a BIOS without needing a CPU installed.
Can a damaged CPU still work?
A damaged CPU can still work, but it is likely to cause problems and may fail prematurely. Physical damage to the CPU such as bent pins, cracks, or other signs of physical damage can prevent the CPU from functioning properly. This can result in system instability, crashes, or even prevent the system from booting. Additionally, even if the CPU is functioning, the damaged pins can cause poor electrical connections, which can result in reduced performance or data errors. In general, it is recommended to replace a damaged CPU to ensure reliable and stable operation of your computer.
Trusted VPN
VPN software can be important in this day and age, especially if you do lots of online banking and/or use public WiFi whilst travelling. Having a VPN adds an extra layer of security to your PC or laptop when online to help protect your data, passwords, financials, etc from hackers or malicious programs. It can also let you access region-locked content (eg US Netflix from overseas). For gamers their can be even more benefits to using a VPN.
Because they're so popular these days, there are countless VPN providers, and it can be confusing to pick one. If you want my 2 cents, after a lot of research I decided on NordVPN 'cause it's one of the fastest, most reliable VPNs for both gaming and general use, with a lot of credible reviews out there backing that up. They also quite often run very solid deals.
Popular Articles (see all)
Search the Site
About the Author (2025 Update)
I'm an indie game developer currently very deep in development on my first public release, a highly-immersive VR spy shooter set in a realistic near-future releasing on Steam when it's ready. The game is partly inspired by some of my favorites of all time including Perfect Dark, MGS1 and 2, HL2, Splinter Cell, KOTOR, and Deus Ex (also movies like SW1-6, The Matrix, Bladerunner, and 5th Element).
Researching, writing, and periodically updating this site helps a little with self-funding the game as I earn a few dollars here and there from Amazon's affiliate program (if you click an Amazon link on this site and buy something, I get a tiny cut of the total sale, at no extra cost to you).
Hope the site helps save you money or frustration when building a PC, and if you want to support the countless hours gone into creating and fine-tuning the many guides and tutorials on the site, besides using my Amazon links if purchasing something, sharing an article on socials or Reddit does help and is much appreciated.

|
ABOUT BGC Helping you build better systems for less, here at Build-Gaming-Computers.com you'll find simultaneously comprehensive yet simplified guides and tutorials, including continuously updated PC build examples. Always as objective and unbiased as possible with product recommendations, and with little to no ads. |
Intro | Best PC Builds | Best Cases | PC Assembly | Prebuilt PCs | PSU Guide | VR Headsets | Privacy | Contact | Donate | Archives

Copyright (C) 2006-2025 Build-Gaming-Computers dot com All Rights Reserved
As an Amazon Associate we earn from qualifying purchases
For the Love of Gaming + Flawless Frame Rates