Home > Motherboards > Update BIOS Without CPU
How to Update Your BIOS Without a CPU (BIOS Flashback Using a USB Flash Drive)
Beginner's Step-by-Step Guide to Flashing a Asus, Gigabyte, MSI, or ASRock Motherboard
 We explain exactly how to use the BIOS flash button; a special feature found on some motherboards (and many B550/X570 models)
Last Updated: January 1, 2021
In this guide we'll cover how to update your BIOS without a CPU installed, on either a Gigabyte, Asus, ASRock, or MSI motherboard using BIOS flashback (called Q-Flash Plus on Gigabyte boards). The steps are mostly the same for each manufacturer, however there is a slight difference when it comes to preparing the downloaded BIOS file (but we'll point that out when the times comes).
This guide applies if you're building a new computer from scratch and your motherboard requires a BIOS update in order to be able to boot-up for the first time with a new CPU series. For example, if you bought an AMD B550 or X570 motherboard which does NOT have a "Ryzen 5000 Ready" type of logo/sticker on the front of the box, and you're building with a Ryzen 5000 CPU. If your motherboard's box does not this sticker, it's a strong indicator that the board's BIOS hasn't been updated by the manufacturer to support the new Ryzen 5000 series out the box, and you will need to update the BIOS yourself. In order to do BIOS flashback as outlined in this guide, you must have a motherboard model that has BIOS flashback feature/button (not all boards have it, but many good modern boards do).
As a side note, if you already have a working PC and looking to update the BIOS to the latest version, do not use BIOS flashback as you should be updating the BIOS from within the actual BIOS itself. Plus, if you have a working PC, you shouldn't necessarily be updating your BIOS unless you have a good reason to anyway (such as knowing that it will enable certain features or improve stability/performance). When it comes to BIOS updates, a solid general rule of thumb that many enthusiasts (including I) generally stick to is as follows; if it ain't broken then be hesitant to try and fix it, as BIOS updates can go wrong if you're not careful (and in certain instances can in fact "brick" AKA damage your motherboard).
That said, if you know that you do need to update the BIOS (and in this instance without a CPU using the BIOS Flashback method), don't be intimidated or worried as the process is quite quick, and most importantly easy - IF you follow all instructions carefully. Whenever you see people having issues with doing a BIOS update, it's often because they overlooked a certain specific detail such as using a USB 3.0 flash drive which is known to cause issues for some people (we'll get to that) among other little details that may be important. But the good thing is, if your BIOS flash fails for whatever reason, you can just retrace your steps and try again.
See Also: Do You Need a BIOS Update for Ryzen 5000?
What is BIOS Flashback?
To summarize, BIOS flashback is a feature found on some motherboards that allows you to update the BIOS without needing a CPU, memory, or GPU installed.
Depending on the manufacturer, the BIOS flashback feature will be referred to as different things:
- On Gigabyte motherboards the feature is named Q-Flash Plus (not to be confused with Q-Flash, which is for updating the firmware from within the BIOS itself on an existing PC).
- On ASUS boards it's called USB BIOS Flashback (they've coined that term, hence why other manufacturers don't use that exact same wording to refer to the feature).
- On MSI boards the feature is specifically referred to as a Flash BIOS Button (not to be confused with M-Flash, which is MSI's update utility found within the actual BIOS itself).
- On ASRock boards the feature is specifically referred to as a BIOS Flashback Button.
To know if a motherboard has BIOS flashback, check the spec sheet on the manufacturer's site and it will be listed as one of the names I just mentioned (sometimes listed under the "special features" section of the spec-sheet). Or simply check my list of motherboards with BIOS flashback.
If your motherboard doesn't have a BIOS flashback feature, if you find yourself needing to update the BIOS you would need to have another CPU installed already, hence why BIOS flashback can be a handy feature to have when building a new PC from scratch as in some situations you need to update the BIOS in order to be able to start-up your PC with a new CPU series (ie Ryzen 5000 CPU with a B550 or X570 motherboard).
Before we get into the steps in detail, in a nutshell using BIOS flashback simply involves downloading a specific BIOS update for your particular motherboard chipset and model using another computer, renaming the downloaded file, moving it onto a freshly FAT32 formatted USB flash drive, connecting the power supply to your new motherboard, inserting the USB drive into the correct USB port on the rear, and then pushing the BIOS flash button found on the rear of the board (which is sometimes found on the actual board itself).
What Type of USB Drive Do You Need for BIOS Flashback?
Not that it's guaranteed to be an issue for everyone, I've seen enough reports on Reddit, YouTube, and other places mentioning issues with BIOS flashback updates using newer USB 3.0 drives, and that trying an older USB 2.0 flash drive solved the problem. Therefore, use a USB 2.0 flash drive if possible to be on the safe side. Here's what they look like in case you don't have a spare one lying around:
SanDisk 16GB Cruzer USB 2.0 Flash Drive
The fact that USB 2.0 drives seem to cause issues for some does make sense, seeing as USB 2.0 is more reliable in general when it comes to connecting devices for instant plug and play when booting up a PC for the first time. Sometimes your keyboard won't work when plugged into a USB 3.0 port until after you've installed Windows and drivers. Again, doesn't mean a USB 3.0 drive won't work to flash your BIOS, just that if you have the option, use a USB 2.0 drive, and if you have issues doing the update with a USB 3.0 drive, the first thing you should try is re-do the update using a 2.0 drive.
In terms of what size USB drive you should use for BIOS flashing, it's generally recommend to stick to USB flash drives that are 16GB or smaller. A smaller drive like 2GB for instance is fine too, as the BIOS download is not big (usually only around 10 to 25 megabytes). The reason to not use larger drives than 16GB is that in the past certain motherboard BIOS flash utilities have had issues detecting and working with large USB drives, so if possible I would avoid them just to be on the safe side once again. BIOS updates can be finnicky processes.
How to Tell the Difference Between a USB 2.0 and 3.0 Flash Drive
If you already have a USB drive you're thinking of using to flash the BIOS, and therefore don't have the packaging to know what type it is, if it's not printed on the actual drive you can usually tell if it's either a USB 2.0 or 3.0 drive by inspecting the color of the end connector. USB 3.0 drives (and ports) usually have a blue connector, with USB 2.0 drives having a black connector.
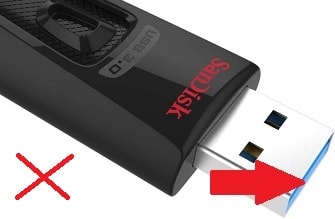 If possible, AVOID using a USB 3 drive (blue end)
Steps to Updating the BIOS Without a CPU (BIOS Flashback)
Manufacturers provide instructions on how to flash a BIOS using a USB in short videos (Gigabyte, MSI) and written form (Asus, ASRock boards have basic instructions in the manual), but if you're new to this you may want more detailed instructions to clarify a couple more things. Well, that's why I'm here; if you want someone to hold your digital hand through this potential anxiety-inducing process (BIOS updates can and do go wrong) then it's your lucky day.
1. Go to Your Motherboard's Page on the Official Manufacturer Site
Using another desktop or laptop computer, you'll need to download the BIOS update file from the manufacturer's website - never download a BIOS file from anywhere other than the official Gigabyte, Asus, MSI, or ASRock dot com website.
The quickest way to find the BIOS download is to simply search for your motherboard model in Google. For example, type in "MSI B550 Tomahawk" if you have that board, and click on the official manufacturer's page that comes up for that specific model. It should be the very first organic search result that comes up (avoid any paid/ad listings that may show above it).
Double check the page to make sure it's the exact motherboard model that you have; some models can have very similar yet slightly different model names, so it wouldn't be too hard to search for the wrong model (for example, some B550 boards have both a standard-size "B550" model and smaller "B550M" models (M indicating Micro ATX).
2. Download the Latest BIOS Update
On your motherboard's page click on the "Support" tab, then look for the BIOS section (which may be under "Drive and Utility" for some boards). You'll see a list of different BIOS versions with release dates, with the most recent at the top. Unless you have a good reason not to, download the latest version.
If that latest version is labeled as a "Beta" version, unless it's less than a week old, I would still download that version. But if that Beta version was literally just released within a week or so, I would advise against downloading it just yet as sometimes Beta BIOS versions can cause issues (and I would search places like Reddit for info on that BIOS to see what the general consensus is). In that case, download the next most recent version, but make sure it's labelled as at least AGESA 1.0.8.0 if you're doing all this for Ryzen 5000 compatibility (as many of you undoubtedly will be if reading this tutorial in late 2020 or early 2021).
Note: For Ryzen 5000 to boot, any BIOS version listed as having a minimum AGESA version of 1.0.8.0 will work. But for full support and performance for Ryzen 5000 CPUs, a BIOS that is at least AGESA 1.1.0.0 is best.
 The latest BIOS for a Gigabyte B550 Aorus Elite
3. Extract the Download and Rename BIOS File
Once the download is complete, you need to first extract it because it comes as a compressed (ZIP) file. Open up where the download is on your computer, right click on the compressed folder, and click 'Extract All'. Just extract it to anywhere on your computer, then open up the extracted file/s.
Now you need to rename the BIOS file. For Asus motherboards, the BIOS download would have come with a utility named BIOSRenamer.exe which you simply need to double click to run and it will automatically rename the BIOS file for you.
For Gigabyte, MSI, and ASRock motherboards, you need to rename the file yourself. Look for the BIOS file, which will simply be the largest file within the extracted folder, and which should have part of the BIOS version or model name in the file name (ignore the small text file that may have come with the download).
Now, rename that BIOS file as follows:
- For Gigabyte motherboards, rename the file to gigabyte.bin
- For MSI motherboards, rename the file to msi.rom
- For ASRock motherboards, rename the file to creative.rom
When you rename the file, it's normal if a warning message pops up saying that renaming it may make the file unstable - just click yes to confirm you want to continue renaming the file. Also, it does not matter if you use lowercase or uppercase (such as gigabyte.bin or GIGABYTE.BIN) as Windows treats them exactly the same.
4. Format USB Drive As FAT32 and Transfer BIOS File
Now plug in your USB flash drive, and find it within Windows file explorer/My PC. Right click the drive and click 'Format'. Select FAT32 as the format type, and you can leave other options at their default setting.
The USB drive must be formatted as FAT32, not NTFS. If you already formatted your drive a while ago and it's fresh, make sure it's FAT32 by right clicking on the drive and clicking 'Properties'.
Now move/transfer the BIOS file that you renamed earlier onto the main root/base directory of your USB drive.
5. Eject USB Drive Properly and Connect Power Supply
Properly remove the USB flash drive from the PC by first right-clicking on the drive either within file explorer or in the bottom right of the Windows desktop, and clicking 'Eject'. This isn't entirely necessary when removing USB drives, but a safety precaution that's generally recommended and something you might as well do to avoid any (rare) potential for damaging the drive since it takes just one second.
Now, get your power supply and BEFORE plugging it into the wall or turning it on, you want to connect both the large 24 pin main motherboard power connector and the 8 pin CPU power connector. Yes, to do the BIOS update you need the CPU cable connected despite not having a CPU installed.
Once the 2 cables are inserted all the way into your motherboard (make sure they're well connected), connect the power supply to the mains/wall socket and then turn on both the mains/wall and the little switch on the back of the power supply. If you need more detail on this, see our PSU cables guide:

6. Insert USB Drive and Press Flash BIOS Button
Remember that you don't need any parts installed on the motherboard except the 2 power supply cables mentioned above; no CPU, RAM, GPU, or SSD is required (in fact I would advise against having any of these installed to avoid issues with doing the flash). So, now you have the power supply connected to the board and turned on, locate the special USB port on the back of your new motherboard that should be labelled as "BIOS" or something similar (shown in the photo below).
Now insert the USB drive - just make sure to have the power supply turned on BEFORE inserting the drive; sounds strange, but I have seen some people have issues when not doing this in the correct order (ie when inserting the USB first, then turned on the power). So to be on the safe side just follow this order, which is what manufacturers suggest in their tutorials too.
Once the USB drive is fully inserted, press the small BIOS flash button found somewhere next to the USB port on the rear of your motherboard (on Gigabyte boards it will be labelled as Q-Flash Plus).
Keep in mind on some motherboards the button is on the actual board itself (not on the rear). On some motherboards, usually ASRock boards, you will need to hold the button down for 3 seconds or so.
If you have a Asus, Gigabyte or MSI board and nothing happens when you press the button, try doing this too (hold it down for 3 seconds). Be sure to only start the update if you're sure there won't be a power outage in your house; you don't want the motherboard to lose power while the update is still taking place otherwise it can damage your board.
Can You Keep a CPU Installed When Doing a BIOS Flashback Update?
If you're like most people who will be following this tutorial that are doing this to be able to boot-up with a new CPU series like Ryzen 5000, if you're curious, no, it does NOT matter if you have your new CPU installed/seated on the motherboard or not when doing the BIOS flashback update. So if you already tried booting up with your CPU and the system won't boot because you found out the BIOS is not recent enough, you can safely just leave your CPU in and do this process.
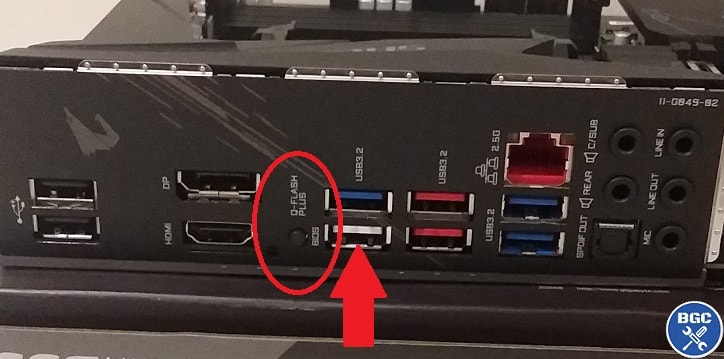 Most motherboards, like this Gigabyte B550 Aorus Elite, has the BIOS flashback button on the rear
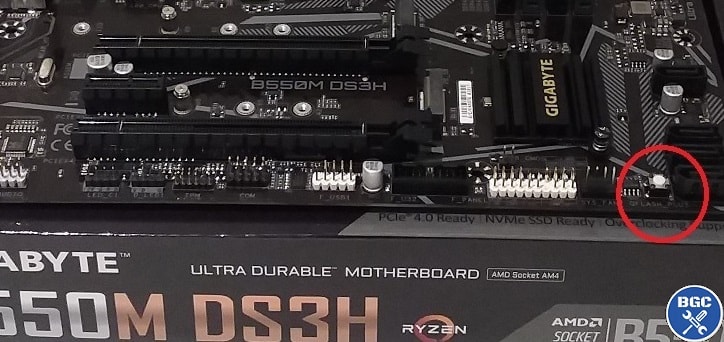 Some motherboards like the B550M DS3H have the flash BIOS button on the actual board
7. Confirm Update Worked and Remove USB Drive Once Complete
When you press the flash button (or hold it for 3 seconds for ASRock and potentially certain other boards) you should see a LED light near or next to the button start blinking/flashing. That means the update is underway. If you don't see a flashing light, or you see a constant light, the update may not have begun. Make sure you inserted the USB stick in the correct USB port labelled as "BIOS" or something similar, make sure the power supply cables are all the way in, or see the troubleshooting tips down below.
When the update is underway, be patient and let it do its thing for a few minutes without touching or disconnecting anything. When the BIOS update has been completed, the LED light should stop flashing. The motherboard may also restart or shut down itself.
At that point you can remove the USB drive, turn off and unplug the power supply from the wall and from the motherboard, and then proceed to install all your PC parts. Or if you already had your parts installed whilst doing the BIOS flashback update (not recommended but many people have done this without issue), you should now be able to boot-up into the BIOS screen (once you connect your monitor and keyboard).
How Long Should BIOS Flashback Take? (Troubleshooting Tips)
If you're wondering if your update might have failed because it's taking a long time (perhaps the light is blinking/flashing indefinitely for a long time, ie over 45 minutes), don't worry as you can just retry the process and hopefully it will work.
No matter whether you're flashing an ASUS, ASRock, Gigabyte or MSI motherboard, the process shouldn't take more than a few minutes in most cases (sometimes less than a couple minutes), however make sure to wait it out for at least 20-30 minutes before taking any action, as sometimes it really can take ages. I mean, I once heard a guy say it took him like 45 minutes, so I would be patient before removing the drive and starting over.
But if it really starts to drag on for over an hour and there's no change in the status of the light (if it was blinking during the update, and then stopped, it might have completed), you probably have an issue such as:
- Not having the USB drive formatted properly (must be formatted as FAT32)
- The motherboard not recognizing the particular USB drive you're using (try another, ideally older, USB drive)
- The BIOS file wasn't renamed properly as per the manufacturer's instructions
- Not following the correct order for doing the update
Try doing the update again, starting from the very beginning, and using a different USB drive if you can. If that fails, try to clear the CMOS battery on the motherboard (check your manual to know how for your model; some boards have a handy "clear CMOS" button on the back) and then try the update again.
If no luck, you can contact your manufacturer if you want, though they're unlikely to tell you anything that you don't already know if you're at this point. You could bring your board into a computer store and see if they can work it out for you, or depending on where you bought the board, you can submit a RMA/return and get a replacement board that will hopefully already have been updated with a more recent BIOS.
Alternatively, return the board and go into a physical store and look to buy a board with a "Ryzen 5000 Ready" type of logo on the front of the box. Lastly, another option that you may be eligible for is AMD's short term CPU loan boot kit where they send you out a free temporary CPU in order to be able to boot-up and update the BIOS from within the BIOS itself (instead of doing BIOS flashback).
Your Feedback
|
ABOUT BGC Helping you build better systems for less, here at Build-Gaming-Computers.com you'll find simultaneously comprehensive yet simplified guides and tutorials, including continuously updated PC build examples. Always as objective and unbiased as possible with product recommendations, and with little to no ads. |
Intro | Best PC Builds | Best Cases | PC Assembly | Prebuilt PCs | PSU Guide | VR Headsets | Privacy | Contact | Donate | Archives

Copyright (C) 2006-2025 Build-Gaming-Computers dot com All Rights Reserved
As an Amazon Associate we earn from qualifying purchases
For the Love of Gaming + Flawless Frame Rates