Home > PC Assembly > Install WiFi Card
How to Install an Internal PCIe Wireless Network Card (Add WiFi to a Desktop)

Most motherboards don't come with wireless capability (except some high-end motherboards), so in order to get WiFi on your desktop computer you'll need to install an internal wireless adapter card which slots into a spare PCIe (PCI Express) slot on your motherboard.
The steps to installing a WiFi card are easy, but if you need a helping hand this guide will layout everything you need to know. All you'll need is a Phillips-head screwdriver (size 2 head).
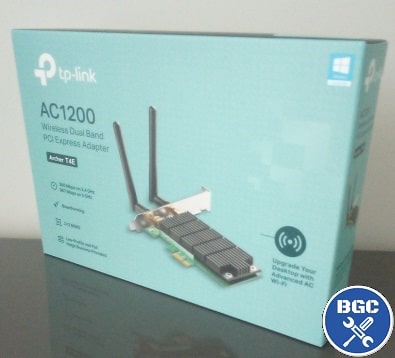
For this guide we'll be showcasing the installation of the TP-Link T4E AC1200 wireless card, which for anyone wondering is an excellent value for money choice that allows for very good speeds and a strong signal at a good price.
Related: Best PCIe Wireless Adapters
1. Locate an Available Small PCIe Slot
All internal add-on cards these days will be of the PCIe connection type, which has replaced the older PCI connection. PCIe slots come in different sizes, with the full length PCIe slots on a motherboard designed for graphics cards.
The smaller PCIe slots are for add-on cards like wireless cards. If your build has a large graphics card, it may hang over one of the smaller PCIe slots, in which case you would need to skip a slot and use the bottom PCIe slot (as is the case for our example build).
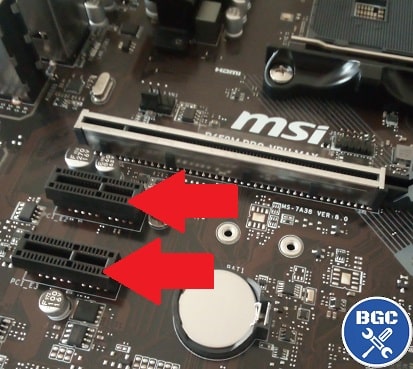 These are the small PCIe slots. If your graphics card hangs over the top slot once it's installed, you'll need to use the bottom slot
Safety Reminder
If you're adding a WiFi card to an existing desktop, before opening up your case to be able to access the inside, don't forget to:
1. Turn off your PC
2. Turn off switch on the back of computer
3. Remove power plug from the wall
Also, don't forget to be aware of static electricity precautions explained in our guide to building a PC. Put simply, always ground yourself by touching a metal object before handling any PC components.
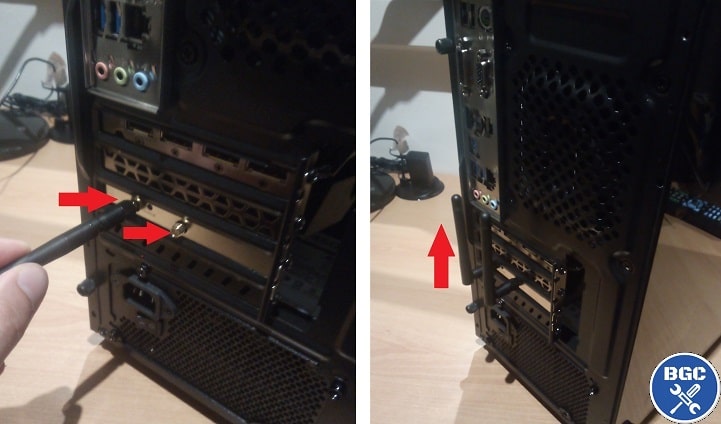
2. Remove Metal Bracket on Case
Once you know which PCIe slot to install the WiFi card, you need to remove the metal bracket on the back of the case that aligns to that slot by unscrewing it using a screwdriver and then removing it. This is so the rear bracket of your wireless card can fit through the back of your PC.
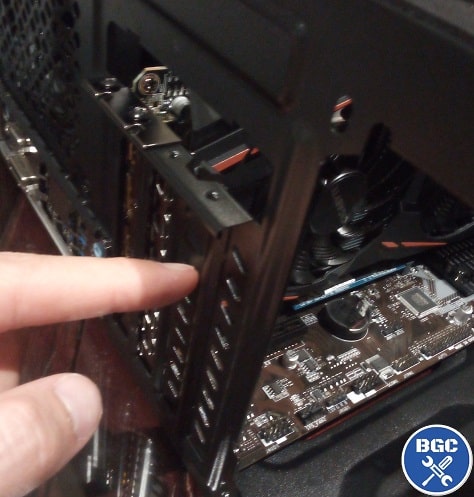 The case bracket that directly aligns to the PCIe slot needs to go
3. Insert Wireless Card in PCIe Slot
Remove the card from its box and the protective bag (keep the card in this bag until you're ready to install it), and pick it up by the metal bracket. Avoid touching the exposed green circuitry area, but handling the top or bottom of the actual card or the heatsink is safe (heatsink is the large black/grey part that sits on top of the circuitry).
Lower the card into your case and align the bottom connectors with the PCIe slot, and align the metal bracket with the rear of the case. Then gently push the top of the card all the way into the slot so that it's fully secure.
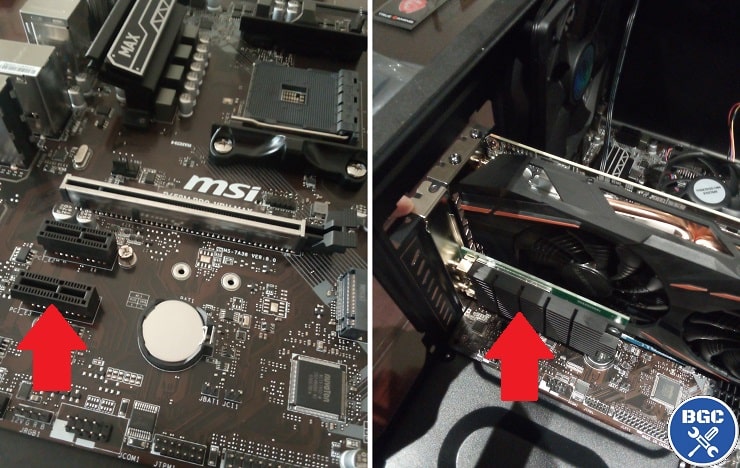 Insert the PCIe card into the small PCIe slot
4. Secure Wireless Card to Rear of Case
Now screw the wireless network card securely to the rear of your case using 2 screws that you removed earlier. You want 2 screws on either side of the card's metal bracket so that the card won't wiggle around. Tighten the screws nice and tight using a screwdriver.
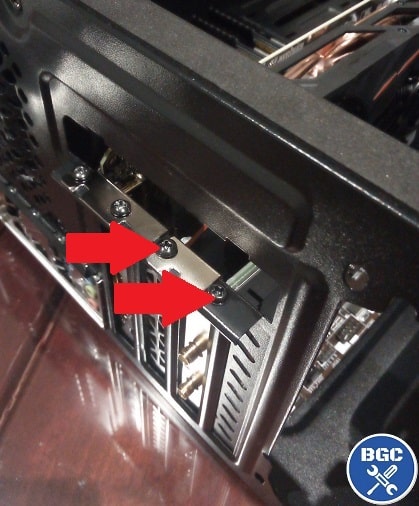 Secure the PCIe card to the case
5. Attach and Position Wireless Card Antennas
All that's left is to install the antennas that came with your WiFi card. Simply attach them to the rear of the card into the metal holes. There might be caps protecting these holes which you need to first remove. Twist the antennas all the way in using your hands, and then angle/position them so that they're facing upwards (as in, perpendicular to the floor). This is generally going to be the best angle for wireless antennas.
Getting the Best Signal With Your Internal WiFi Card
If you get a weak signal from your internal wireless card, experiment with adjusting their position as perhaps you'll get a stronger signal if you position them horizontally instead.
You can also get an extension cable and base for antennas so that you can place them on your desk somewhere (the best wireless network adapters already come with these), but before that I would try positioning your PC so that the rear is facing towards where your router is because you want to avoid your router signal being obstructed by metal objects or other electronic devices (and your actual computer case could hinder that signal).
If you get a poor wireless signal no matter what you try, then perhaps it's time to upgrade to a better router which can make a world of difference if you're stuck with an older model at the moment (or maybe it's your internet plan and/or ISP holding you back).
Related: How to Choose the Best Router for Gaming
6. Download Latest Wifi Card Drivers (Use CD if Needed)
The TP-Link T4E wireless card we installed for this particular PC build worked straight out of the box (plug and play) for a new PC build, meaning that we didn't have to first install drivers in order to access the internet with it and could finish the entire Windows 10 installation for that new build (including updates and downloading drivers) before actually going to the TP-Link website to download the latest drivers for the card.
Windows 10 is good like that, and it can automatically get many devices working without first needing drivers, plus it can automatically find and install drivers for most devices as well, including wireless cards. But even if that happens, I still recommend manually downloading the latest drivers for your particular wireless card.
So, once you've installed your WiFi card, go ahead and do that. If you have a TP-Link card like us, that means going to the official TP-Link website and searching the site for drivers for your specific card.
However, be mindful not all wireless cards are going to automatically work out the box, especially if you're not using Windows 10. That's where you would need a wired Ethernet connection in order to first be able to download its drivers before you can connect your new PC wireless with your new card.
Lastly, if your wireless card came with a driver CD, that would be great to use if your card doesn't work out the box (if you're installing an optical drive in your PC that is). But if your WiFi card works without the CD, I would just ignore the CD and download drivers online as there's no telling how old those CD drivers are.
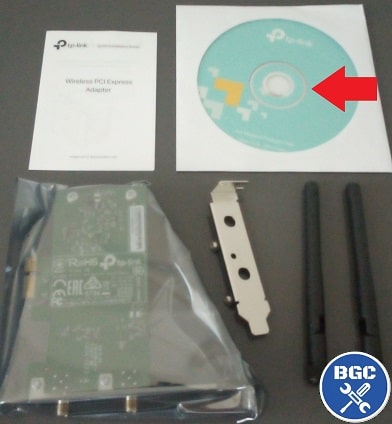 If your WiFi card works out the box, or if you have an ethernet cable to download drivers, there's no need for the driver CD
Anyway, hope this WiFi card installation guide helped. Check out our full guide to assembling a PC for beginner-friendly advice and photos on installing any of your other PC components.
Trusted VPN
VPN software can be important in this day and age, especially if you do lots of online banking and/or use public WiFi whilst travelling. Having a VPN adds an extra layer of security to your PC or laptop when online to help protect your data, passwords, financials, etc from hackers or malicious programs. It can also let you access region-locked content (eg US Netflix from overseas). For gamers their can be even more benefits to using a VPN.
Because they're so popular these days, there are countless VPN providers, and it can be confusing to pick one. If you want my 2 cents, after a lot of research I decided on NordVPN 'cause it's one of the fastest, most reliable VPNs for both gaming and general use, with a lot of credible reviews out there backing that up. They also quite often run very solid deals.
Popular Articles (see all)
Search the Site
About the Author (2025 Update)
I'm an indie game developer currently very deep in development on my first public release, a highly-immersive VR spy shooter set in a realistic near-future releasing on Steam when it's ready. The game is partly inspired by some of my favorites of all time including Perfect Dark, MGS1 and 2, HL2, Splinter Cell, KOTOR, and Deus Ex (also movies like SW1-6, The Matrix, Bladerunner, and 5th Element).
Researching, writing, and periodically updating this site helps a little with self-funding the game as I earn a few dollars here and there from Amazon's affiliate program (if you click an Amazon link on this site and buy something, I get a tiny cut of the total sale, at no extra cost to you).
Hope the site helps save you money or frustration when building a PC, and if you want to support the countless hours gone into creating and fine-tuning the many guides and tutorials on the site, besides using my Amazon links if purchasing something, sharing an article on socials or Reddit does help and is much appreciated.

|
ABOUT BGC Helping you build better systems for less, here at Build-Gaming-Computers.com you'll find simultaneously comprehensive yet simplified guides and tutorials, including continuously updated PC build examples. Always as objective and unbiased as possible with product recommendations, and with little to no ads. |
Intro | Best PC Builds | Best Cases | PC Assembly | Prebuilt PCs | PSU Guide | VR Headsets | Privacy | Contact | Donate | Archives

Copyright (C) 2006-2025 Build-Gaming-Computers dot com All Rights Reserved
As an Amazon Associate we earn from qualifying purchases
For the Love of Gaming + Flawless Frame Rates