Home > PC Assembly > Install M.2 SSD
How to Install an M.2 SSD in a Desktop PC
4 Simple Steps to Installing an M.2 SSD Onto the Motherboard (PCIe/SATA M.2)

In this guide we'll explain how to install an M.2 in your desktop PC in simple to understand terms, using an MSI motherboard as an example (but steps are the same for all motherboards).
M.2 SSDs are the very small thin storage drives that are installed directly onto the motherboard, not to be confused with regular-sized 2.5 inch SSDs which still connect to the motherboard but don't actually "live" on the board like M.2 ones do (regular SSDs are instead installed beside the motherboard within your case somewhere such as in a case drive bay).
See Also: How to Install a SATA SSD
Assuming you do actually have an M.2 SSD to install, let's move on. But do also keep in mind there are two main different types of M.2 SSDs you could install. There are PCIe NVMe M.2 drives, and there are SATA M.2 drives (the former being the faster connection type, but at a price premium).
Both PCIe M.2 SSDs and SATA M.2 SSDs are installed in the same way and same location on the motherboard, however they have different sized connectors which require slightly different sized M.2 slots on the motherboard. In other words, you need to make sure your motherboard supports the specific type of M.2 SSD that you have.
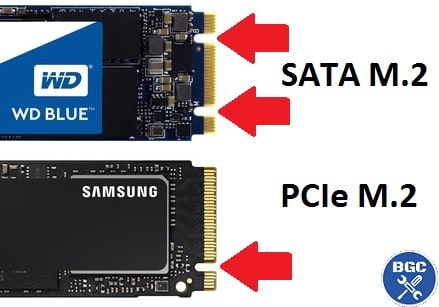 There's a physical difference between PCIe M.2 vs SATA M.2 drives
Anyway, this tutorial assumes you already have the right type of M.2 SSD for your motherboard, but if you're still planning your purchase then don't forget to do this compatibility check (and for anyone wondering, yes the PCPartPicker compatibility checker tool does automatically do this for you).
To install a M.2 SSD you'll need a Phillips-head screwdriver, but instead of the usual size 2 head that you need for installing any other PC parts, for an M.2 you'll need a size 1 head. The screw used to secure an M.2 drive is smaller than regular computer screws.
If you're installing an M.2 SSD during a fresh new PC build, this is why it's a good idea to install an M.2 SSD onto your motherboard externally outside the case before you install the motherboard into the case - if you lose that pesky little screw (which is easy to drop and can roll all over the place) it can be a struggle to try and find it from the dark depths of your case (especially if it drops behind the motherboard).
Upgrading An Existing PC With an M.2 SSD?
If instead of building a new PC you're adding an M.2 drive to an existing PC, you may need to remove your graphics card and perhaps other components (like a PCIe wireless card) to be able to access the M.2 slot on your motherboard.
Before opening up your case and working on your PC, don't forget to turn off your PC, turn off the switch on the back of the computer, and remove the power plug from the wall to be safe.
Also, don't forget to be aware of static electricity precautions explained in our guide to building a PC (ground yourself by touching metal before going near your motherboard or other parts).
1. Find Where M.2 Slot is on Motherboard
Where the M.2 slot is on a motherboard will vary from board to board (and some boards have more than 1 M.2 slot). But many motherboards will have an M.2 slot just above or below the graphics card PCIe slot.
Our MSI B450M Pro VDH Max Micro-ATX motherboard has a M.2 slot just below the graphics card slot, while our MSI B450 Tomahawk Max ATX has the M.2 slot just above the graphics card slot.
On other motherboards, the M.2 slot could be hidden and tucked away under a heatsink (metal plate used to help keep the drive cool) which you need to unscrew and remove in order to be able to access the slot.
Some motherboards may even have an M.2 slot on the rear/underside of the board. Check your motherboard manual if you can't find the M.2 slot.
Related: Best SSDs for Gaming
 Where the M.2 SSD slot is on our MSI B450M Pro-VDH Max motherboard
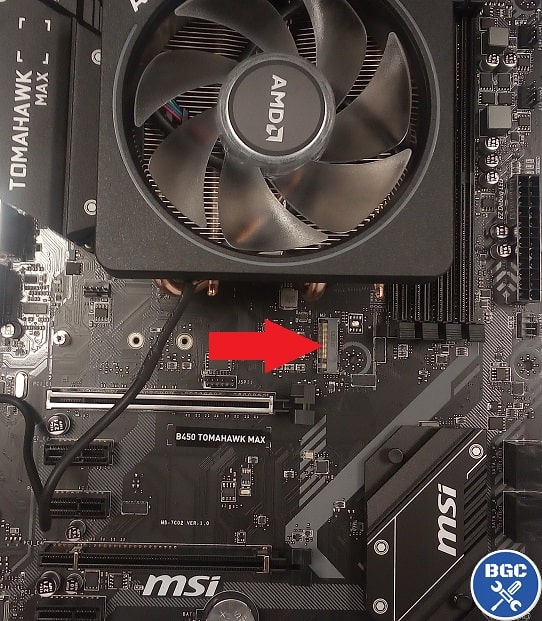 Where the M.2 slot is on our MSI B450 Tomahawk Max motherboard
2. Reposition Standoff/Riser Screw (If Necessary)
Now look for the 3 holes on the motherboard that are to the left of the M.2 slot. One of the holes should have a large standoff/riser screw already screwed in. This acts as a little raised platform for the end of your M.2 SSD to rest upon (and what the small M.2 screw will screw into later).
As you can see on our MSI B450M Pro-VDH Max motherboard, the far left hole has the riser screw in place, and this is the correct location for the particular SSD we're installing (Kingston A400 M.2 for anyone wondering) and so we don't need to move it:
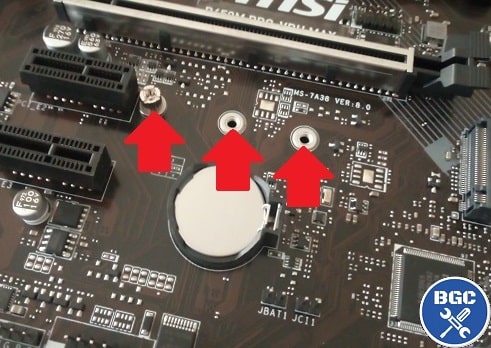 The motherboard came with the standoff screw already installed in the correct position for the length of our particular M.2 SSD
If you have a shorter length M.2 SSD then you need to remove and reposition the riser screw so that the end of your particular M.2 drive will rest on top of it once installed:
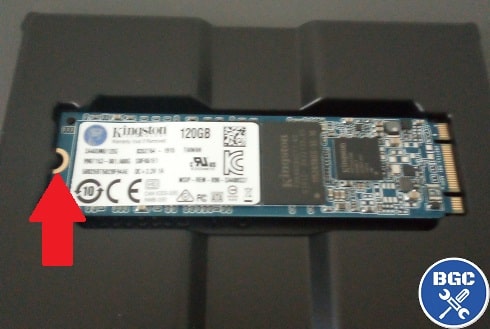 The far left of the M.2 SSD needs to rest on top of the large screw
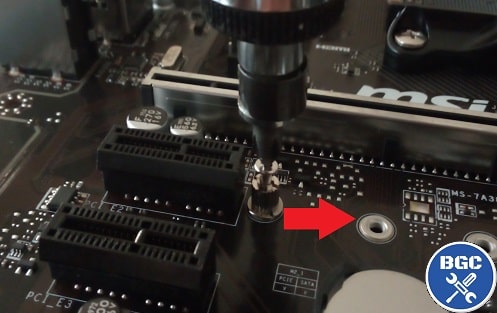 Unscrew and then re-screw the large motherboard screw to another hole if your particular M.2 SSD is shorter in length
3. Insert M.2 SSD Into M.2 Slot On Motherboard
Carefully pick up your M.2 SSD by its edges (avoid touching the exposed circuitry), and carefully insert it into the motherboard M.2 slot at a 30 degree angle.
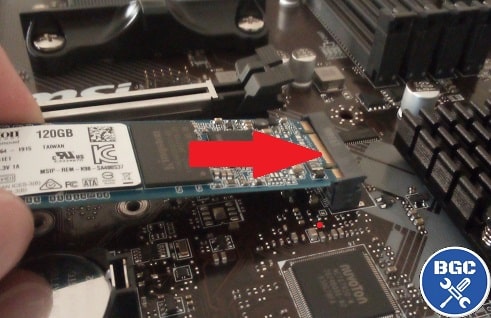 Gently slot the M.2 drive all the way in
It shouldn't require much force to insert the M.2 drive all the way into the slot, but you may need to gently wiggle and firmly push it in. If it won't go in fairly easily, perhaps you've made the mistake of getting the wrong type of M.2 SSD for your motherboard. As mentioned at the start of this guide, PCIe and SATA M.2 SSDs have different size notches (ie cutouts) on the end of the drive, which should match the slot.
4. Secure M.2 SSD With Small M.2 Screw
Now all you need to do secure the M.2 drive. With one hand, push down on top of the M.2 drive so that the left side sits on top of the standoff/spacer (touch the label of the drive and avoid touching the exposed circuirty), and then with your other hand screw the M.2 drive into the standoff using a special small M.2 screw.
As mentioned earlier, you'll need to use a Phillips-head size 1 screwdriver head, as opposed to the normal size 2 that other computer screws require. As for the small M.2 screw, that should have been provided in your motherboard box and labelled as an M.2 screw:
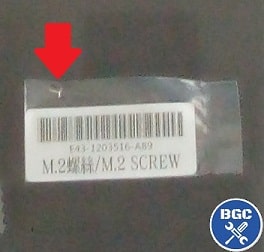 If a motherboard has an M.2 slot, it should come with a small M.2 screw
 Secure M.2 SSD with a small M.2 screw
That's all there is to installing an M.2 SSD onto your desktop motherboard. Hope this helped, and see the full steps to assembling a computer for specific, beginner-friendly guidance and photos on installing any other components.
Trusted VPN
VPN software can be important in this day and age, especially if you do lots of online banking and/or use public WiFi whilst travelling. Having a VPN adds an extra layer of security to your PC or laptop when online to help protect your data, passwords, financials, etc from hackers or malicious programs. It can also let you access region-locked content (eg US Netflix from overseas). For gamers their can be even more benefits to using a VPN.
Because they're so popular these days, there are countless VPN providers, and it can be confusing to pick one. If you want my 2 cents, after a lot of research I decided on NordVPN 'cause it's one of the fastest, most reliable VPNs for both gaming and general use, with a lot of credible reviews out there backing that up. They also quite often run very solid deals.
Popular Articles (see all)
Search the Site
About the Author (2025 Update)
I'm an indie game developer currently very deep in development on my first public release, a highly-immersive VR spy shooter set in a realistic near-future releasing on Steam when it's ready. The game is partly inspired by some of my favorites of all time including Perfect Dark, MGS1 and 2, HL2, Splinter Cell, KOTOR, and Deus Ex (also movies like SW1-6, The Matrix, Bladerunner, and 5th Element).
Researching, writing, and periodically updating this site helps a little with self-funding the game as I earn a few dollars here and there from Amazon's affiliate program (if you click an Amazon link on this site and buy something, I get a tiny cut of the total sale, at no extra cost to you).
Hope the site helps save you money or frustration when building a PC, and if you want to support the countless hours gone into creating and fine-tuning the many guides and tutorials on the site, besides using my Amazon links if purchasing something, sharing an article on socials or Reddit does help and is much appreciated.

|
ABOUT BGC Helping you build better systems for less, here at Build-Gaming-Computers.com you'll find simultaneously comprehensive yet simplified guides and tutorials, including continuously updated PC build examples. Always as objective and unbiased as possible with product recommendations, and with little to no ads. |
Intro | Best PC Builds | Best Cases | PC Assembly | Prebuilt PCs | PSU Guide | VR Headsets | Privacy | Contact | Donate | Archives

Copyright (C) 2006-2025 Build-Gaming-Computers dot com All Rights Reserved
As an Amazon Associate we earn from qualifying purchases
For the Love of Gaming + Flawless Frame Rates