Home > PC Assembly > Install SATA Drive
How to Install a SATA Hard Drive (SSD or HDD)
Desktop Installation Walkthrough for Internal 2.5/3.5 inch Storage Drives
Installing a new hard drive into a desktop is very straightforward no matter what type of storage device you have, and is one of the easiest steps of building your own computer. In this installation walkthrough we'll explain how to install an internal SATA hard drive, which could either be a 2.5 inch SSD or a 3.5 inch HDD (the steps are the same). Overall, it's a matter of slotting the SSD/HDD into the right location within your case, perhaps screwing it in to secure the drive, and then connecting cables.
Related: How to Install M.2 SSD
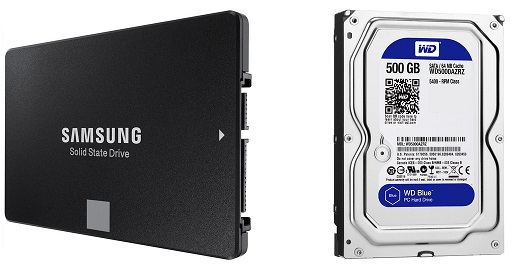
The steps to install a 2.5" SSD (left) or a 3.5" HDD (right) are the same
SATA is the connection type of the hard drive, and if your drive looks like the SSD or HDD pictured above, you have a SATA drive and this is the guide for you. If instead you have one of the faster, super-thin SSDs of the m.2 form-factor, the installation steps are different so see our separate guide on that (m.2 SSDs plug directly into a motherboard slot, unlike SATA SSDs which you typically install in a case drive bay). This tutorial is a part of our main How to Build a PC for Beginners guide, so head over there after if you want the installation steps for all your PC components.
Related: How to Choose a SSD for a Gaming PC
1. Find Best Place to Install Hard Drive
An internal HDD or SSD (that have SATA connections) can either be installed in an available drive bay (a 2.5 inch drive bay for SSDs, or a 3.5 inch drive bay for a HDD), or you can still it in a drive cage if your case has one in the bottom. For the example build used for this tutorial, we will install the HDD in a hard drive bay, and we removed the hard drive cage to free up some space as we're building a mini tower PC with limited space. Whether you install your SSD/HDD in a bay or cage will depend on your particular case and the components you're installing.
You also ideally want to install your storage drive/s in a location where they can stay cool and not overheat, with the best place to install them being in front of a case fan if you can do so. If you're mounting multiple hard drives inside your PC, leave as much space as you can between them as well.
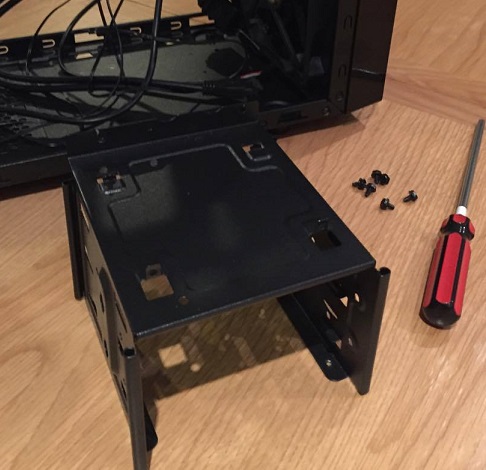
We removed the hard drive cage in our Cooler Master mini tower to free up space
2. Fit Hard Drive Into Case Bay or Cage
Before going ahead and installing the internal hard drive into your PC build, it's worth reminding you to ground yourself before handling your drive if you're not wearing an anti-static strap (or using other anti-static equipment: see our guide to the best computer tools for more). Plus, if you're adding this new hard drive as an upgrade to an existing system (instead of building a brand new PC), remember to always turn off the computer at the mains before opening up your case.
Ok, let's physically mount your SATA drive. If you're installing your hard drive in an available drive bay like we're doing for our example PC build in the picture below, it's simply a matter of either sliding it directly into the drive bay, or removing a cradle if your case's bay has one and placing your storage drive into the cradle (and then sliding the cradle back into the bay).
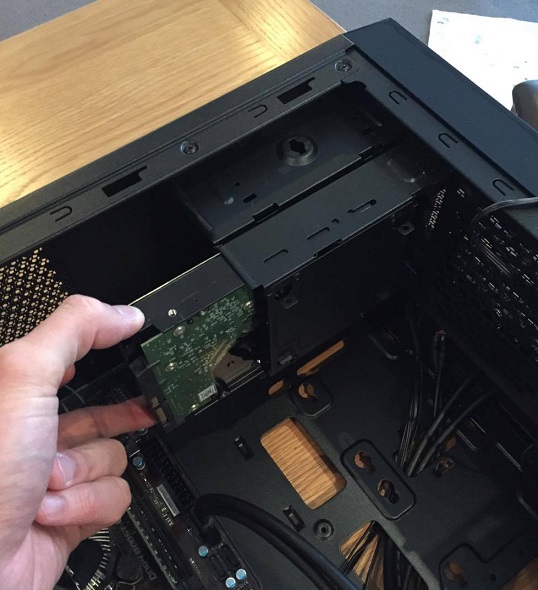
Just make sure you install the drive the right away around so that the connections of the drive are facing the inside of your case (so you can connect them via cable to the motherboard and PSU later). If you don't have an available 3.5 inch drive bay for your HDD, or a 2.5 inch bay for your SSD, you can always get a 2.5 to 3.5 inch adapter or a 3.5 inch to 2.5 inch adapter.
3. Secure Hard Drive With Screws
If your case has a tool-less cradle, you won't need to screw the hard drive into place which makes for a quicker installation. Using screws is always going to be more secure though, and you should probably only use a tool-less cradle (without screws) if you won't be moving your desktop computer around at all. Building a LAN party rig? Screw those drives in.
Line up your hard drive with the holes in the drive bay (or cage) and screw it in using the appropriate screws; for our build it's a couple of thumbscrews provided by the case, but check your case manual if in doubt as to which screws to use as it should label the HDD screws. With thumbscrews you should be able to use your hands to screw them in almost all the way, and then use a screwdriver to tighten them just that fraction further, but not TOO tight though as overly-tightened computer hardware may cause damage.
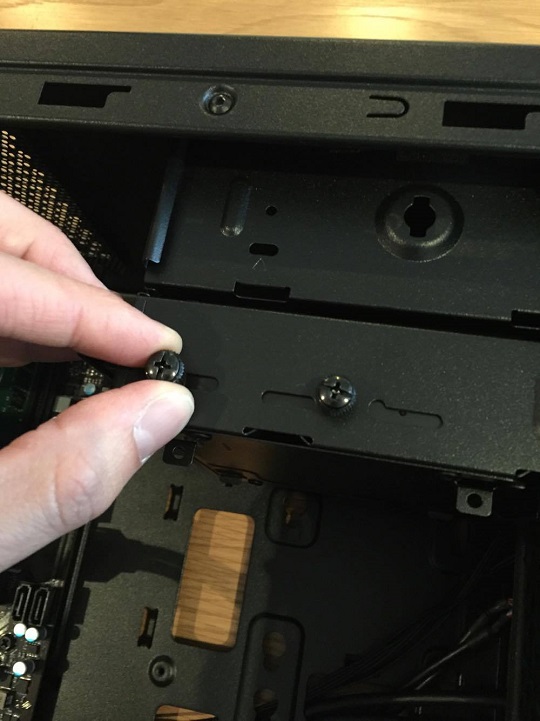
Secure your new hard drive into the drive bay/cage with screws
4. Connect SATA Cable to Motherboard
Now your HDD or SSD is fitted in place securely, grab the SATA data cable that should have come with your motherboard (if not, your hard drive) and connect it from the back of the drive to an available SATA port on your motherboard. You'll want to plug it into the first SATA3 port, which should be labelled as SATA1 or SATA0 or something like that on your motherboard. See your motherboard manual if in doubt on where the first SATA channel is on your particular board.
If the SATA cable is long enough, you'll want to try thread it through a cable management hole in your case somewhere if you can in order to keep things neat. Having loose cables hanging over your motherboard isn't the best. If you need to remove a SATA cable, remember that you need to push down on a little metal clip on top of the connector to remove it.
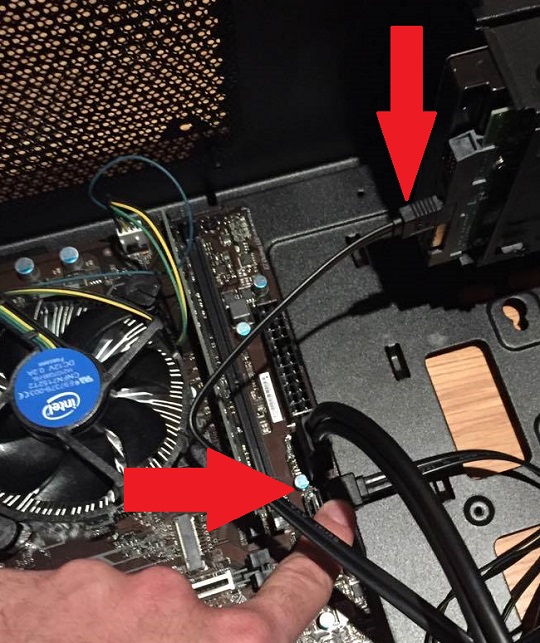
Connect the SATA data cable from the HDD/SDD to the motherboard
5. Connect Hard Drive to Power Supply
A SATA hard drive will also need to be connected directly to your power supply as well. Modern PSUs come with SATA power connectors which you can easily plug straight in, but if you perhaps have an older power supply that doesn't have SATA connectors and instead only has Molex connectors, you will need to get a Molex to SATA adapter. That's all there is to installing a new hard drive into a desktop computer.
Related: How to Install Power Supply Cables
Trusted VPN
VPN software can be important in this day and age, especially if you do lots of online banking and/or use public WiFi whilst travelling. Having a VPN adds an extra layer of security to your PC or laptop when online to help protect your data, passwords, financials, etc from hackers or malicious programs. It can also let you access region-locked content (eg US Netflix from overseas). For gamers their can be even more benefits to using a VPN.
Because they're so popular these days, there are countless VPN providers, and it can be confusing to pick one. If you want my 2 cents, after a lot of research I decided on NordVPN 'cause it's one of the fastest, most reliable VPNs for both gaming and general use, with a lot of credible reviews out there backing that up. They also quite often run very solid deals.
Popular Articles (see all)
Search the Site
About the Author (2025 Update)
I'm an indie game developer currently very deep in development on my first public release, a highly-immersive VR spy shooter set in a realistic near-future releasing on Steam when it's ready. The game is partly inspired by some of my favorites of all time including Perfect Dark, MGS1 and 2, HL2, Splinter Cell, KOTOR, and Deus Ex (also movies like SW1-6, The Matrix, Bladerunner, and 5th Element).
Researching, writing, and periodically updating this site helps a little with self-funding the game as I earn a few dollars here and there from Amazon's affiliate program (if you click an Amazon link on this site and buy something, I get a tiny cut of the total sale, at no extra cost to you).
Hope the site helps save you money or frustration when building a PC, and if you want to support the countless hours gone into creating and fine-tuning the many guides and tutorials on the site, besides using my Amazon links if purchasing something, sharing an article on socials or Reddit does help and is much appreciated.

