Home > PC Assembly > NH D15 Installation
How to Install a Noctua NH-D15 chromax.black (& Fan Airflow Guide)
Mounting One of the Best Air Coolers of All Time (AMD AM4 Motherboard Example)
The Noctua NH-D15 is a legendary CPU air cooler that has stood the test of time, and in this photo-filled tutorial we'll explain how to install the NH-D15 chromax.black - the most recent model that is way more aesthetically pleasing than the older beige and brown edition.
If you're a beginner building your first PC, don't worry as there's nothing to be scared of if you follow each step carefully and take your time with it. If you don't rush anything, it's hard to make a mistake when installing the NH-D15. Besides, the manual that comes with the NH-D15 is actually better than most coolers out there. Noctua did a great job and are one of the better manufacturers in that regard.
Related: How to Install CM Hyper 212 Cooler
However, even with the official manual it's still entirely possible (and from my experience quite common) to get a little stuck or confused by a certain aspect of the NH-D15 installation process if you're new to PC hardware in general. You can download the online version of the manual here (it's listed under the 'Service' tab) if you perhaps bought a used NH-D15 or something and don't have access to the physical manual, but if you want a little more explanation and clarity on each step including real-world photos, this guide is here to hopefully make things easier for you. The NH-D15 chromax.black comes included with 2 140mm Noctua NF-A15 fans, so we'll also explain what to know about fan placement and direction (setting up the fan/s incorrectly will restrict airflow). Let's get to it.
1. Gather Required Pieces for an AMD Install
For this tutorial I've used an AMD motherboard with the AM4 socket (compatible with any Ryzen series including the latest Ryzen 5000 processors). Installation of the Noctua NH-D15 chromax.black differs slightly if using an Intel CPU, however much of the information and explanations below will still apply to Intel installations.
So, the first thing to do is gather which specific bits and pieces from within the NH-D15 box you'll be needing for your particular CPU socket type. The manual illustrates this clearly so there's not much else to be said on this step.
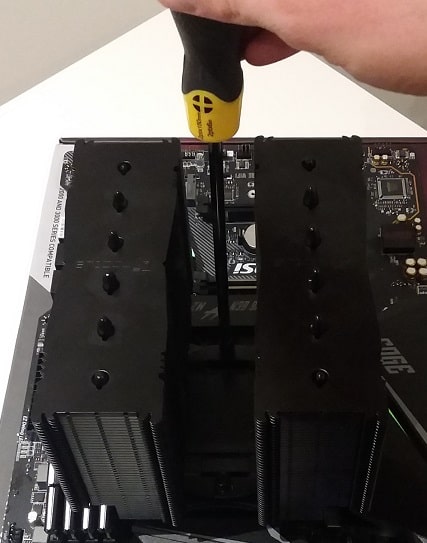
Oh, and if you haven't already, make sure to have a long Phillips-head screwdriver on hand (size #2 head). You'll see why a long one is needed later on; if you only have a short screwdriver then you are going to have trouble securing the cooler to the motherboard, and probably won't be able to finish installation of the NH-D15, not to mention installing the motherboard into the case later on which will also require a long-ish screwdriver due to the NH-D15 hogging so much space within most standard size PC cases.
Lastly before moving on, always remember to ground yourself by either touching a metal object or wearing an anti-static wrist strap before handling your motherboard (even when it's not connected to any power source). See our full PC assembly guide if you need more details on safety.
2. Unscrew and Remove the Stock AMD Brackets
If you're not building a new PC from scratch, and are instead upgrading an existing system, you will need to first remove the motherboard from your PC in order to install the NH-D15 (you'll be needing access to the rear of the motherboard). If you don't have a special PC building mat or other suitable surface to rest your motherboard safely on, pop it on your motherboard box or other piece of sturdy cardboard. This is to avoid scratching the underside of the board.
Now that your motherboard is ready to be worked on, it's time to begin the installation. AMD motherboards will typically come with 2 pre-installed black brackets on either side of the CPU slot, called the Stock Retention Module. You need to remove these by simply unscrewing the 4 screws (2 on each bracket).
 Unscrew the stock retention module (2 black brackets)
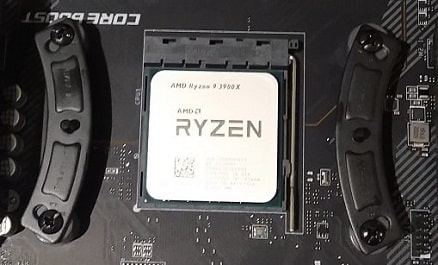
Do not remove the stock AMD backplate (the piece on the underside of the board) as you will need this for installing the NH-D15. If your AMD motherboard did not come with the 2 brackets and backplate pre-installed, the backplate should be in the motherboard box somewhere so go and grab it and place it under your motherboard so that the 4 corners poke through.
 Keep the stock AMD backplate attached to the underside
3. Attach Spacers and Mounting Bars
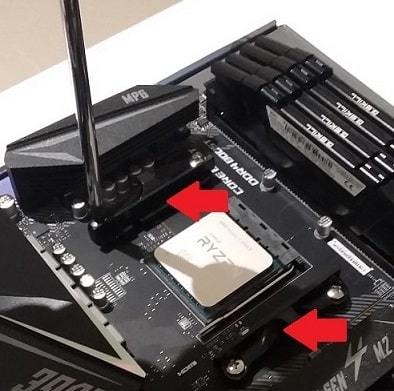
As explained in the NH-D15 manual, choose the correct 4 spacers from the box based on your AMD socket (eg AM4), and place these spacers onto the 4 corners of the backplate.
Now place the 2 mounting curves onto the spacers, making sure the curved side is facing inwards towards the CPU socket. On Intel motherboards, the curves should face the other way (outwards). Then screw in the 4 provided long screws (labeled in the manual as "NM-ALS1") using a screwdriver, making sure to put the screws through the correct holes on the mounting curves based on which AMD socket type you have (as shown in the manual).
For example, for the AM4 socket pictured below, you can see the 4 screws needing to go through the inner holes on the mounting curves (the holes on the CPU socket side). Tighten these 4 screws so that the mounting bars are firmly attached to your motherboard.
 The 2 mounting bars installed on an AM4 motherboard
4. Apply Thermal Paste to Top of CPU
Now it's time to apply thermal paste onto the CPU, which you must do before installing the NH-D15 (or any cooler for that matter) since the NH-D15 does not come with pre-applied paste on the bottom of it (some coolers, especially stock AMD/Intel coolers, come with paste pre-applied). Noctua provides a small tube of good-quality Noctua branded paste with the NH-D15, so there's no need to buy your own paste.
Holding the tube with two fingers as shown below, gently press down on the top/end of the tube with your thumb to release a small blob in the middle of the CPU. You're aiming for around the size of a pea as explained in more detail in our Cooler Master Hyper 212 installation guide. Not too little, but not too much - either can negatively affect performance.
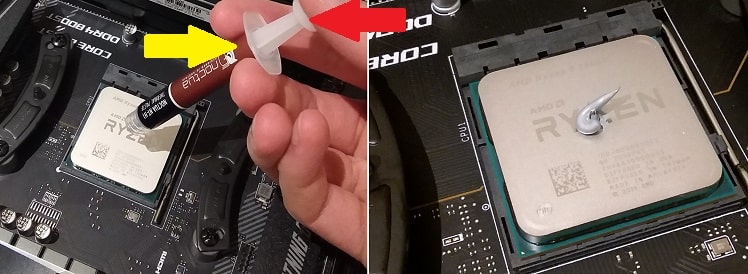 Hold tube with 2 fingers (where yellow arrow is pointing), and press the top with thumb (red arrow)
5. Remove Cover and Middle Fan
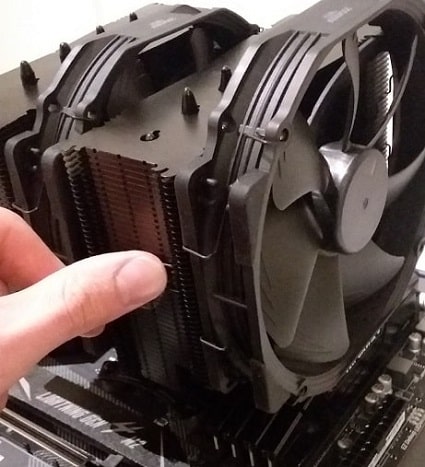
Now you have thermal paste applied, it's time to physically mount the NH-D15 onto the CPU/motherboard. Go grab that humongous beast, making sure to handle it by the radiators/fins. Remove the cover on the bottom, but be sure not to touch that area as your hands contain natural oils that could transfer onto the surface.
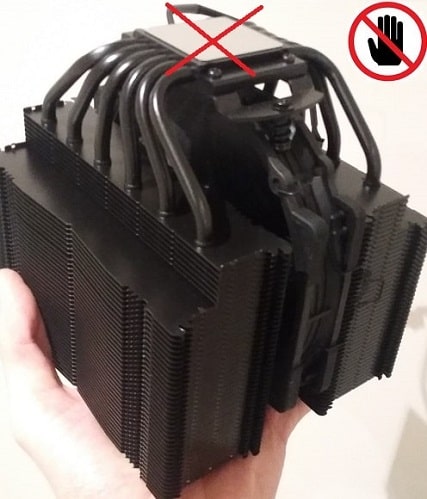 Grab the NH-D15 by its 2 large radiators
You want to keep this surface - and the top of the CPU where you applied paste - as clean as possible and away from any oil or debris. It's not something to stress about, but worth pointing out if you're new to hardware. Keep these surfaces covered and out of the way of potential debris until the moment you're ready to install your cooler.
For example, avoid leaving your motherboard with an installed CPU out in the open for too long (without a cooler mounted on top to cover it), as it can collect dust or other things like cat hair if you also have such critters roaming the house as I do right now. Same goes for your cooler; leave it protected in its box until installation time (or simply with its protection cover on if your cooler came with one).
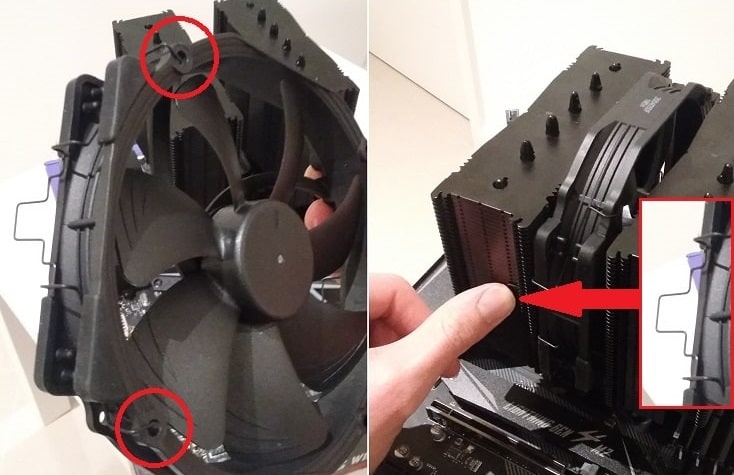
Let's move on. The NH-D15 comes shipped with the middle fan already attached, but you need to remove it to be able to install the cooler (and then you'll attach it back on later). Simply undo the 2 clips found on either side of the fan that is holding it in place.
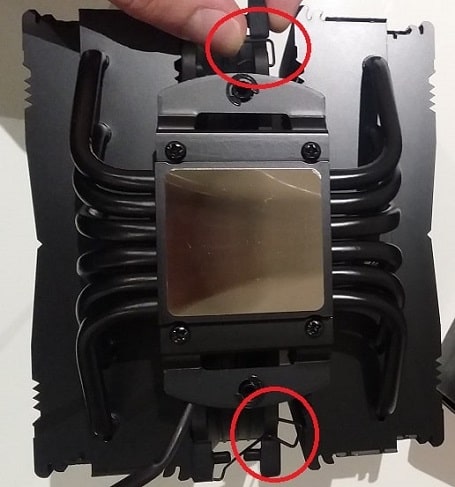 Remove the middle fan by undoing the 2 clips that hold the fan in place
6. Mount and Secure Heatsink to Motherboard
Now it's time to physically mount the NH-D15 on top of your CPU. Before rushing in, figure out which way you need to mount the cooler. You don't want to make contact with the CPU (and paste), and then have to lift it off and rearrange the cooler because you lowered it in the wrong way.
Once you squish down on that paste (which by the way will naturally spread out over the CPU due to the pressure), you ideally don't want to remove the cooler and put it back on again. Doing so can lead to less effective paste application, and you might have to clean up and re-apply the paste to get the best cooling performance (though if you're lucky it might not affect it and you'll be fine).
So, look at the 2 screws on the bottom of the cooler as pictured below (left photo). These 2 screws need to line up with the 2 middle screws on the motherboard mounting bars (right photo). Once you know which way you need the cooler to be oriented, lower it onto the CPU. As mentioned, the pressure will naturally spread the paste around, so there's no need to twist the cooler or anything like that in order for the paste to evenly spread out over the CPU (I would avoid doing that as it could spread the paste over the edge of the CPU which is not good).
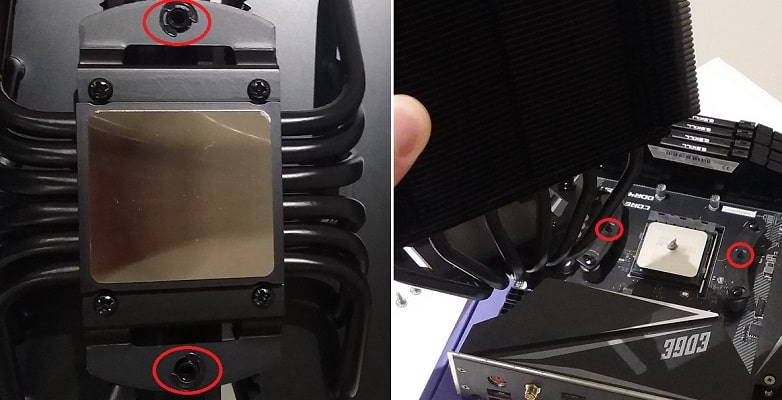
Once the cooler is sitting on your CPU and the 2 screws are lined up, it's time to secure the cooler by tightening those 2 screws. This is simple, but can be a little tricky and require some patience to get right, especially if you're doing this by yourself without someone to help. Use one hand to keep the cooler properly aligned over the 2 screws (as well as firmly down onto the CPU), and use your other hand to tighten the 2 screws one at a time with a long-neck screwdriver (a short screwdriver is going to be a struggle here). Having someone else hold the cooler in place while you screw in the 2 screws can make this easier.
Also, as mentioned in the NH-D15 manual, it's important that you slowly tighten each screw at roughly the same rate. In other words, don't fully tighten one of the screws all the way - tighten one screw for a couple turns, then do the same for the other, and keep repeating until they are both tight. Also, don't use excessive force - tighten the 2 screws until you can't turn them any more and so that the cooler is firmly in place, but there's no need to keep forcing the screws beyond that point.
 Secure the 2 screws to the 2 mounting bars
To know that you've properly installed the NH-D15 and that both screws are fully inserted properly into the motherboard, look to see that the cooler is completely flat onto the CPU. Also, gently try to slide the cooler from side to side with your hands to confirm that it doesn't move around at all. I would also carefully pick up your entire motherboard by the cooler (as in, hold the cooler and lift the board up a little bit off the surface you are resting it on, eg your motherboard box) to get a sense that it is completely attached and won't slip off.
7. Attach Middle Fan in Proper Direction
Now that the cooler is mounted, it's time to re-attach the middle fan that you removed earlier. First of all, re-attach the 2 clips onto each side of the fan, making sure the middle bit (that will attach to the radiator) sticks out the correct side of the fan. You need to attach the fan so that it will blow air in the proper direction - backwards towards the rear of your PC case.
The side of the fan with the 4 spokes on it (the 4 bars with the fan logo in the middle that sits over the actual fan blade) is the side where air blows out. Or you can just look closely on the side of the fan where there is an arrow indicating which way the air blows.
 Arrow on side of Noctua fans show which way air blows
You want this side (the side with the 4 spokes) to be facing towards the rear of your PC, so that this middle fan will suck/intake air in from the front radiator and blow it through the rear radiator (the NH-D15 has 2 radiators). Once you have attached both of the clips (through the holes circled in the left photo below), lower the fan in between the two radiators and attach the clips onto each side of the rear radiator (the radiator that will be closest to the rear of your PC case).
 Attach clips to each side using the 2 holes (left photo), and attach clips to each side of the rear radiator (right photo)
8. Attach Second Fan to Front (or Rear)
Now you want to install the 2nd fan (that comes with the NH-D15) on the front of the cooler, positioned in the same manner as the middle fan so that the fan sucks air in from the front of the case and blows it through the radiator in a backwards direction. Installing this second fan on the front is optional, but will further improve cooling performance of the NH-D15 so is recommended unless you have a good reason not to use it (eg RAM clearance issues explained in a second).
It's important to note that you may wish to hold off on attaching the second fan until you have first installed the motherboard into your PC case, as this second fan may get in the way of installing your motherboard and/or attaching a certain cable later on in the PC assembly process (such as connecting the main motherboard power cable from your PSU, which on many boards will be located near this front fan).
The attachment process for the front fan is the exact same as the middle fan; attach the 2 clips to each side of the fan and attach the end of these clips to the radiator. Keep in mind it's normal for the front fan to sit slightly higher than the middle fan.
 Install the second fan to the front radiator, oriented so that it will blow air backwards through the radiator
Attaching a front fan is optional because if you have tall RAM modules, a front fan may not fit. If that's the case, you can get around this by attaching the front fan to the radiator at a slightly higher level (so that the top of the fan sits higher up over the heatsink). However, you can only do this if you have enough clearance within your case so that the fan won't stick out so much that you cannot close your case's side panel.
If the NH-D15 is a tight fit in your particular computer case, and you have tall RAM modules, you may not be able to install the front fan at all. Check the CPU clearance in your case's spec sheet against the height of the NH-D15 (which is 165mm). If your case's CPU cooler clearance is only like 170mm for instance, you won't be able to move the front fan up to accommodate your tall RAM modules, in which case you can't attach a front fan.
You could attach it on the back of the rear radiator if you wanted to instead (positioned to pull air in from the rear radiator and blow it out towards the rear of the case), or just leave it off if you there's issues installing it on the rear as well and only have the middle fan installed. Using 1 vs 2 fans with the NH-D15 doesn't make a big difference in temperatures anyway so I wouldn't worry about it.
See Also: PC Fans and Airflow Basics for Beginners
Push Push vs Pull Pull for NH-D15
This fan setup (middle and front fan both pushing air through the radiators) is called a "push push" configuration, as opposed to a "pull pull" configuration where you would orient the fans the other way around (having a middle and rear fan both "pulling" air through the radiators). The push push setup is most common and recommended due to its potentially slightly better cooling performance, however the difference in temperatures is minimal. Therefore, don't hesitate to do a pull pull setup if you must (eg if you have RAM clearance issues).
9. Connect Fan/s to Motherboard
Now all that's left is to plug the fan/s into the CPU fan header/s on the motherboard, which will provide power to the fans. Refer to your motherboard manual if you can't locate the CPU fan header/s. If you're connecting 2 fans (as is recommended) but your motherboard only has one CPU fan header, you can simply use the fan splitter cable pictured below (that comes with the NH-D15) to connect both fans to a single CPU fan header.
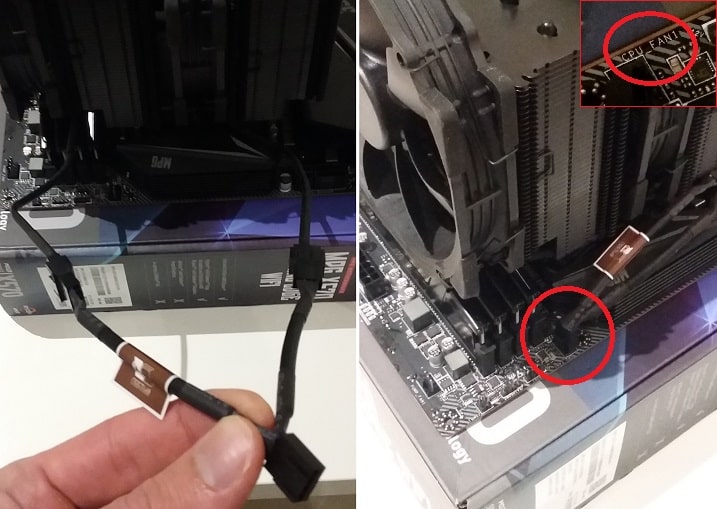 Connecting the fans to the CPU fan header using the provided splitter cable
That wraps up how to install the NH-D15 with optimal airflow. Once your system is up and running, remember you can change fan speed settings in the BIOS if you like. You should also check your CPU temperature when you're running a demanding game or other demanding application to confirm that your cooler (and thermal paste application) is working as it should.
If you get abnormal results (it's easy to find info online on what ballpark temps are normal for your type of setup) then you may not have applied paste properly, in which case you'd have to re-do installation and the paste. But if you followed all the installation steps carefully, you should be absolutely fine.
In terms of maintenance for the NH-D15, all you really need to do is remove and dust off the fans every few months or so if you want to keep things in peak condition. Anyway, hope the guide helped and enjoy your new super effective, super quiet setup.
See Also: How to Build a PC from Scratch
Trusted VPN
VPN software can be important in this day and age, especially if you do lots of online banking and/or use public WiFi whilst travelling. Having a VPN adds an extra layer of security to your PC or laptop when online to help protect your data, passwords, financials, etc from hackers or malicious programs. It can also let you access region-locked content (eg US Netflix from overseas). For gamers their can be even more benefits to using a VPN.
Because they're so popular these days, there are countless VPN providers, and it can be confusing to pick one. If you want my 2 cents, after a lot of research I decided on NordVPN 'cause it's one of the fastest, most reliable VPNs for both gaming and general use, with a lot of credible reviews out there backing that up. They also quite often run very solid deals.
Popular Articles (see all)
Search the Site
About the Author (2025 Update)
I'm an indie game developer currently very deep in development on my first public release, a highly-immersive VR spy shooter set in a realistic near-future releasing on Steam when it's ready. The game is partly inspired by some of my favorites of all time including Perfect Dark, MGS1 and 2, HL2, Splinter Cell, KOTOR, and Deus Ex (also movies like SW1-6, The Matrix, Bladerunner, and 5th Element).
Researching, writing, and periodically updating this site helps a little with self-funding the game as I earn a few dollars here and there from Amazon's affiliate program (if you click an Amazon link on this site and buy something, I get a tiny cut of the total sale, at no extra cost to you).
Hope the site helps save you money or frustration when building a PC, and if you want to support the countless hours gone into creating and fine-tuning the many guides and tutorials on the site, besides using my Amazon links if purchasing something, sharing an article on socials or Reddit does help and is much appreciated.

|
ABOUT BGC Helping you build better systems for less, here at Build-Gaming-Computers.com you'll find simultaneously comprehensive yet simplified guides and tutorials, including continuously updated PC build examples. Always as objective and unbiased as possible with product recommendations, and with little to no ads. |
Intro | Best PC Builds | Best Cases | PC Assembly | Prebuilt PCs | PSU Guide | VR Headsets | Privacy | Contact | Donate | Archives

Copyright (C) 2006-2025 Build-Gaming-Computers dot com All Rights Reserved
As an Amazon Associate we earn from qualifying purchases
For the Love of Gaming + Flawless Frame Rates