Home > PC Assembly > Hyper 212 Installation
Installing the Cooler Master Hyper 212 RGB Black Edition (& Compatibility FAQ)
How to Mount One of the Most Popular CPU Coolers of All Time On a AMD Motherboard
 Don't be intimidated by installing the Hyper 212 - with a complete guide like ours it's actually quite easy
Installing the Cooler Master Hyper 212 RGB Black CPU cooler is quite a straightforward process, but if you're a beginner perhaps building your first PC or you've just never installed an aftermarket CPU cooler before, the assembly diagrams that come included with the cooler's manual (which you can download here) may not provide you enough information during certain aspects of installation and can even be a little confusing or unclear.
All you get in the manual are some basic little diagrams which may be enough for some people to figure out - especially if you're naturally good at manual labor and assembling things - but the lack of any detailed instructions makes it easy to get a little stuck or frustrated. In this beginner friendly installation guide we'll slowly take your hand through each and every single one of the steps in as basic, layman's terms as possible, along with many accompanying photos to help make the process as frustration-free as possible.
See Also: How to Install a Stock AMD Cooler
Few hardware components have had as good a run over time as the immensely popular Cooler Master Hyper 212, and for good reason as it's an excellent value cooler that effectively keeps CPU temperatures low and reduces noise to a minimum (even when overclocking your CPU). For a CPU cooler, it also looks quite decent. The older Hyper 212 EVO model wasn't the prettiest thing in sight, so when Cooler Master released the slick Hyper 212 Black Edition (and RGB Black Edition - exactly the same cooler except with an RGB fan included) I wondered why they hadn't done so earlier.
So if you're still on the fence about buying one and are here reading this assembly guide as a tire-kicker to see what installation is like, having used this cooler in multiple builds I can personally highly recommended it for any mid to high-end gaming PC. It's also a regular inclusion in our quarterly best gaming PC builds for the money series, and would work well to effectively cool any type of Ryzen 5, 7, and even 9, or an Intel i5, i7, or i9.
It's also not that hard to install, despite what some people may say in customer reviews you see around the 'net - however, if you only rely on the diagrams from the cooler's manual for installation, I can imagine it being difficult for a beginner. But that's why you're here, right? I've written this guide in as simple terms as possible, with clear photos and my own diagrams to hopefully make this a breeze. All you need is a screwdriver, and some patience, and you're good to go. Oh, and a motherboard with an already-installed CPU would be nice too.
You should also have the cooler's manual on hand as you still want to refer to it during installation, even while reading this guide. Alright, let's get straight into the steps using an AMD motherboard as the example; the installation steps for Intel motherboards will be slightly different in a couple areas, but a huge chunk of this guide will still apply. Oh and if you have any feedback on this guide, do let me know in the comments. Good luck and let's go.
See Also: How to Build a PC from Scratch
Table of Contents
1. Unbox the Hyper 212 & Gather Pieces
2. Remove Default Mounting Brackets
3. Prepare the Hyper 212 Mounting Bracket
4. Attach and Secure the Mounting Bracket
5. Prepare the Hyper 212 for Installation
6. Apply Thermal Paste to CPU Socket
7. Mount the Hyper 212 Onto Motherboard
8. Attach Fan & Connect to Motherboard
9. Connect RGB Cable to Motherboard/PSU
FAQ
1. Unbox the Hyper 212 & Gather Pieces
Starting squarely at ground zero, let's unbox the Cooler Master Hyper 212 RGB Black and gather what you need for installation on an AMD motherboard. Here's everything included in the box:
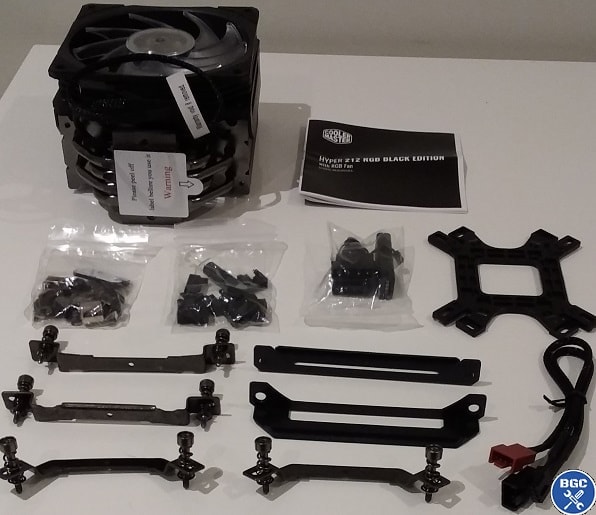 Everything that comes with the Cooler Master Hyper 212 RGB Black Edition
Some of the pieces are only needed for installing the Hyper 212 on an Intel motherboard, some are just for AMD installations, and some are used for both. As mentioned before, in this guide we'll be showing how to install the cooler on an AMD motherboard (specifically socket AM4, which covers most modern AMD CPUs including all Ryzen models). The installation process is similar for Intel, but keep in mind there are differences in the steps. Anyway, in the manual it lists which parts you need for an AMD install:

Image Credit: Cooler Master
Go ahead and gather the listed pieces for AMD (AM4) motherboards which is piece C, D, E, F, H, and M. You'll also need the tub of thermal paste labeled 'K' - note in the picture above it's not listed as needed for AM4 installs since it's a piece needed for both Intel and AMD installations.
If you bought the RGB Black Edition too (not the standard Black Edition or another model) you will also need the pieces 'O', 'P', and 'Q' if you'll be connecting the cooler's RGB fan cable directly to the power supply. We'll explain all this later in detail, but you have the option to connect the RGB cable either to the power supply or directly to the motherboard (and if you do the latter, you won't need those 3 pieces).
So, besides those 3 optional pieces for the RGB cable (set them aside in case you need them later), below is everything you need for now for an AMD install, including a screwdriver and of course your motherboard which I recommend you have sitting on top of its cardboard box:
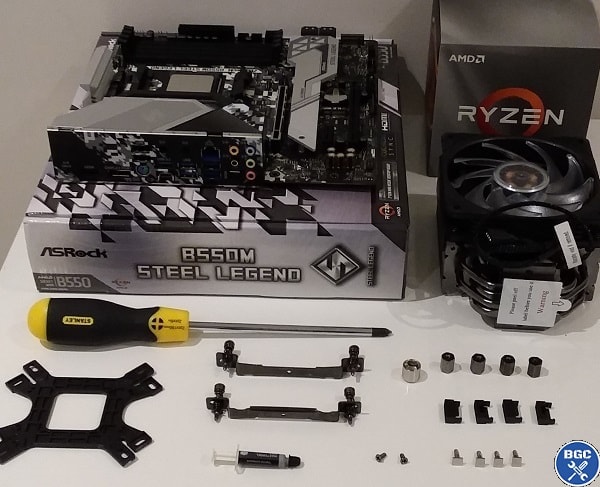 What you need to mount the Hyper 212 RGB Black Edition on AMD motherboards
If you're building an entire PC from scratch and following this guide in conjunction with our full PC assembly guide, you'll know that sitting your motherboard on its cardboard box is a handy way to work on the board as it can protect the underneath of the board and also prevent it from sliding around when working on it.
If you're not building an entire PC from scratch, and are instead just adding the Hyper 212 cooler to an existing PC, you'll need to first remove your motherboard from its case since you need access to the backside of the board in order to install the Hyper 212. Before removing the board from your PC remember to first turn off and unplug your PC at the wall, and ground yourself before reaching into your PC and touching anything (by either wearing an anti-static wrist strap or touching a metal object).
2. Remove Default Mounting Brackets
On a modern AMD motherboard, including the ASRock B550M Steel Legend we're using for this guide, surrounding the CPU socket should be 2 black brackets that are held in place by 4 screws on each corner. These brackets are used to install the Wraith Prism, and are typically already pre-installed on AMD motherboards.
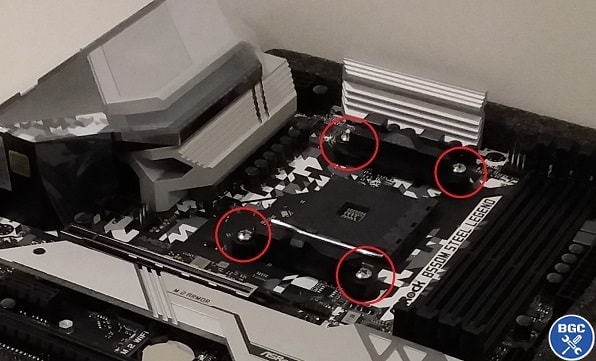 The AMD brackets surrounding the CPU socket need to be removed
These brackets are not needed to install the Hyper 212 cooler, so go ahead and unscrew the four screws using your screwdriver. Once the 2 brackets come loose, remove them and store them away somewhere - you never know, you might need them in future to install a stock AMD cooler.
You want to then carefully lift up your motherboard to remove the mounting bracket underneath the board that will have come loose. Pick up the board by holding a firm part of it such as the large heatsink on the top left of the board, the rear metal IO part, or just by its edges.
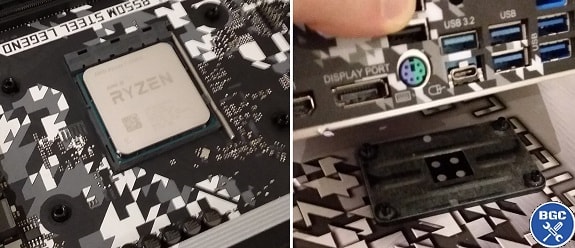 The 2 brackets on either side of the CPU socket removed (left), and lifting the motherboard to remove the bracket underneath (right)
3. Prepare the Hyper 212 Mounting Bracket
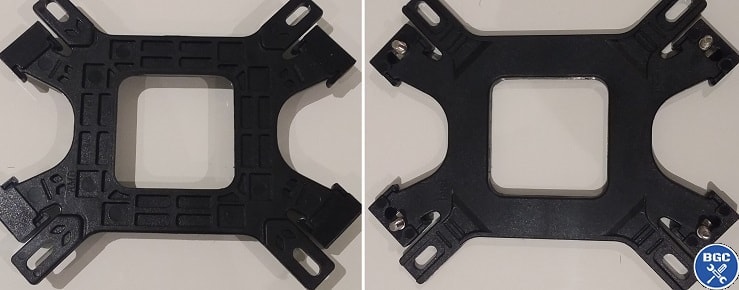
Before actually installing the cooler, you need to prepare the rear mounting bracket that came with the Hyper 212 cooler, which needs to be prepared in a certain way for AMD motherboards (the process is different for Intel motherboards). Once prepared, this bracket will replace the one you just removed from underneath your motherboard. First, grab the 4 square pegs and the 4 clips from earlier.
As shown in the manual, with the bracket facing upwards with the "AMD" sign showing, on each of the 4 corners of the bracket you need to first insert one of the small square pegs (labeled "E") through the hole labeled as "AM4" (if your motherboard uses an AM4 socket as most modern AMD motherboard do including the popular B450, X470, B550, and X570 chipsets).
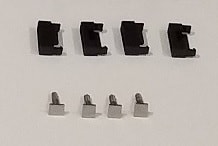 4 clips. Check. 4 pegs. Check.
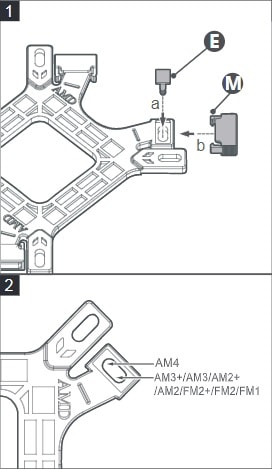
After first putting in the square peg, you then insert the clip (labeled "M") over the square peg and firmly push the clip all the way in until you hear a clicking noise (which means it's fully locked onto the bracket). You want to then flip the bracket over to check from behind that the small square piece is aligned through the right hole (it's easy for it to slide slightly into the wrong hole).
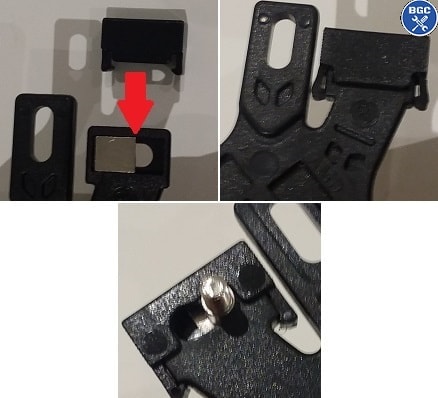 Attach the clip over the peg until it clicks all the way in, then have a look behind to ensure the peg is in the correct hole
Once you've repeated the process for each corner your mounting bracket should look like this on either side. Note how in the photo on the right the square pegs are placed in the correct holes as shown in the manual for AMD installations. Make sure your bracket looks the same before continuing.
4. Attach and Secure the Mounting Bracket
Now lift your motherboard carefully again and insert your nicely prepared mounting bracket through the 4 holes surrounding the CPU socket. Then grab the 4 black corner pieces/raisers (labelled 'F' in the manual) and use your hands to twist them into the 4 corners of the CPU socket.
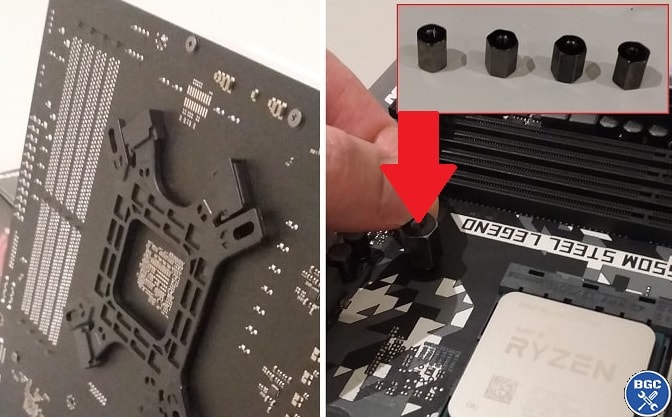 Insert mounting bracket through rear of motherboard (left), and attach the 4 black raisers (right)
Now grab the socket attachment (labelled 'J' in the manual) and use it to tighten the 4 raisers with your screwdriver.
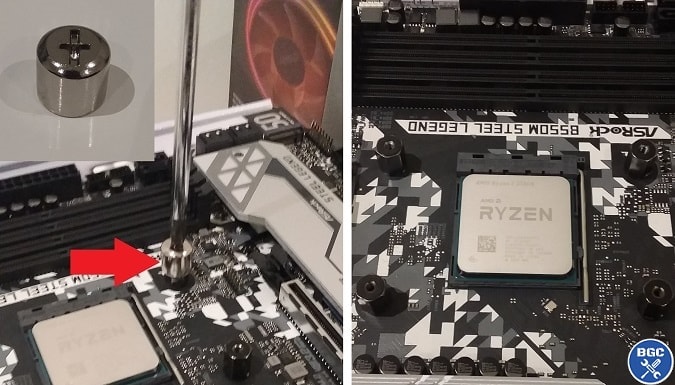 Use the socket attachment to tighten all 4 corners
5. Prepare the Hyper 212 for Installation
Now grab the actual cooler and place it upside down on your table with the sticker facing up. First remove the attached fan by simply unclipping it on the sides. This will allow you to better handle the cooler when it's time to mount it. Also, remove the sticker on the bottom, but avoid touching the surface underneath the sticker as you want to keep this area clean of any debris, oil from your hand, and so on (this is the area of the cooler that will directly come in contact with the CPU and thermal paste).
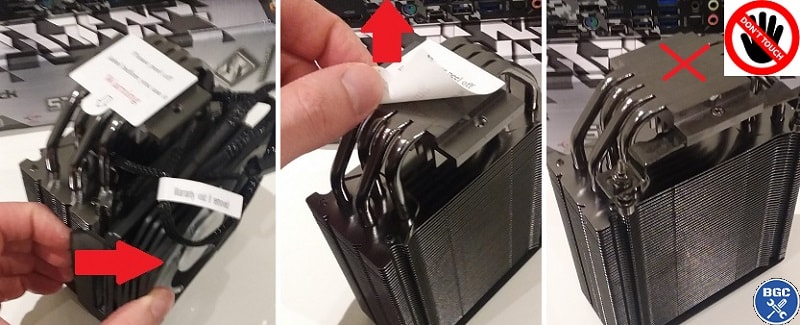 Unclip fan (left photo), remove sicker (middle photo), and avoid touching the exposed base (right photo)
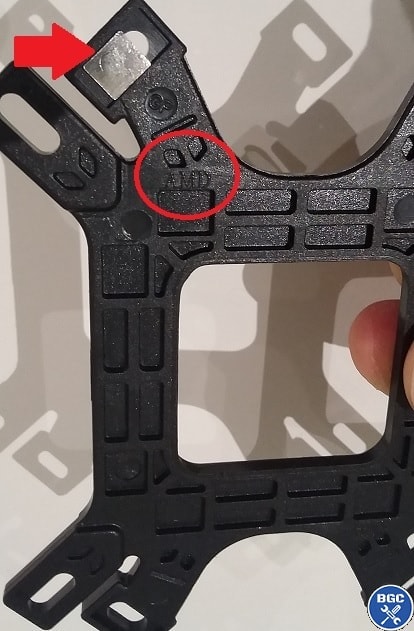
Grab the 2 attachments labelled 'C' in the manual (not to be confused with the similar-looking 'B' brackets which are for Intel motherboards). Doing one at a time, place the attachment under the side of the cooler so that the small tiny indents are facing inwards towards the middle of the cooler (these indents are circled below). Then, while holding the attachment in place with one hand, use your other hand to screw the attachment in place with your screwdriver using the tiny screws (these small screws are labelled 'H' in the manual).
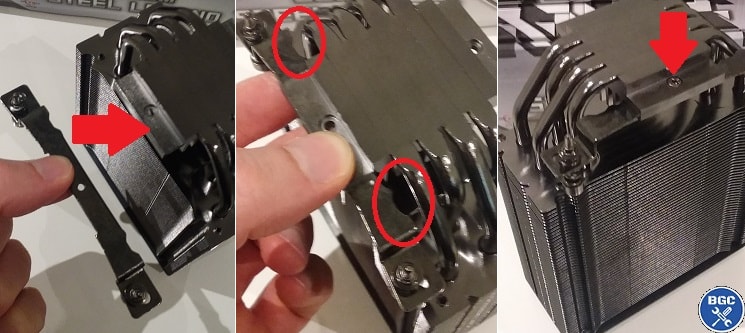 Attach the "wing" to the cooler with the small indents (circled) facing inwards. Then screw it in and repeat for other wing
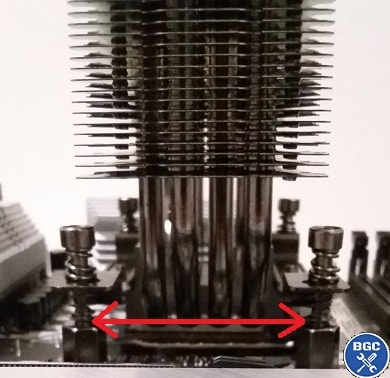
To confirm you've attached these "wings" correctly and securely, after screwing them in on each side of the cooler, try to wiggle them up and down as pictured below - you do NOT want it to be able to wiggle around. If they do wiggle from your touch, unscrew the small screw and re-attach the wing so that it's properly in place. You want these wings to be secure and not be able to move around.
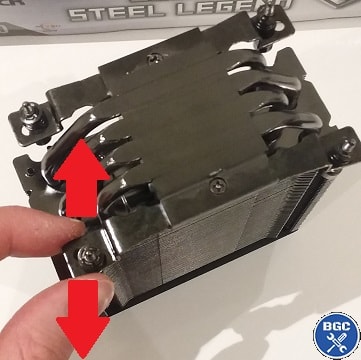 Try wiggling the wing to check it's secure and won't budge
6. Apply Thermal Paste to CPU Socket
Now before mounting the cooler, you need to add some thermal paste (also called thermal compound) to the top of your CPU. Unlike installing stock Intel or AMD coolers, the Cooler Master Hyper 212 RGB Black Edition, and any other variants of the Hyper 212, does NOT come with thermal paste already pre-applied. Therefore, you must apply the paste yourself. Fear not, Padawan, this is simple.
Go and grab the paste that should have come included with the Hyper 212, and first remove the small lid. Then, while holding the tub of paste with two fingers, gently press down on the rear end of the tub to squeeze out the paste onto the middle of the CPU (NOT onto the cooler). You want to squeeze slowly until you have a small blob roughly the size of a green pea (or a fraction larger).
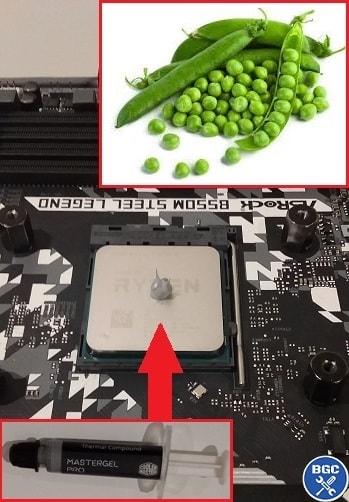 Apply a pea-sized blob of paste in the middle
You don't want to put too much paste, but you also don't want too little, though it's better to have slightly more than you need as opposed to slightly less. Just don't create too big of a blob (again, around the size of a green pea or a fraction larger). Don't stress too much over the amount of paste, as tests have proved over and over again there's very little difference in performance between different amounts/methods of thermal paste application (to a certain degree; too small of a blob, or too large of a blob can slightly negatively affect performance).
Just keep in mind this wonderful masterstroke that is the "blob in the middle method" is just one way of applying thermal paste. There's other strategies, such as applying diagonal lines in an 'X' pattern for instance, but as I said it's been proven time and time again there's little to no difference between different methods (assuming all things being equal). The pea/blob method is the simplest, and quickest, and what I recommend to anyone. Never had an issue with it and I've used it on many, many builds.
Also, you do NOT need to try and spread the paste out with the cooler (ie shifting it around the CPU) - once you mount the cooler in the next step, the paste will naturally spread out over the CPU from the pressure. If you want more detail on thermal paste, see the guide on how to apply thermal paste.
7. Mount the Hyper 212 Onto Motherboard
The moment of truth is here. Physically mounting the cooler isn't hard, but it can be a little annoying as it may take a bit of slight wiggling around of the cooler in order to align and secure it properly. I recommend reading through this entire step first to get an idea of what it is you're going to be doing, and then come back to actually perform the steps.
With one hand, grab the cooler and hover it above the CPU. Align the 4 screws on the bottom of the cooler directly above the 4 corners of the CPU socket. When you have the cooler aligned the correct way, slowly lower it directly onto the 4 corners (and therefore directly onto the CPU and the paste). There is NO need to spread the paste by moving the cooler around; the paste will naturally disperse over the CPU from the pressure of the cooler.
Now what you need to do is hold the cooler firmly in this position using one hand - holding the cooler by the top and pushing it downwards onto the CPU might be easier for you - and at the same time screw in the 4 corners with a screwdriver using your other hand. Getting someone else to screw in the cooler while the other person holds it would make it easier, but you can manage by yourself if you must. As shown in the cooler's manual, make sure to only slightly tighten one corner before moving onto tightening the opposite corner slightly, and then slightly tightening the other 2 remaining corners before then repeating the entire cycle again.
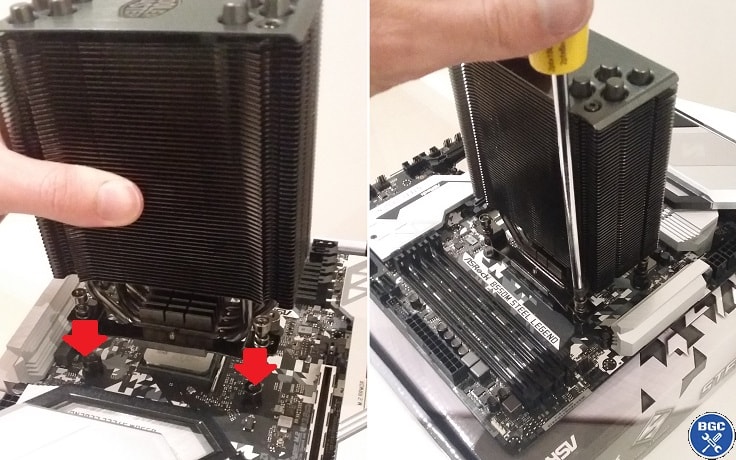
You must do this process (of only slightly tightening one corner before moving onto the next and rinsing and repeating) in order to secure the cooler properly and uniformly/evenly. If you just tighten one corner all the way in before moving onto another corner, it's not going to work as the cooler will tilt to that side. As for how far to tighten each corner, simply tighten until it won't let you go any further. There are springs underneath each corner (indicated in the photo below with the arrows) that prevent you from turning the screws all the way in.
It might take you a little bit of time to properly align and secure all four corners nice and evenly, but don't worry if that's the case. This is normal and it's easy to slightly misalign one of the corners and have the cooler slip a little, meaning that you have to start again and realign the cooler. Plenty of people have got a little frustrated at this stage, but it's not difficult and just takes a little patience. Remember to keep a nice firm grip on the cooler as well as press it down (firmly but gently) onto the CPU while you're trying to screw in the corners.
Once you've tightened all 4 corners - to the point where you can't physically tighten any further - check to see that the cooler is evenly aligned on all corners (so that no one corner has accidentally slipped out). I would also pick up the motherboard - by grabbing the cooler - and checking underneath the board to double check that the bracket underneath is also fully secure and not able to be wiggled around.
Should You Reapply Thermal Paste?
Don't worry if the cooler slides around on top of the CPU a little, as it's almost surely going to happen to most people; there's no need to re-apply the thermal paste. Only reason you would need to consider re-applying the paste (which don't forget would mean having to first clean it off properly) is if you completely removed the cooler from the CPU multiple times.
If during this step of installation the cooler slides around a bit - and even if it raises up a couple times from the CPU (as in, looses contact completely), I really wouldn't worry about it. If you get paranoid, you can check your CPU temperature after building your PC anyway (when idle and when gaming), to confirm the cooler and paste is doing its job. As for whether you should
 Look closely to ensure all corners are evenly mounted
8. Attach Fan & Connect to Motherboard
Now re-attach the fan to the heatsink by simply clipping on each side. You could theoretically attach the fan on either side of the cooler, but you want it on the RAM side of the motherboard (ie facing towards the front of your computer case). This fan acts as an intake fan that will suck in cool air from the front of the case and blow it through the cooler/heatsink fins (and then out the rear).
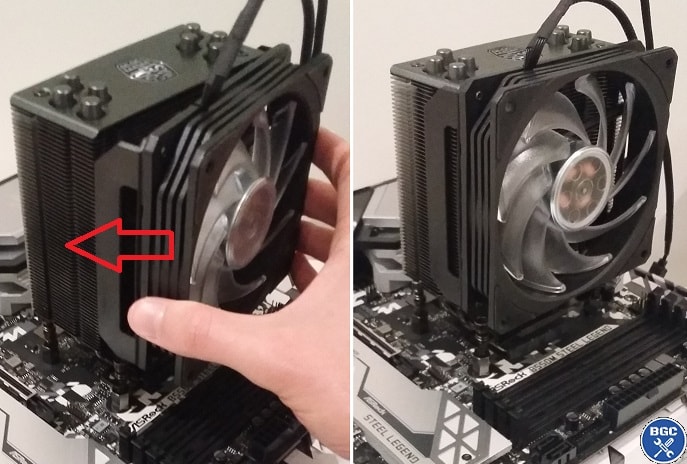 Attach the fan on the side where the RAM slots are
As you'll see in the cooler's manual, there's no need to attach a second fan to the rear, though you could if you really wanted to (and position it as an exhaust so that air is sucked from the heatsink and blown out the rear). Having 1 vs 2 fans attached on a CPU cooler makes very little difference in terms of cooling performance (at least for most typical gaming PC builds), so it's entirely unnecessary to buy and attach an extra fan.
If you did want a 2nd fan to gain a potential slight boost in cooling performance (again, it's unlikely to make much difference to most people, and I don't recommend it unless you have a good reason), the mounting clips for a 2nd fan is already provided in the Hyper 212 box and the instructions for this are at the end of the manual. If you're wondering, having that second fan can theoretically help as it helps pull heat away from the heatsink at a faster rate.
Anyway, now that you have the fan attached, you need to connect the 2 cables that are attached to it (one is for power, one is for RGB lighting). Firstly, connect the 4 pin power connector to the CPU fan header on the motherboard, which is usually up near the top of the motherboard and should be labelled (physically printed on the board) with a name along the lines of "CPU_FAN". If in doubt, check your motherboard manual.
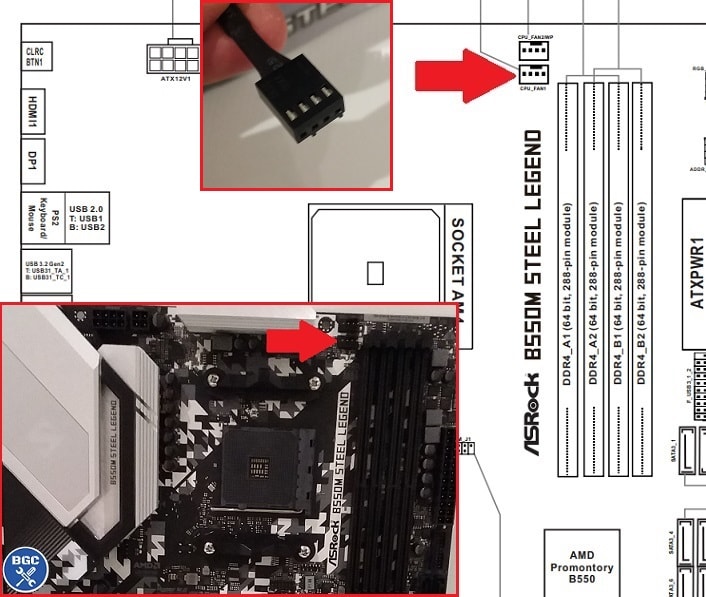 Attach this connector that is attached to the fan onto the motherboard
9. Connect RGB Cable to Motherboard/PSU
Now let's connect that second cable coming from the fan, assuming you are indeed installing the Cooler Master Hyper 212 RGB Black Edition (and not the non-RGB standard Black Edition). You have two options for connecting the Hyper 212 RGB Black Edition's RGB cable.
The first option is plugging the RGB cable directly into the motherboard - if your particular motherboard has a 4-pin RGB header. Most mid to high-end motherboards will have an RGB header (or multiple), but many motherboards won't. Plugging the RGB cable into the motherboard allows you to control the RGB lighting effects via software (ie changing colors or patterns). If you can't locate the RGB header on your motherboard, check your motherboard manual. When connecting the RGB cable, do so slowly and don't force it, making sure you connect it the proper way around.
Also keep in mind something very important: ARGB headers (typically 3pin 5 volt) are different than standard RGB headers (4pin 12 volt), and you should never use an ARGB header for a standard RGB cable otherwise you can cause damage to your components. I repeat; only connect the Hyper 212 RGB Black to a standard RGB header. If your motherboard only has an ARGB header (which may be listed as Addressable RGB and not ARGB; be on your toes), do NOT use that header.
The second option of connecting the cooler's RGB cable is using the provided RGB controller and plugging that into your power supply. The benefit of this is you can use the RGB controller buttons to manually change the RGB effects, as opposed to doing so via your motherboard's RGB software. Note that you have to open up your PC case in order to access the controller to do this though (software control is more convenient).
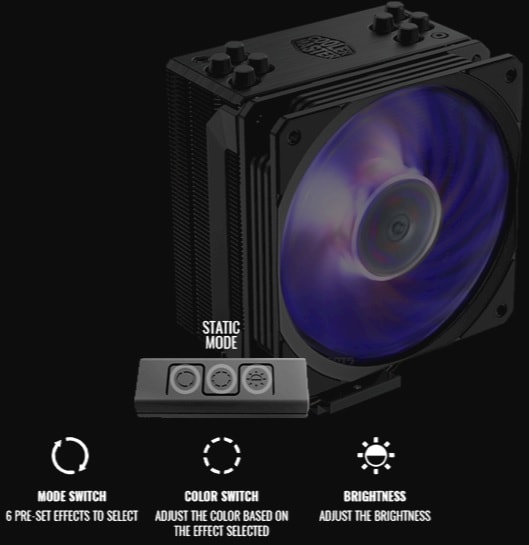
How to control the Hyper 212 RGB Black Edition's lighting (Image: Cooler Master)
On one end of the controller, connect the tiny double-sided 4-pin attachment (labelled 'O' in the manual), making sure to connect it the proper way around. Then, your cooler's RGB cable plugs into here. On the other side of the controller, insert the big 4-pin Molex connectors (labelled 'Q' in the manual) which then connects directly to a Molex connector on your power supply. If your power supply doesn't have Molex connectors, you can get a Molex to SATA adapter.
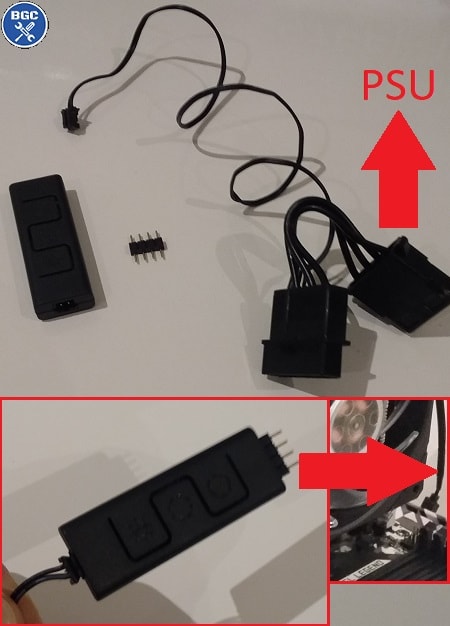 The mini double-sided 4-pin attachment plugs into one end of the controller (which plugs into the fan), and the Molex cable goes into the other end (which plugs into your PSU)
FAQ
Is the Cooler Master Hyper 212 RGB Black Edition Hard to Install?
Generally speaking, the assembly and installation of the Cooler Master Hyper 212 onto an AMD or Intel motherboard is not hard, and actually relatively straightforward. The install process is a little bit more involved compared to installing a stock AMD or Intel cooler, but not by much, and there definitely are more difficult coolers to install than the Hyper 212.
Do You Have to Remove Motherboard to Install the Cooler Master Hyper 212 RGB Black Edition?
If you already have a gaming PC and are upgrading your CPU cooler, you may wonder if you can simply reach inside your case and install the Hyper 212. But unlike some other CPU coolers, which you may be able to simply mount onto the motherboard from above (without needing to remove the motherboard from the case), to install the Hyper 212 you need to access the rear of the board in order to attach a special backplate that comes with the cooler.
Just keep in mind that this applies to AMD motherboards and certain Intel motherboards - with some particular Intel sockets you can install the Hyper 212 without needing to remove the motherboard, as those Intel boards already have a suitable backplate in place behind the motherboard.
Which Cases Are Compatible With the Cooler Master Hyper 212 RGB Black Edition?
The Hyper 212 RGB Black Edition has a height of 158.8mm (6.3 inches), which means it will fit in any computer case that has a 'CPU cooler clearance' spec (may be named slightly different by the case manufacturer) with at least this amount.
For example, if a case lists 150mm as its maximum supported CPU cooler clearance/height, the Hyper 212 RGB Black will not fit since its height is 158.8mm. But if a case lists around 160mm or higher, it will fit. Ideally, you want to make sure there's at least a few mm of space, so a 162-165mm (or higher) case clearance spec would be ideal.
Is the Cooler Master Hyper 212 RGB Black Edition Compatible With Intel and AMD CPUs?
Yes, the Hyper 212 RGB Black Edition is compatible with all modern Intel and AMD CPUs, including all AMD Ryzen CPUs such as the latest Ryzen 5000 series and previous Ryzen 3000 series. The cooler also comes shipped with the mounting brackets and pieces required for installation on either an Intel or AMD motherboard, so there's no need to buy anything else to install it on your particular motherboard.
Which CPU Sockets is the Cooler Master Hyper 212 RGB Black Edition Compatible With?
The Hyper 212 RGB Black Edition is compatible with the following CPU sockets:
- LGA2066
- LGA2011-v3
- LGA2011
- LGA1200
- LGA1151
- LGA1150
- LGA1155
- LGA1156
- LGA1366
- AM4
- AM3+
- AM3
- AM2+
- AM2
- FM2+
- FM2
- FM1
Source: Cooler Master
What Type of Fan Does the Cooler Master Hyper 212 RGB Black Edition Come With?
The Hyper 212 RGB Black Edition comes with a single SF120R RGB 120mm fan. It can be either connected to the motherboard via an RGB header (for software control of the lighting), or directly to the power supply (for manual control of the lighting using the included RGB controller).
Does the Cooler Master Hyper 212 RGB Black Edition Come With Thermal Paste?
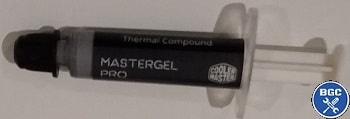
Yes, the Cooler Master Hyper 212 RGB Black Edition comes shipped with Cooler Master branded Mastergel Pro thermal paste in the box. All other variations of the 212, including the standard Black Edition (non RGB) and the older EVO model, also come with thermal paste.
Does the Cooler Master Hyper 212 RGB Black Edition Support Tall RAM Modules?
Depends on the particular module in question, but like many other coolers there is definitely a chance that the fan of the Cooler Master Hyper 212 RGB Black Edition will get in the way of the closest RAM slot on the motherboard (if you have a tall or tall-ish RAM module installed there; if you have only 2 RAM sticks you might not use that furthest RAM slot). However, if you do want to use all 4 RAM slots and your RAM is on the taller side (such as the Corsair Vengeance RGB modules which are taller than average) which gets in the way of the edge of the fan, this problem can be solved by simply moving the cooler's fan upwards slightly as pictured below:
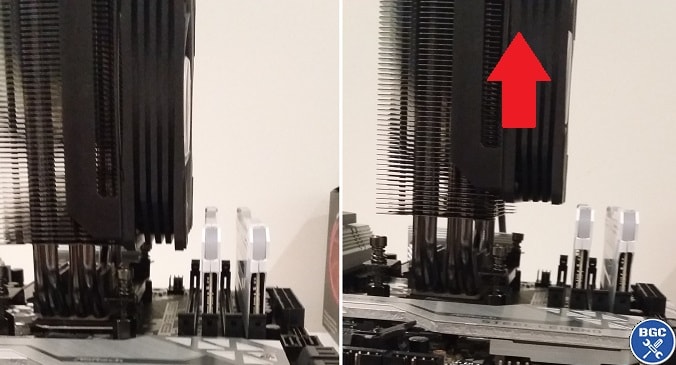 Assuming the top of the fan doesn't clash with the side of your case, to accommodate 4 tall RAM modules you can simply move the fan higher
Your Feedback
That wraps up this Hyper 212 installation guide; I hope my explanations helped clarify a certain aspect of the process that you perhaps did not get from just reading the manual. If you have any feedback on the guide then let me know in the comments below, and if you want a ton more tips on installing all your other parts then don't miss our comprehensive guide to building a PC from scratch.
Trusted VPN
VPN software can be important in this day and age, especially if you do lots of online banking and/or use public WiFi whilst travelling. Having a VPN adds an extra layer of security to your PC or laptop when online to help protect your data, passwords, financials, etc from hackers or malicious programs. It can also let you access region-locked content (eg US Netflix from overseas). For gamers their can be even more benefits to using a VPN.
Because they're so popular these days, there are countless VPN providers, and it can be confusing to pick one. If you want my 2 cents, after a lot of research I decided on NordVPN 'cause it's one of the fastest, most reliable VPNs for both gaming and general use, with a lot of credible reviews out there backing that up. They also quite often run very solid deals.
Popular Articles (see all)
Search the Site
About the Author (2025 Update)
I'm an indie game developer currently very deep in development on my first public release, a highly-immersive VR spy shooter set in a realistic near-future releasing on Steam when it's ready. The game is partly inspired by some of my favorites of all time including Perfect Dark, MGS1 and 2, HL2, Splinter Cell, KOTOR, and Deus Ex (also movies like SW1-6, The Matrix, Bladerunner, and 5th Element).
Researching, writing, and periodically updating this site helps a little with self-funding the game as I earn a few dollars here and there from Amazon's affiliate program (if you click an Amazon link on this site and buy something, I get a tiny cut of the total sale, at no extra cost to you).
Hope the site helps save you money or frustration when building a PC, and if you want to support the countless hours gone into creating and fine-tuning the many guides and tutorials on the site, besides using my Amazon links if purchasing something, sharing an article on socials or Reddit does help and is much appreciated.

|
ABOUT BGC Helping you build better systems for less, here at Build-Gaming-Computers.com you'll find simultaneously comprehensive yet simplified guides and tutorials, including continuously updated PC build examples. Always as objective and unbiased as possible with product recommendations, and with little to no ads. |
Intro | Best PC Builds | Best Cases | PC Assembly | Prebuilt PCs | PSU Guide | VR Headsets | Privacy | Contact | Donate | Archives

Copyright (C) 2006-2025 Build-Gaming-Computers dot com All Rights Reserved
As an Amazon Associate we earn from qualifying purchases
For the Love of Gaming + Flawless Frame Rates