Home > PC Assembly > Memory Overclock
How to Change RAM Speed in BIOS / UEFI
Beginner's Step by Step Guide to Manually Setting Memory Frequency (DDR4 or DDR5)
Published: February 26, 2023
Changing RAM speeds is done in the motherboard BIOS (or UEFI, a newer type of BIOS found on some motherboards) using a setting called XMP. Increasing the speed of your RAM modules is actually technically performing a memory overclock, but it's a very simple process.
Plus, it's a necessity for many PC builders since DDR4 memory modules will typically default to 2133MHz or 2400MHz, and DDR5 memory modules should default to 4800MHz. So, if the DDR4 or DDR5 RAM you have lists a higher speed in its spec, you'll need to learn how to change the RAM speed in the BIOS as explained in this guide.
Related: How to Choose a Motherboard
For example, if you bought DDR4 memory that lists a speed (which is technically referred to as frequency) of 3200MHz or 3600MHz or higher, you need to go into the BIOS to be able to run your memory modules at that speed. Because if you go into the BIOS after building your PC, you will see that your DDR4 RAM is actually running at 2133MHz or 2400MHz (whichever speed it defaults to).
Same goes for DDR5 memory - let's say you bought some DDR5 sticks that have a listed speed of 5600MHz. Just like with DDR4, you will need to go into the BIOS and manually set the speed to 5600MHz, because your memory should just default to 4800MHz.
Let's get into a real life example of how to change RAM speeds in the BIOS including screenshots, using DDR4 as an example as most PC builds will still use that since it's more cost-effective at the time of writing (and still will be for a while to come).
1. Enter BIOS and Check RAM Speed
To change RAM speeds, the first thing you need to do is of course to enter the BIOS/UEFI. If you don't know how to enter a BIOS, see the article on things to do after building a computer.
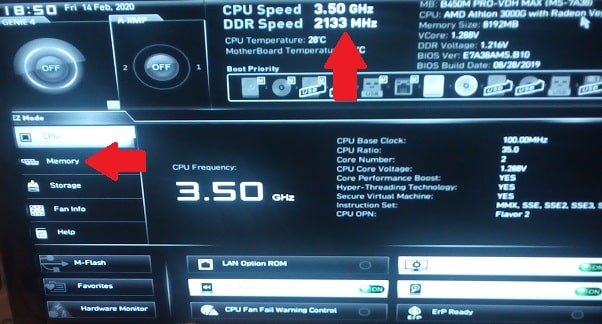
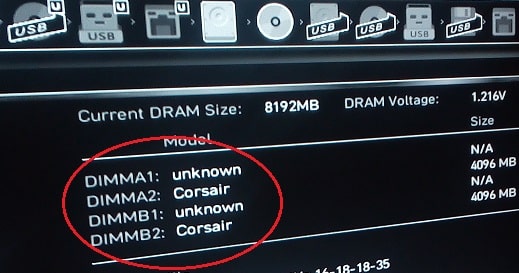
On the main screen, you should see your current memory speed show up as it does in the top of our AMD B450 motherboard BIOS (as shown below). Click on the 'Memory' option in the menu to see that your memory modules are all showing up correctly.
 RAM speed should be listed in the top of the BIOS home screen. Then go to 'Memory' settings
 Check that all your installed RAM modules show up
2. Enable XMP and Enter OC Settings
For our DDR4 modules in this example, the RAM defaults to 2133Mhz, which is normal for DDR4 to default to. The RAM in this particular build example has a speed of 2666Mhz, so in order to get that speed we need to manually change the RAM speed. As mentioned earlier, you'll likely need to do the same with your PC since DDR4 and DDR5 memory will always default to its base frequency.
Related: How to Install RAM (Which Slots?)
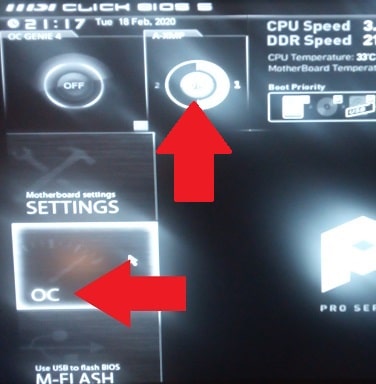
The rest of the steps to actually change RAM speed should be very much the same or similar for any type of BIOS, whether that's for a motherboard from Gigabyte, Asus, ASRock, or MSI. For our MSI BIOS in this build example, we need to first enter advanced mode by pressing F7 on the keyboard. Then click the XMP button up the top to enable XMP mode, and then once XMP is enabled click on the OC button on the left to enter overclocking settings:
 Enable XMP by clicking on it, then click OC settings
XMP, short for Extreme Memory Profiles, is an Intel technology used by both Intel and AMD motherboards that allows for the simple changing of memory settings via different built-in memory profiles. In other words, it's basically how you overclock RAM in a simple way without having to manually tinker with specific settings of your memory (frequency, voltage, and timings). And changing RAM speeds through XMP mode as we're doing here is technically a version of overclocking, albeit a very basic one.
3. Set Desired Memory Frequency
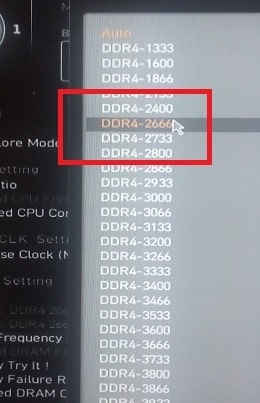
In the OC settings screen, look for a setting called frequency and from the selection of different speeds go ahead and select the speed that your RAM modules are listed as in the specs/packaging. In this example, our memory modules are 2666MHz, so we need to select that speed:
 Select your RAM speed in the BIOS
Now press F7 to go back to the main screen (or whichever button is the 'back' button in your particular BIOS) and confirm that your RAM speed is now showing up correctly on the main BIOS screen (up the top). Once you're all done, you need to remember to save and exit your BIOS (not just exit) otherwise your changes won't be properly registered.
For perfectionist types who want to further confirm that memory modules are running at their intended speed, you can download a system monitoring program like CPU-Z to double check if you really wanted to.
You could also test your memory speed using the Windows Memory Diagnostic, which you can find in Windows by simply searching in the search bar. If you do that, you'll have to restart your system, and then go to Event Viewer, Windows Logs, System, and you'll see the results of the test there. If you can't find it then enter Event ID 1201 in the search filter.
Related: What is Overclocking?
Trusted VPN
VPN software can be important in this day and age, especially if you do lots of online banking and/or use public WiFi whilst travelling. Having a VPN adds an extra layer of security to your PC or laptop when online to help protect your data, passwords, financials, etc from hackers or malicious programs. It can also let you access region-locked content (eg US Netflix from overseas). For gamers their can be even more benefits to using a VPN.
Because they're so popular these days, there are countless VPN providers, and it can be confusing to pick one. If you want my 2 cents, after a lot of research I decided on NordVPN 'cause it's one of the fastest, most reliable VPNs for both gaming and general use, with a lot of credible reviews out there backing that up. They also quite often run very solid deals.
Popular Articles (see all)
Search the Site
About the Author (2025 Update)
I'm an indie game developer currently very deep in development on my first public release, a highly-immersive VR spy shooter set in a realistic near-future releasing on Steam when it's ready. The game is partly inspired by some of my favorites of all time including Perfect Dark, MGS1 and 2, HL2, Splinter Cell, KOTOR, and Deus Ex (also movies like SW1-6, The Matrix, Bladerunner, and 5th Element).
Researching, writing, and periodically updating this site helps a little with self-funding the game as I earn a few dollars here and there from Amazon's affiliate program (if you click an Amazon link on this site and buy something, I get a tiny cut of the total sale, at no extra cost to you).
Hope the site helps save you money or frustration when building a PC, and if you want to support the countless hours gone into creating and fine-tuning the many guides and tutorials on the site, besides using my Amazon links if purchasing something, sharing an article on socials or Reddit does help and is much appreciated.

