Home > Best CPUs > How to Overclock
3 Ways to Overclock a CPU (How To)
CPU Overclocking Explained for Beginners (& Choosing the Right Parts)
Last Updated: January 13, 2023
In this beginner's guide to overclocking CPUs we'll cover the basics including why you should consider overclocking your processor, what you need to overclock a CPU (in terms of what CPUs to use, motherboards, cooling, etc), and an introduction to the various different ways you can go about overclocking CPUs. We also have other more specific guides on CPU overclocking if you want to take your knowledge further, including a guide on how to overclock a graphics card for anyone interested in that instead.
See Also:
Benefits of Overclocking a CPU (Worth It?)
When you think of overclocking, you probably think about the processor. The benefits of overclocking your CPU past its stock clock speed include:
- Slightly improved performance in games (ie higher frame rate) especially in CPU-intensive games such as GTA V, Witcher 3 and Fallout 4 just to name a few.
- Less chance of CPU bottlenecking; which is where your CPU limits your gaming performance even when your GPU is handling everything without issues.
- Slightly improved performance in other applications like video editing/encoding, 3D rendering, and any other demanding programs.
- Increases the lifespan of a processor that may have had its day and is falling behind in modern games.
Whilst those reasons sound all well and good, sometimes overclocking a CPU isn’t worth it. For example, if you’re building a new computer, instead of buying a cheap CPU and overclocking it to the level of a more expensive chip, you may very well be better off just buying the better CPU from the start and forget about overclocking.
Why? Overclocking requires you to invest money into an aftermarket CPU (and the further you push a CPU the better the cooler you’ll need), and a better PSU and motherboard. So overall, planning to overclock may not be the more cost-effective route compared to simply getting a better non-overclockable CPU.
Another reason not to overclock a CPU, not including the general cons of overclocking explained in module 1, is that modern top-tier processors generally don’t benefit all that much from an overclock as they’re already supremely fast. You will see an improvement in speed, but whether that extra little boost is worth it or not is completely subjective.
Overall, we’d generally only recommend overclocking your CPU if you’re using a mid-tier processor and already have a decent motherboard and PSU, as mid-tier CPUs will generally see the most gains. Alternatively, go ahead and overclock if you’ve got a high-end system with high-quality parts and you care about every extra ounce of processing power for CPU-intensive games and non-gaming applications.
Choosing a CPU and CPU Cooler for Overclocking
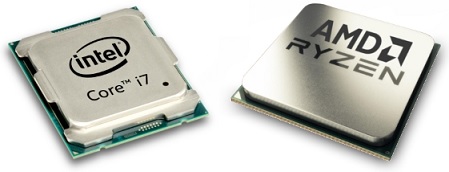
To overclock a CPU you need to have a CPU model that has an unlocked multiplier. Basically all AMD CPUs have this and Intel CPUs that have a “K” on the end of the model number such as the Intel Core i7-9700K. As mentioned earlier, the best candidates for overclocking are mid-tier CPUs as they offer the most performance benefit; top-tier CPUs will still receive a boost but it won’t be as noticeable of a jump as with a mid-tier model.
You’ll also require a third-party/aftermarket CPU cooler (ie HSF: Heatsink and Fan), as the stock coolers that come shipped with CPUs aren’t designed to handle the extra heat that overclocking brings. Plus, some CPUs that are designed for overclocking (such as the i5 11600K / 12600K / 13600K) don’t even come with a stock cooler anyway as it’s assumed you’ll get your own.
At the very least, for basic to moderate overclocking, you’ll to get something like the Cooler Master 212 Evo or Arctic Freezer 7 which are two excellent-value, popular models within the overclocking community. For higher-end processors and with more intense overclocking you’ll want something even more effective such as a good Noctua or Dark Rock cooler, or something like the popular Cryorig H7 (see the latest recommended CPU coolers in our recommended gaming PC builds).
You also have the option of getting a liquid cooler, which are technically referred to as AiO (All in One) liquid coolers. A couple of popular examples are Corsair’s Hydro and NZXT’s Kraken series. Liquid cooling is even more effective than air cooling but comes at an added cost. In general, the more you spend on your cooler, the lower the potential temperatures you can get, the further you can push your system, and the safer overclocking will be.
Then finally, if you’re wanting to go all-out with overclocking and you want the absolute best possible cooling solution possible (and you have the time, interest, and money) then you may wish to consider planning and installing a custom water cooling loop. It’s not necessary, especially with the presence of good AiO coolers and many great air coolers on the market, but nothing beats a custom water cooling setup when it comes to keeping temperatures low during intense overclocking, and minimizing (or obliterating in some cases) noise, but there are the downsides of the extra complexity, cost, and potential for things to go wrong with your system (and a little extra maintenance).
It’s also recommended to get and apply some good quality thermal paste to your cooler such as the popular and high-quality Arctic 5 paste for maximum cooling efficiency. Some aftermarket CPU coolers may come with paste already, but many enthusiasts prefer getting their own to be sure of quality and reliability.
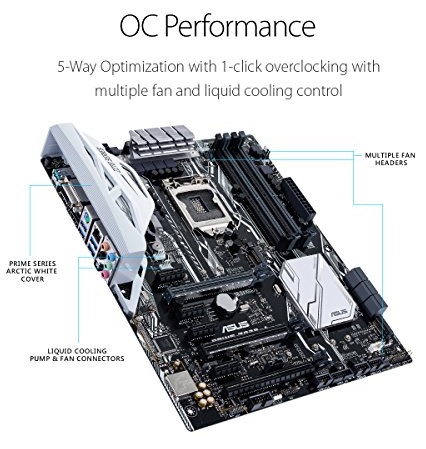
Choosing a Suitable Motherboard to Overclock Your CPU
On top of having a CPU with overclocking capability and an aftermarket CPU cooler with thermal paste to handle the extra heat, to overclock a CPU you’ll require a motherboard that supports overclocking. For Intel motherboards you’ll need a board with a Z-rated chipset, which means looking for a “Z” in the model number.
As for AMD, any motherboard should work for overclocking, however you’ll want to lean towards a high-quality board that is designed for overclocking as not all boards are created equal when it comes to pushing your CPU; read reviews and others’ experiences with overclocking on certain boards (same goes for Intel boards mind you).
Related: Motherboard FAQ for Beginners
Pushing your parts with an overclock increases the amount of power flowing through your motherboard to the CPU. That power is transmitted by what’s called the voltage regulator module (VRM) on your motherboard. Ideally you want a board that has a VRM with high-quality, leak-resistant capacitors, good-quality chokes, and ideally a heatsink/fan over the MOSFETS (Metal-Oxide Semiconductor Field-Effect Transistors). Cheaper motherboards won’t have these features, so for overclocking you want to ideally get a higher-quality (and almost always more expensive) motherboard.
Choosing a Good Power Supply for Overclocking
Another thing to think about is your power supply. Because overclocking increases the power output, you’ll want to be sure your power supply can handle the added requirements of your overclocking adventures. If you built your PC wisely, this shouldn’t be an issue as you should have planned ahead and got a PSU with wiggle room. As well as having enough power, you’ll want to ensure your PSU is at least a fairly reliable model with good reviews from trusted sources. Ideally, stick to the best PSU brands around such as Seasonic, Silverstone, XFX, or top-tier models from Corsair, Antec, and EVGA.
Whilst not always an indicator of reliability, getting an 80-plus rated unit (either Bronze, Silver, Gold or Platinum) is highly recommended as it means it’ll be an efficient unit. Also research what sort of rails you will need, as not all PSUs are created equal. The last thing you want to do is push your components hard with a low-quality unreliable PSU as it could possibly blow your PSU and other parts in the process, so do your research and read professional reviews, too.
Related: How to Choose a Good PSU for a Gaming PC
How CPU Overclocking Works (Overview)
Before diving in and getting your hands dirty, it’s a good idea to review the basic principles of how overclocking a CPU actually works, and to look at the 3 main methods you have to choose from and how to decide which strategy to go ahead with. Overclocking a CPU is basically adjusting the clock speed of the CPU, which is the measurement of how quickly the processor switches from one cycle of instructions to another and is measured in gigahertz (GHz).
The clock speed is not the only determining factor of the overall speed of a CPU but it’s the most well-known and important one. Clock speed is actually calculated by taking what’s known as the base clock speed (abbreviated as BCLK) of your motherboard, which could be 100 MHz for instance, and multiplying that by the CPU’s multiplier which is just a single number such as 35. In this example, the CPU clock speed is 3500 MHz or 3.5 GHz.
What you actually do when overclocking is either increase the base clock or the multiplier, either via entering the motherboard’s BIOS software or using another software program (such as automated motherboard software, Intel XTU, or Ryzen Master).
By changing either the multiplier or the base clock speed, the CPU clock speed is therefore recalculated at a new speed. So for example, if we change the multiplier from 35 to say 38 that means the clock speed will now be 3.8 GHz instead of 3.5 GHz. Back in the day it was more common that you would alter the base clock, but modern overclocking is all about tweaking the multiplier (sometimes called the Core Ratio) until you get a faster, stable speed.
Also, keep in mind the increase in CPU speed requires more power consumption, which can cause system instability if you don’t take precautions. The solution is manually adjusting the CPU’s core voltage (VCORE) to maintain system stability which we’ll also cover later.
When it comes to overclocking your CPU by changing the multiplier, which is the way we’ll be covering it in this guide, you’ve got three choices to get it done:
- Using automatic overclocking tools provided by some motherboards (least control)
- Manually overclocking using certain software applications in your operating system (more control)
- Manually overclocking using your motherboard’s BIOS/UEFI software (most control)
The rest of this module will cover each of these three CPU overclocking methods in a little more detail, including a look at the pros and cons to each method to help you decide between them for your own situation.
Related: How to Overclock a Graphics Card
What to Do Before Overclocking a CPU
Before we get into comparing the different ways your can overclock a CPU, there are some universal things to do before diving in that apply no matter which method you use.
Clean Your Case
Because overclocking increases the heat generated by your CPU, you not only want to have a good CPU cooler as mentioned earlier, but you’ll want to also make sure your case airflow is on-point. That means getting rid of dust, so unless you’ve just built a brand new PC build from scratch, open up your case and clean it out with a can of compressed air or special computer vacuum. Use a soft long-bristle house-paint brush or cotton swab/bud to clean hard to reach areas. Don’t forget to remove dust on your case fans so they’re in peak condition, and clean any dust filters or grills that your case has.
Backup Important Data
Before tinkering with your system you want to backup any important files that are on your PC because you never know what could happen if things go bad; while highly unlikely these days, there is the possibility of damaging your hard drive.
Other Considerations
Before following any of the steps outlined in this guide, a wise move would be to read ahead before actually applying anything you learn so you can anticipate what’s to come and take that into account. Don’t just blindly follow steps listed here, or in any overclocking tutorial for that matter. Consider whether it applies to you, plan ahead, and move slowly and methodically through any sort of overclocking process.
3 Ways to Overclock a CPU
1. Automatic Overclock with Built-In Motherboard Software
If you’re brand new to overclocking and also a hardware beginner that has never changed a single setting in a BIOS before, you might want to consider starting with this method as it’s the easiest, less-risky, most beginner-friendly way to get your feet wet with overclocking.
Many modern motherboards will come with some automatic overclocking software either provided on DVD or downloadable from the manufacturer’s site, and these programs will increase the performance of your CPU until your system becomes unstable, at which point the software will automatically restore the last working settings.
These automatic performance optimization programs are usually fairly straightforward to use and can work well at times depending on your motherboard and your CPU, but they don’t always produce the best results. Also, they tend to be less precise, and as well as not giving you the best speed increases they may increase your CPU voltages higher than necessary.
If your motherboard has this type of software, and you want to give it a shot, then refer to your motherboard manual which should be all you need as it is the most simple way to overclock after all.
2. Manual Overclock in the Operating System
Let’s move onto the next level of CPU overclocking, which is using manual overclocking software in your operating system (as opposed to entering your BIOS). Whilst not the ideal way to manually overclock, as nothing beats heading into your BIOS/UEFI for maximum control and results, this method is quite a bit better than using automatic motherboard software, and simpler and less tedious than using the BIOS.
Another benefit that overclocking in your operating system has over using the BIOS is it’s universal. Meaning, it’s the same process on different PCs, and the same interface. When using a BIOS to overclock, the process can differ quite a lot from motherboard to motherboard. In terms of which software you should actually use to overclock manually in your OS, you want to stick to the official programs provided by the processor manufacturers. For Intel users that would be Intel’s Extreme Tuning Utility (XTU), and for AMD you have Ryzen Master if you’re using their modern Ryzen range of processors.
See Also: How to Overclock an Intel CPU with XTU
3. Manual Overclock in the BIOS/UEFI
Out of all three main ways you can overclock a processor, entering into the holy BIOS is the most complicated yet it gives the most control and potential for good results. If you’re a total beginner and just wanting to get your feet wet with overclocking, I’d advise you to stick to Intel XTU/Ryzen Master or even your automatic motherboard overclocking.
But if you do want to venture into the potentially murky BIOS waters read on to learn the basics of how this works and some general good practices. I say general good practices because it’s tough to give specific guidance when overclocking in the BIOS because the process is unique to different systems and CPUs. Different CPUs, motherboards and memory setups will have their own nuances to look out for and will produce different results.
There isn’t a universal way to approach this, but there are some basics and general best practices that apply no matter what your particular setup is. But manual overclocking is a process that needs to be undertaken slowly and methodically, with plenty of testing and monitoring along the way to ensure you have decent system stability and you don’t damage or severely reduce hardware lifespan, corrupt your operating system over time, or create other complications. Refer to your motherboard/BIOS manual to see what they say about overclocking with your particular board.
I’m not trying to scare you off from the BIOS, as once you get the hang of it it’s really not that bad or complicated, but I just want to warn you that it’s not for those who just want to dabble in overclocking for an afternoon. You’ve got to be willing to dedicate some time to doing it slowly, methodically, and safely, although to be fair that applies no matter which way you overclock. The good news about BIOS overclocking though is that these days the modern BIOS is usually a lot easier to navigate than text-only versions of the past. Many now have graphical UI’s that you can control with your mouse.
Learn more with this guide: How to Overclock in the BIOS
Trusted VPN
VPN software can be important in this day and age, especially if you do lots of online banking and/or use public WiFi whilst travelling. Having a VPN adds an extra layer of security to your PC or laptop when online to help protect your data, passwords, financials, etc from hackers or malicious programs. It can also let you access region-locked content (eg US Netflix from overseas). For gamers their can be even more benefits to using a VPN.
Because they're so popular these days, there are countless VPN providers, and it can be confusing to pick one. If you want my 2 cents, after a lot of research I decided on NordVPN 'cause it's one of the fastest, most reliable VPNs for both gaming and general use, with a lot of credible reviews out there backing that up. They also quite often run very solid deals.
Popular Articles (see all)
Search the Site
About the Author (2025 Update)
I'm an indie game developer currently very deep in development on my first public release, a highly-immersive VR spy shooter set in a realistic near-future releasing on Steam when it's ready. The game is partly inspired by some of my favorites of all time including Perfect Dark, MGS1 and 2, HL2, Splinter Cell, KOTOR, and Deus Ex (also movies like SW1-6, The Matrix, Bladerunner, and 5th Element).
Researching, writing, and periodically updating this site helps a little with self-funding the game as I earn a few dollars here and there from Amazon's affiliate program (if you click an Amazon link on this site and buy something, I get a tiny cut of the total sale, at no extra cost to you).
Hope the site helps save you money or frustration when building a PC, and if you want to support the countless hours gone into creating and fine-tuning the many guides and tutorials on the site, besides using my Amazon links if purchasing something, sharing an article on socials or Reddit does help and is much appreciated.

|
ABOUT BGC Helping you build better systems for less, here at Build-Gaming-Computers.com you'll find simultaneously comprehensive yet simplified guides and tutorials, including continuously updated PC build examples. Always as objective and unbiased as possible with product recommendations, and with little to no ads. |
Intro | Best PC Builds | Best Cases | PC Assembly | Prebuilt PCs | PSU Guide | VR Headsets | Privacy | Contact | Donate | Archives

Copyright (C) 2006-2025 Build-Gaming-Computers dot com All Rights Reserved
As an Amazon Associate we earn from qualifying purchases
For the Love of Gaming + Flawless Frame Rates