Home > Best GPUs > Overclocking
How to Overclock a Graphics Card (GPU)
Plus the Pros and Cons to Overclocking a GPU and Performance Gains to Expect

Last Updated: January 13, 2023
Overclocking a graphics card isn't hard, and if your gaming PC is up to the task with sufficient cooling inside your case and enough wattage headroom from your PSU, it can be well worth the small time investment it takes to learn how to overclock a GPU for the first time. Why? Free frames; 'nuff said.
But it's not without risk, and sometimes it actually is not worth overclocking a GPU. In this introduction to GPU overclocking we break down the basics and what to know before diving into this fun little hobby of sorts, along with specific steps on how to overclock a graphics card / GPU in easy to understand language for beginners to understand.
See Also: What Are Safe GPU Temperatures?
Pros and Cons to Overclocking a GPU
Overclocking your graphics card is the second most common route when it comes to overclocking a PC, and for good reason as it’s quite simple to do, relatively safe, and cheaper overall when compared with CPU overclocking: when you overclock a GPU you don’t need to spend extra on a higher-quality, overclocking-friendly motherboard, aftermarket cooler or thermal paste.
Also, unlike CPU overclocking there’s no tinkering with any BIOS settings, as you can’t overclock a GPU in the BIOS (it’s done in Windows only), meaning it’s more beginner-friendly. GPU overclocking software is also straightforward to work with.
Overclocking your GPU directly improves gaming performance, and more so than overclocking the CPU due to the fact that modern games rely more heavily on your GPU than your CPU.
 Instructions unclear. House on fire
To be honest, there aren’t too many reasons against overclocking your GPU if your system is prepared for it and you follow the correct steps, as you’re getting extra performance for no added cost and low risk. We generally recommend it more than CPU overclocking, especially if you care mainly about gaming performance, and especially if you’re a PC beginner.
Basically, if you have the option to overclock your GPU, give it a serious consideration if you care about getting the absolute best frame rates in your games and making the most of your graphics card and hard-earned money. Keep in mind some graphics cards come overclocked by the manufacturer from the get-go. These already-overclocked cards usually have an “OC” or “Turbo” in the model name, and have been set to run faster than the standard version of that card.
While overclocking a GPU sounds great, there are scenarios where it may not be worth it. For example: if you have a low quality PSU, if your GPU is notoriously bad for overclocking, or you don’t want the potential extra noise of your GPU fans working overtime. Or, if you have stuffed your graphics card in a tight, small case with barely any room to move and poor cooling, you probably want to avoid overclocking it as you may generate too much extra heat for your case to handle.
In those instances, overclocking your graphics card may not be worth it to you, or may even be a straight-up bad idea. Especially if you’re already happy with your gaming performance and don’t care for cranking out a few extra frames-per-second in your games. Also, even though pushing a GPU is quite safe, you’ve also got to factor in the other general cons to overclocking such as potential system instability and crashes, reduced lifespan, and potential hardware damage or failure.
How Much Does GPU Overclocking Improve Gaming Performance?
Many people wonder what sort of exact performance you can gain from pushing your GPU past its stock settings, and as you can probably guess there is no exact answer as it’ll depend on your system, your card, the games you play, your resolution, how you overclock, etc. In the best case scenario the performance boost can be quite significant, for example you may possibly get a nice 10-15 FPS boost across some games. In the worst case you might get a tiny boost in frames per second of say 2-10 FPS.
Related: How to Show FPS Counter
But yes, overclocking can be quite worth it and has the potential to turn a choppy game into a smoother affair, and/or allow you to comfortably play a certain game at higher in-game settings than you could before. For some gamers, and that’s likely you if you’re reading about overclocking, even a boost of around 10 FPS can make a difference. For example, before overclocking if you run your favourite game at 50 FPS, and then you overclock and reach a consistent 60, that can make a noticeable difference.
Is Your GPU and Hardware Suitable for Overclocks?
So what do you need, in terms of actual hardware, to safely and effectively overclock your GPU to squeeze out more of those vital frames per second? Firstly, if you haven’t already got one, you may want to pick a GPU that is known to work well with overclocking and that others haven’t had issues with.
You also want to do certain testing of your GPU at its stock settings to double check that it’s suitable for overclocking; we’ll cover this exact process in our following step by step tutorial to overclocking any GPU. Also, you’ll want to make sure your cooling is up to scratch, which not only includes the cooling solution built onto your actual graphics card, but the fans and airflow of your PC’s case.
The standard 2 pre-installed fans that many modern cases come shipped with may not be enough, and you’ll ideally want to have 3-4 fans within your case to really cool things down (depends of course; on your case, your GPU, your room temp, how much you overclock, etc). Having sufficient cooling setups is especially important if you’ll be increasing the voltage settings of your card as well as the general speed settings (which isn’t necessary and generally not recommended anyway).
Related: How to Install Extra Fans in Your PC Case
Many GPUs have decent built-in cooling setups that can withstand overclocking, but you’ll want to do your research on your particular card’s cooling solution and also see what you can dig up about other enthusiast’s overclocking experience for that particular model. Only extreme overclocking (including pushing voltages) of high-end GPUs would need a custom GPU cooling setup such as setting up a custom water-cooling loop. Otherwise, you should be good.
You also ideally want a good-quality, reliable power supply with enough wattage, especially if you’ll be increasing the voltage settings. We’d suggest a mid-tier 80-Plus-rated unit at the very least. Unlike with overclocking your CPU, for tweaking GPUs your motherboard, RAM and other hardware components don’t need any special consideration.
How to Overclock a GPU (Step by Step)
The general principles of CPU overclocking apply to overclocking a graphics card, but as you’ll see in the following steps, tuning your graphics card is quite a bit simpler, easier and quicker. First of all, there’s no mucking around with your BIOS, as you can’t overclock a graphics card there; it’s done all in Windows.
As for your software options, AMD and NVidia actually have overclocking support as part of their drivers. For AMD cards you can use what’s called the Catalyst Control Center which is under the Performance section of the driver tools. For NVidia, it’s the System Tools utility.
Overclocking using these apps are as simple as adjusting sliders for the GPU clock speed, the memory speed, and the fan speed. Once you’ve increased one or more of those settings, you test the results either in a game or in a GPU benchmarking or stress-testing program.
However, you can’t adjust the voltage of your card within these basic tools, and for that you’ll need to use a more detailed GPU overclocking program such as MSI’s Afterburner which is the industry standard and the program we’ll be using as an example in the following steps to overclocking a GPU (don’t worry, you don’t need an MSI-branded card to use it).
The AMD and NVidia overclocking tools are limited compared to third party software like MSI Afterburner, which offers more control and features. Afterburner is the best all-round software, is beginner-friendly, and works with almost any GPU out there – it doesn’t have to be an MSI card (though you do get bonus features for MSI cards). Plus, it’s completely free. EVGA’s Precision is good too, especially for EVGA cards due to bonus features, but I would stick to Afterburner.
 Afterburner is a Solid Noob-Friendly Tool
Adjusting the voltage isn’t generally recommended, and only suitable if you want to really push your card to the limit and you have the cooling capability to do this safely. GPUs are already pushed fairly hard in stock form to squeeze out as much performance as possible, and increasing the voltage really does run the risk of frying your card. But whether or not you’ll be increasing the voltage or not, we’ll show you how to overclock using Afterburner as it’s not as limited as the basic AMD/NVidia tools and includes more functionality. Plus it’s totally free.
Anyway, the basic premise of overclocking a GPU goes like this:
- Download overclocking software
- Download stress testing software
- Increase GPU settings slightly (clock speed, memory speed, fan speed, voltage)
- Run stress testing software to test performance and stability at the new GPU settings
- Go back and adjust settings based on the test results
- Continue until you find stable settings that don’t cause issues
But let's get more specific.
Step 1: Preparing Your PC
Clean your PC case of any dust, backup any important data/files on your PC just in case, make sure you have the latest GPU drivers installed, and set your local fire brigade to speed dial in case things go south.
Step 2: Download Afterburner
Grab Afterburner from the official site and load up this gem. Afterburner has been relied upon for a long time by enthusiasts, and as mentioned it’s actually fairly easy to use (easy as far as overclocking goes though; it still takes time to use properly).
Step 3: Download Stress-Testing Software
Ok, so as well as overclocking software like Afterburner, you’ll also want to get your hands on some GPU benchmarking software to test your graphics card performance before and after your overclock so you can measure the direct impact your overclock had. A good, free option for this is Heaven Benchmark and is the program we’ll include in this example. It can benchmark and stress-test your card well. 3DMark, PassMark and Unigine’s Valley are some good alternative programs to use instead.
Go ahead and download one (or more if you really want) of these programs. Another program you may want to consider if you want to go deeper with monitoring your card is GPU-Z, a popular (and free) utility that reports a lot of information about your card. It’s not necessary, but it can be handy to confirm that any overclocking settings you change are actually registered by your card, among other things.
 The Heaven Benchmark really pushes your GPU
Step 4: Run Initial Stress-Test
Before overclocking you want to stress-test your GPU at its current settings to see how high the temperature reaches and whether it’s stable, so that you can check that temperature against the official temperature limit of your GPU model. This will give you an idea of how much headroom you have for overclocking.
So, let's say the maximum temperature your card can safely operate at before it throttles itself or shuts down is around 90 degrees Celcius. In that case, the gap between 90 degrees and the maximum temperature you get from this initial test is basically how much leeway you have for overclocking. For example, if you push your GPU and it already gets a max temp of near 90 degrees or mid to high 80’s, you may want to rethink overclocking unless you can lower that base max temp. Running a test now will also give you a benchmark score which is a good way to measure the results of the changes you’ll be making to your card as you run the test again.
Open up Heaven if you haven’t already done so. Adjust the benchmark settings if you want to, otherwise just leave the default settings. It doesn’t matter what settings you use for the test so long as you keep these settings the same from test to test, but if in doubt crank them up so your GPU is really tested. Before running the test, have Afterburner running in the background (ideally side by side on your desktop) so you can keep an eye on the “GPU temperature” graph.
Also, you want to set the GPU fan speed to 100% for maximum cooling before running the test and whilst overclocking. To do this in Afterburner, click on “Auto” next to the fan speed control and go into manual mode. Drag the slider to 100%. Doing this will also increase the noise of your GPU fans, but that’s the sacrifice you may have to make for the extra performance. If your fans become too loud on 100% and you care a lot about minimizing noise, you can lower the fan speed a bit, but keep in mind this will affect how aggressive you can overclock. In Heaven click run and just let it run for about 15 minutes or so so you can get a good idea of the maximum GPU temperature. It doesn’t matter if the test runs slow and laggy as this just means your GPU is being really tested.
If you successfully made it through the test, and you’re confident you have a decent amount of room to play with because the maximum temperature at stock settings is well under 90 degrees, ideally under 80 degrees, you’re good to continue on. Otherwise, your card is running too hot as it is. Also, click on the benchmark button in the top-left of Heaven and it will run a benchmark and give you a score at the end. Write this down if you want so you can compare it with your post-overclock score.
Step 5: Find Optimal Overclock Settings
It can be a little time-consuming and/or difficult to find the exact optimal settings for your particular GPU when overclocking manually. So before doing any tweaking a wise move would be to do some research online on overclocking your particular GPU to see what specific settings other enthusiasts have successfully (and stably) overclocked at for that same exact model. I would start with google searches, and sites like Overclock.net and Overclockers.com.
This preliminary research isn’t necessary, as you can manually tweak and test until you find a nice balance of settings, but it may give you a better idea of what your card is capable of and what kind of ballpark settings may work well. But of course, take into account that everyone’s system is slightly unique, and so one set of settings may work well for one system but be a total disaster for another (yes, even if they have an identical GPU).
Plus, the reality is there are many other factors that come into play, and even luck plays a factor in overclocking results; you can have the exact same model and other hardware parts as someone else, and get different results with the same overclocking settings. If you input and apply specific settings that you read online, still be methodical about it and take it slow with all the regular testing you would normally do when finding ideal settings the long and manual way.
If you are going to hunt down optimal settings for your card, try and find out the highest safe voltage for your particular model too if you’ll be increasing the voltage in your overclock (which is totally up to you). This could decrease the chances of you lowering the lifespan of your GPU by setting the voltage too high for your model.
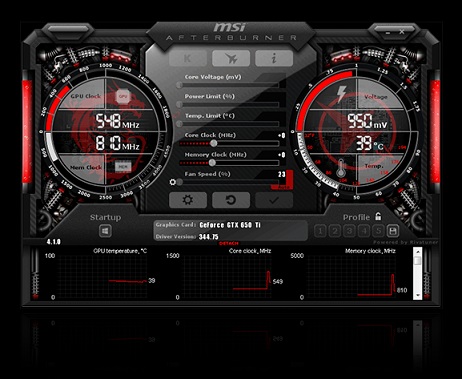
 A = Core Clock Speed (main setting to overclock), B = Memory Speed, C = Sliders Where You Overclock, D = Core Voltage, E = GPU Temperature
Step 6: Increase GPU Core Clock Speed
Now it’s finally time to overclock. Take note of the current default core clock and memory clock speeds that are displayed in Afterburner on the left hand side, and write them down somewhere in case. The sliders in the middle are where you tweak settings, and on the right side you see the GPU temperature and the voltage. Go ahead and raise the “core clock” in Afterburner by 10 or 20 MHz and click the “apply” button. You could increase it more such as 50 Mhz if you really want and feeling confident based on research you (should) have done on your specific GPU and its overclocking potential, but if you’re unsure then stick to smaller increments.
If you’re using GPU-Z as mentioned earlier, I would check in there that the new core clock speed has actually been applied just to be sure. Overclocking is a matter of trial and error, and you’re essentially trying to find the perfect balance between extra performance and safe GPU temperatures. But to get to this nice balance you’re likely to have to go through crashes, black screens, and/or seeing weird graphic artefacts or glitches in your benchmarking/stress-testing program. These things indicate instability, but don’t worry as it will not damage anything if you increased settings slowly, and simply means you went a little too far and need to revert back to lower GPU settings.
Step 7: Visual Artefacts or System Crashes
Now you want to run Heaven again, if you don’t already have it running, and look out for the first sign of visual artefacts which indicate your overclock is unstable. Visual (or graphical/digital) artefacts are a discoloration or tear in a frame. In other words, they’re glitches that aren’t supposed to be there and can appear as black boxes, blotches, colored lines or other errors that are out of the ordinary. At first sign of artefacts (or a crash) you’ll need to lower the clock speed to stabilize your card again.
One thing about artefacts/glitches you should keep in mind is that different stress-test programs and games will stress your GPU differently. You may get glitches in one test/game, yet not in another. However, artefacts of any kind in any program indicate that your overclock isn’t optimal, and at worst definitely unstable, so you shouldn’t ignore them and adjust your speeds accordingly once you encounter them. Alternatively, If your system crashes after increasing your core clock speed, that means your overclock is either unstable or your card has overheated under the stress. Your card has built-in protection for this kind of thing and likely won’t take any damage and may simply automatically revert back to its default settings.
You have two choices on how to proceed after a crash: either lowering your overclock by decreasing the clock speed back to the last stable setting just like when encountering visual artefacts, or you can increase your voltage to test whether that will allow your new clock speed to be stable. If increasing your clock speed runs Heaven without issues, then click on “benchmark” in Heaven and if it makes it through that without problems, then your overclock is stable and you can then go back to Afterburner and raise your core clock speed by another 10-20 MHz, repeating the process of testing in Heaven.
Once you do encounter problems and you revert the clock speed back to its highest stable setting, you want to double check that the temperature of your GPU is in check. Look that the maximum GPU temperature in the graph in Afterburner doesn’t go too high above 75-80 degrees Celcius whilst running Heaven for a few minutes. 75-80 degrees Celcius is generally considered safe as a max temp reading, but you could let it run a little hotter if you feel comfortable (and you have good cooling and/or are fine with a little extra risk). If the max temp goes too high for your liking when under load, you might want to tone down the clock speed just a tad more.
Step 8: Increase the Voltage (optional)
Tweaking the core clock speed can give you a nice little boost in performance, but depending on your setup your gains may be quite limited unless you increase the voltage as well. Increasing the voltage comes increases risk though, and ups the chances of lowering your card’s life expectancy.
Only do this step if you’re comfortable with overclocking your card, you have good cooling, your temps are good already, and you’re fine with the added risk. MSI Afterburner has a lock on the voltage settings so you can’t accidentally change them, so in order to proceed with this step you have to open up the settings area of the program and check the boxes that say “unlock voltage control” and “unlock voltage monitoring”. This will allow you to adjust the voltage in Afterburner. Increase the voltage slightly by 10 mV or so and click apply. Afterburner may slightly change the voltage number as it may not work with the exact voltage you enter, but it will be close enough. Run through the Heaven benchmark and if you get through that without artefacts or a crash, your core clock speed should be stable with the new voltage.
At this point you can increase the core clock speed incrementally again and go back to step 6 on increasing core clock speed. Don’t forget to check your temperatures again after you’ve increased the voltage as it will increase heat output. Remember you want your max temp under 90 degrees Celsius, which is the general absolute maximum temp you want your GPU to run at whilst under load. Under 80-85 is much better.
Step 9: Increase the Memory Speed
Once you’ve fine-tuned your core clock and/or voltage and your GPU is running stable and cool-enough, you can do the exact same process with the memory clock speed if you want. This will give your overclock a slightly bigger boost, and is definitely worth testing. Incrementally increase the memory speed by 10-20 MHz, although you should be fine to increase the memory speed a little higher each time than you would the clock speed, so 50Mhz at a time should be fine. With each small increment, check the Heaven test again for visual artefacts or a crash, and when encountering either go ahead and lower the memory speed back down or increase the voltage slightly.
Step 10: Final Stress-Tests
As you go through these steps you’ll eventually get to the point where you can’t go any further, either because you can’t reach safe temperatures by increasing settings any further, you’ve reached the maximum safe voltage for your card (by researching it online earlier or by getting to that point manually), or your card just doesn’t stabilize past a certain clock speed despite how high you raise the voltage.
When you get there, you want to save your overclock settings in Afterburner, and run a final stress-test in Heaven. Don’t click the “benchmark” button, but instead let Heaven run for a few hours or so (3-4 should be fine) so you can really cross-check that your overclock is nice and stable and not bringing problems. If after that you don’t get artefacts or crashes, you should be set! Don’t worry, you don’t have to sit there for hours waiting for artefacts to show up; simply check back on it every now and then.
If you want to compare the overall results of your overclock, click on “benchmark” in Heaven and once it’s done compare the scores you get with the scores you wrote down before you started. To get an even better indication of how well your overclock has helped, load up your favorite graphically-demanding game and see if your FPS has improved. Also, as we mentioned before you can sometimes avoid all artefacts and issues when running tests like Heaven, but when it comes to a GPU-taxing game you could run into issues.
If you ever encounter artefacts or crashes when gaming that weren’t there before, you may want to back off your overclock a bit. Games can sometimes be one of the toughest stress-tests of all. Anyway, that wraps this overview to GPU overclocking using MSI Afterburner. Hope it helps, good luck, and GG.
Related: Best Value GPUs for Gaming
Trusted VPN
VPN software can be important in this day and age, especially if you do lots of online banking and/or use public WiFi whilst travelling. Having a VPN adds an extra layer of security to your PC or laptop when online to help protect your data, passwords, financials, etc from hackers or malicious programs. It can also let you access region-locked content (eg US Netflix from overseas). For gamers their can be even more benefits to using a VPN.
Because they're so popular these days, there are countless VPN providers, and it can be confusing to pick one. If you want my 2 cents, after a lot of research I decided on NordVPN 'cause it's one of the fastest, most reliable VPNs for both gaming and general use, with a lot of credible reviews out there backing that up. They also quite often run very solid deals.
Popular Articles (see all)
Search the Site
About the Author (2025 Update)
I'm an indie game developer currently very deep in development on my first public release, a highly-immersive VR spy shooter set in a realistic near-future releasing on Steam when it's ready. The game is partly inspired by some of my favorites of all time including Perfect Dark, MGS1 and 2, HL2, Splinter Cell, KOTOR, and Deus Ex (also movies like SW1-6, The Matrix, Bladerunner, and 5th Element).
Researching, writing, and periodically updating this site helps a little with self-funding the game as I earn a few dollars here and there from Amazon's affiliate program (if you click an Amazon link on this site and buy something, I get a tiny cut of the total sale, at no extra cost to you).
Hope the site helps save you money or frustration when building a PC, and if you want to support the countless hours gone into creating and fine-tuning the many guides and tutorials on the site, besides using my Amazon links if purchasing something, sharing an article on socials or Reddit does help and is much appreciated.

|
ABOUT BGC Helping you build better systems for less, here at Build-Gaming-Computers.com you'll find simultaneously comprehensive yet simplified guides and tutorials, including continuously updated PC build examples. Always as objective and unbiased as possible with product recommendations, and with little to no ads. |
Intro | Best PC Builds | Best Cases | PC Assembly | Prebuilt PCs | PSU Guide | VR Headsets | Privacy | Contact | Donate | Archives

Copyright (C) 2006-2025 Build-Gaming-Computers dot com All Rights Reserved
As an Amazon Associate we earn from qualifying purchases
For the Love of Gaming + Flawless Frame Rates